G/L Report Parameters (GL05)
|
Additional Information Enter List of GL Accounts Enter Total Formula Maintain Header 'B' Type Columns Renumber Lines |
The Maintain Report Parameters (GL05) program allows you to create and maintain your own reports. GL05 allows you to specify the format (printing sequence, spacing), contents (headings, subheadings, account detail lines) and calculations (subtotals and report totals) for every report you create.
Note: Ensure that each report is carefully designed so that the format, content and calculations are correct.
- To review the layout of Reports created in GL05, run Print Report Parameters (GL06).
- To print Reports created in GL05, run Generate Reports (GL51) and Print Financial Reports (GL52) or run Print Report Sets (GL55) to run Report Sets defined in Define Report Set (GL12).
When you generate reports using Generate Reports (GL51), a mask can be entered that will substitute corresponding digits in all Account numbers in the report parameter file being processed. You can produce the same report for multiple cost centers (branches, divisions, etc.) by creating only one parameter file for the report. For example:
- With a mask defined as "01----", the report substitutes the "**" with "01" and prints Accounts 011001, 011002, 011003.
- With a mask defined as "02----", the same parameter file prints Accounts 021001, 021002, 021003.
| Account Numbers | = | 011001 |
| 011002 | ||
| 011003 | ||
| 021001 | ||
| 021002 | ||
| 021003 | ||
| Report 'A' created in GL05 | = | **1001 |
| **1002 | ||
| **1003 |
Report 'A' can be generated in GL51:
The following list defines every field on the GL05 screen:
- In the Header Info section:
- GL Report No. - enter or use the VCR buttons to locate the 'GL Report No.' you want to create/edit. The 'GL Report No.' is a 2 character alpha-numeric code that identifies the report. This code is used in other programs to specify the report with which you want to work. For example, you can enter 01, 02, A1, A2, AA, AB, etc.
- Title - the Title field of the report is printed as part of the Header on each page of the report. The Title can be a maximum of 30 alpha-numeric characters in length.
- Sub-title - the Sub-title field of the report is printed immediately following the Title, on the same line in the Header section on each page of the report. The Sub-title can be a maximum of 20 alpha-numeric characters in length. This is an optional field.
- Note: If you are adding the current report to a Report Set created in Define Report Set (GL12), the Sub-title from GL12 prints after the GL05 Sub-title.
- In the Types of Headers section, define the type of report format for this report. You can select from two options:
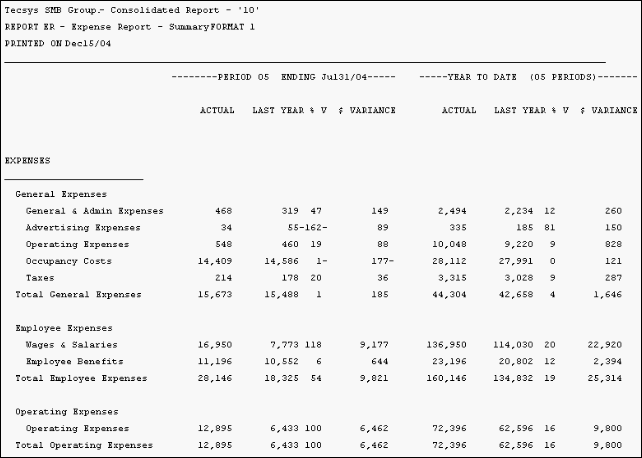
- Predefined Columns (A) - for Type A reports, you are in control of the detail lines that go down the report page (headings, account detail lines, total lines, etc.), but the columns that go from left to right across the top of the report page are predefined and change depending on the Report Format code selected when the report is generated. Type A reports show MTD and YTD balances, compare This Year to Last Year or Actual to Budget, etc. Here is an example of a Type A report using Format 1 when the report was generated in GL51:
- GL Report No. - enter or use the VCR buttons to locate the 'GL Report No.' you want to create/edit. The 'GL Report No.' is a 2 character alpha-numeric code that identifies the report. This code is used in other programs to specify the report with which you want to work. For example, you can enter 01, 02, A1, A2, AA, AB, etc.

Example of Predefined Columns (A) printed in GL51
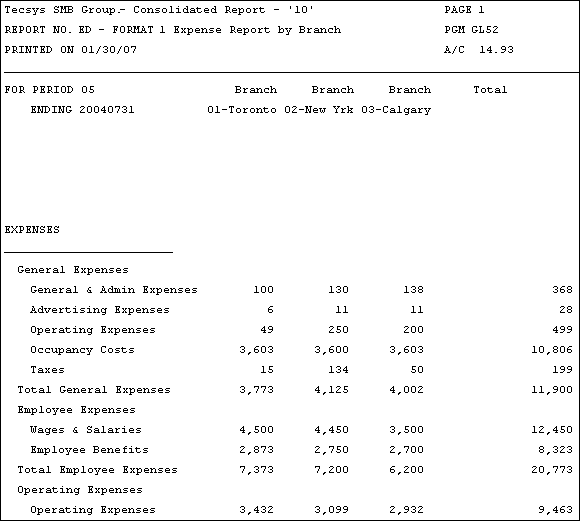
- User Defined Columns (B) - for Type B reports, you are in control of the detail lines that go down the report page (headings, account detail lines, total lines, etc.), but you are also in control of the columns that go from left to right across the top of the report page. Type B reports are most commonly used to compare the same account detail information across multiple branches or divisions. For example, the columns can be headed Branch 01, Branch 02 and Branch 03, and the report detail line can report Advertising Expenses across the three branches. Here is an example of a Type B report:
- Each Column can report the value of a specific Account(s) or can be a formula that adds/subtracts two or more of the other columns.
- You create the Column headings using the Maintain button. This option provides access to the 'GL Maintain Header 'B' Type Columns' screen which includes fields to define Column headings. For more details on the 'GL Maintain Header 'B' type columns' screen, click here.
- User Defined reports print in two sections. Pages reporting Current Period values print first (section 1) followed by pages reporting Year-to-Date
values (section 2). The report headings say either "For Period X" or "For Periods 01 to X". The format of both sections is the same.
- Only current year balances are reported. User Defined reports do not contain previous year or budget data. Note: It does not matter which Report Format is selected when a Type B report is generated because for a Type B report, you are in control of the column headings across the top of the page.
- In the Type B section: (This section is only available when the 'Types of Headers' is set to 'User Defined Columns (B)')
- Columns - enter the number of Columns required for the report. Note: A Total Column is automatically generated in addition to the number of Columns specified here.
- The number of Columns entered also determines the number of fields enabled in the Detail Line's 'List of GL Accounts' screen (the 'List of GL Accounts' screen automatically displays when you are creating a Detail line and when you click on the Details button).
- Maintain - clicking on this button provides access to the GL Maintain Header 'B' type columns screen. You can define the Column headings for the User Defined Column type headers on this screen. For more details on the 'GL Maintain Header 'B' type columns' screen, click here.
- Columns - enter the number of Columns required for the report. Note: A Total Column is automatically generated in addition to the number of Columns specified here.
- In the Details section:
- Line - every report line is given a Line number. The report prints in line number sequence. A recommendation is to number your lines in multiples of 10 so you can insert new lines later. To make room to insert a new line, you can click Renumber Lines to have all of the lines renumbered. If you want to display an existing report line, enter the Line number in this field.
If you do not specify a Line number for a new report line, when you Update the report parameters, the Line is automatically assigned the next available maximum Line number. The new report line automatically appears at the end of the report.
- Type - for each report Line, select a line Type from the Type drop down list. The Type determines how each line will be processed. Valid options include:
- Header - a Header line prints an underlined title using the text entered in the 'Description' field. The Header takes up two lines on the report: one line for the text and one for the underline.
- Detail - the Detail line is the most common line used on reports. When you select Detail from the drop down list (or when you click Details for an existing Detail line), the Enter list of GL Accounts window automatically opens allowing you to enter the GL Account(s) that are summarized on the Detail line. For more information on the 'Enter list of GL Accounts' window, click here.
- Sub-Total (Underlined) - prints a rule line and then prints a sub-total. This sub-total is derived from a formula specified in the Enter Total Formula window. When you select the Sub-Total from the drop down list (or when you click Formula for an existing Sub-Total line), the 'Enter Total Formula' window automatically opens. A default formula, 'P', is automatically provided. This formula sums all of the previous Detail lines back to but not including the previous Total or Sub-Total line. You can also enter your own formula that references any other report lines. For more information on the 'Enter Total Formula' window, click here
.
- Sub-Total (Not Underlined) - a Sub-Total (not underlined) line is the equivalent to the Sub-Total line without the rule line preceding it.
- Total - prints a double rule line and then prints a total. This total is derived from a formula specified in the Enter Total Formula window. When you select Total from the drop down list (or when you click Formula for an existing Total line), the 'Enter Total Formula' window automatically opens. A default formula, 'P', is automatically provided. This formula sums all of the previous Detail and Sub-Total lines up to but not including the previous Total line. You can also enter your own formula that references any other report lines. For more information on the 'Enter Total Formula' window, click here.
- Remark - prints the information entered in the 'Description' field. A Remark is similar to a Header line, but without the underline. A Header line must be created before a Remark line can be added to the report.
- Percentage - a Percentage line calculates one report line as a percentage of another from a formula entered in the Enter Total Formula window. For example, if line 20 is $1000, line 30 is $4000 and the formula is 20/30, then the Percentage line displays a value of 25%.
- Continuation - a Continuation line does not print an actual line. Continuation lines are used for additional GL Accounts to be included with the GL Accounts specified on the previous Detail line. When you select Continuation from the drop down list (or when you click Details for an existing Continuation line), the Enter list of GL Accounts window automatically opens allowing you to enter the additional GL Account(s) that are summarized for the previous the Detail line.
- In 'Predefined Column' reports, a Continuation line is used when a Detail line requires more than 8 GL Accounts. For more information on entering Continuation lines via the 'Enter list of GL Accounts' window, click here.
- In 'User Defined Column' reports, a Continuation line is used when a Detail line for any or all columns requires more than one GL Account.
- You can have as many Continuation lines as are required to cover the GL Accounts to be included on a Report line.
- In 'Predefined Column' reports, a Continuation line is used when a Detail line requires more than 8 GL Accounts. For more information on entering Continuation lines via the 'Enter list of GL Accounts' window, click here.
- Header - a Header line prints an underlined title using the text entered in the 'Description' field. The Header takes up two lines on the report: one line for the text and one for the underline.
- Description - enter a Description of the line in this field up to a maximum of 30 alpha-numeric characters. The Description entered in this field is printed in the left most column of the report and can be formatted to present a hierarchy using the 'Spaces to Indent' field. Most line Types have predefined 'Spaces to Indent'. Note: 'Continuation' lines do not require a Description.
- Change Sign - is for display purposes only and does not affect calculations. When you select the check box, a leading minus sign is NOT printed on credit Account balances. This is appropriate for all Revenue, Liability and Equity Accounts. When this check box is not selected, a leading minus sign IS printed on credit
Account balances. This is appropriate for Asset and Expense Accounts with a credit balance.
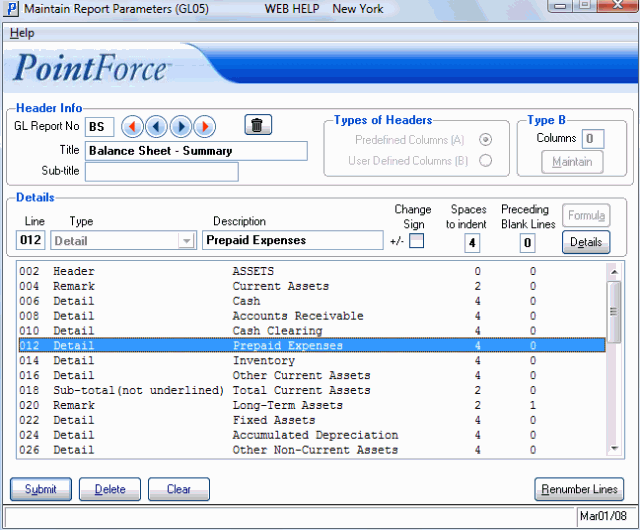
- Spaces to indent - enables you to identify the number of spaces you want to indent a report line from the left of the page. The default number of indent spaces is dependent on the line Type. You can increase or decrease this value for each report line to personalize the indentation for the line Descriptions.
Here is an example of the use of indent spaces:
Report Line Spaces to Indent
Line Type ASSETS 0 Header Cash and Term Deposits 4 Detail Accounts Receivable 4 Detail Prepaid Expenses 4 Detail Inventory 4 Detail Total Current Assets 2 Sub-Total Computer Equipment 4 Detail Office Equipment 4 Detail Accumulated Depreciation 4 Detail Net Fixed Assets 2 Sub-Total Total Assets 0
Total - Preceding Blank Lines - specifies the number of blank lines to print before the current line is printed. TIP: Inserting blank lines before the next Detail line after a Sub-Total line increases the visual effectiveness of the report.
- Note: In order to insert a page break before the current section, enter a "P" (without quotes) in the Preceding Blank Lines field.
- Report Line List Box - displays the lines that exist for the current 'GL Report No.'. Double click a line from the list box to recall the line for editing purposes.
- Line - every report line is given a Line number. The report prints in line number sequence. A recommendation is to number your lines in multiples of 10 so you can insert new lines later. To make room to insert a new line, you can click Renumber Lines to have all of the lines renumbered. If you want to display an existing report line, enter the Line number in this field.

The following list provides additional information on 'User Defined Columns' (Type B) Reports:
The following table outlines the functionality of each button in GL05:
| Button Label | Icon | Functionality |
| Submit |  |
Saves the Report Parameters entered for the current GL Report. |
| Delete |  |
Deletes the line currently highlighted or recalled in the list box from the GL Report entered in the Header Info. section. |
| Clear |  |
Clears all the fields on the screen allowing you to create a new Report. |
| Delete Record |  |
Deletes all information related to the current 'GL Report No.' entered in the Header Info. section. Before the information is deleted, the following message displays: "Delete Header and all its details? Yes/No". Select Yes to confirm the delete request; select No to cancel the delete request. |
| Maintain |  |
Opens the GL Maintain Header 'B' type columns window. This window allows you to define the column headings for the 'User Defined Column' type headers. For more information on the 'GL Maintain Header 'B' type columns' window, click here. |
| Formula |  |
Opens the Enter Total Formula window. This window allows you to define a formula to calculate the value reported on the currently selected report line. This button is only available for Sub-Total (underlined), Sub-Total (not underlined), Total and Percent type lines. For additional details on the 'Enter Total Formula' window, click here. |
| Details |  |
Opens the Enter List of GL Accounts window. This window allows you to enter the GL Account(s) that are summarized on the Detail line. This button is only available for Detail and Continuation type lines. For additional details on the 'Enter list of GL Accounts' window, click here. |
| Renumber Lines |  |
Opens the Renumber Lines window. This window allows you to renumber report lines to accomodate insertion of new report lines between existing lines. For additional details on the 'Renumber Lines' window, click here. |

Maintain Report Parameters (GL05)
