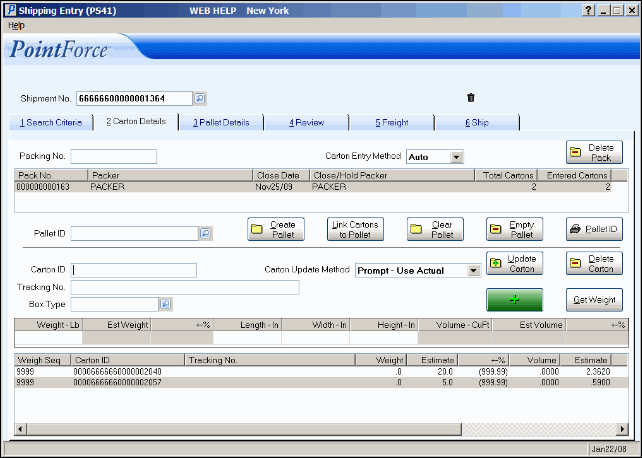
Carton Details (PS41)
|
Additional Information About Weigh Sequences Carton Update/Entry Relationship Field Descriptions Header Recalling a Closed Shipment Troubleshooting Carton Details folder |
The Carton Details folder in the Shipping Entry (PS41) program enables you to:
- Create a Shipment.
- Enter Packing Numbers to a Shipment with all Cartons associated with the Pack entered automatically OR with all Cartons scanned in individually once the Packing Number is added.
- Add specific Shipment information to each Carton.
- Create Pallets.
Note: PS41 Folders 3 to 6 are available once Carton information is entered in Carton Details. Prior to this, Folders 3 to 6 cannot be accessed by the Shipper. Folder 5 (Freight) cannot be accessed until a Freight value is entered on the Ship Folder; if you are using TMS, you do not require access to the Folder 5 (Freight).
The Shipping Criteria set up in Company Control Initialization (CC00/Packing Station) and any overrides set up in Maintain Paying Office Packing Criteria (PS10) also impact the results returned on this folder. If, for example, the 'Paying Office' field is selected in CC00/Packing Station, then the first Sales Order on the first Pack added to the Shipment establishes the Paying Office required for the entire Shipment.
- The Carton Details folder can be used to create a Shipment or to add Packing Numbers to existing Shipments if the Orders on the Shipment have not been Invoiced.
- If you are working on an existing Shipment that is Closed (and Invoices have not been generated) or put on Hold, then scan, enter or select from the query the Shipment Number in the Shipment No. field. The following message displays: "Shipment ###### has been closed. Do you wish to reopen it? Yes/No". Select 'Yes' to reopen the Shipment.
Note: If you are working with a Closed Shipment and Invoices have been generated, see Recalling a Closed Shipment for information on recalling the Shipment.
Note: If you are using TMS, and your Shipment is Closed (Invoices have not been generated), see Reopening a Closed Shipment with TMS for more information.
- If you are creating a new Shipment, scan or enter a Packing Number in the Packing No. field or in the Carton ID field. Once the first Packing Number is updated, a Shipment Number is created.
Tip: If you are manually entering the Packing Number in the 'Packing No.' field, the preceding zeros need not be entered. If you are manually entering the Packing Number in the 'Carton ID' field, the preceding zeros must be entered.
Note: Packing Numbers cannot be entered or scanned under the following circumstances:
- If the Packing Number is assigned to a Shipment, the following message displays: "Packing No. XXXXXX has already been assigned to Shipment No. ######. OK". Click OK to close the message window and return to the Packing No. field.
- If the Packing Number is assigned to a Shipment that has been Invoiced, the following message displays: "The Packing No. XXXXXX is linked to the following orders that have been invoiced. Order(s) xxxxxx and Invoice(s) yyyyyy. OK". (All Sales Orders and Invoice Numbers are listed in the message.) Click OK to close the message window and return to the Packing Number field.
- If any of the Sales Orders are Invoiced and unshipped, the following message displays: "The Packing No. XXXXXX is linked to the following order(s) that have been invoiced. Order xxxx Invoice yyyy. OK". Click OK to close the message window and return to the Packing No. field.
- If the 'Paying Office' field is selected as the Shipping Criteria in either CC00/Packing Station for the Company or in PS10 for the specific Paying Office, and the Paying Office associated with the Packing Number entered does not match, the following message displays: "Pack Paying Office must be the same as the Shipment Paying office. This pack cannot be placed on this shipment. OK". Click OK to close the message window and return to the Packing No. field.
- If the Shipment is for an EDI customer (Trading Partner) and the 'Auto Invoice Generate' field in CC00/EDI is set to 'Never', 'ASN Acknowledged' or 'ASN Transmitted', then the Paying Offices for each Pack MUST match. If the Paying Offices for each Pack do not match, the following message displays: "Pack (Pack #) contains EDI invoice(s). You cannot mix EDI and Non-EDI packs in the Shipment. OK". Click OK to close the message window and return to the Packing No. field.
- If the Packing Number is assigned to a Shipment, the following message displays: "Packing No. XXXXXX has already been assigned to Shipment No. ######. OK". Click OK to close the message window and return to the Packing No. field.
- If you are working on an existing Shipment that is Closed (and Invoices have not been generated) or put on Hold, then scan, enter or select from the query the Shipment Number in the Shipment No. field. The following message displays: "Shipment ###### has been closed. Do you wish to reopen it? Yes/No". Select 'Yes' to reopen the Shipment.
- The Carton Entry Method default is set up in Maintain Packing Station Tables (PS09/Shipper). This field determines the way the Shipper updates the Cartons when a Packing Number is entered in the Packing Number field. Prior to entering a Packing Number, you can change this field. There are two options available:
- Auto - all Cartons associated with the Packing Number are automatically listed in the Carton ID list box at the bottom of the screen.
When a Packing Number is entered, the Packing Number list box automatically displays the Pack details. The 'Total Cartons' for the Pack are displayed and the 'Entered Cartons' equals the 'Total Cartons' for the Pack. This number increases and decreases as Cartons are added or deleted.
- Prompt - the Cartons associated with the Packing Number are not listed in the Carton ID list box when the Packing Number is entered. The Carton IDs must be manually entered or scanned.
When a Packing Number is entered, the Packing Number list box displays the Pack details. The 'Total Cartons' for the Pack are displayed and the 'Entered Cartons' column is set to zero. The 'Entered Cartons' field increases and decreases as Cartons are added or deleted.
Note: When Cartons are added through Auto or Prompt method, a Weigh Sequence is assigned to each Carton. For more details on Weigh Sequence numbers, click here .
- Auto - all Cartons associated with the Packing Number are automatically listed in the Carton ID list box at the bottom of the screen.
- To remove a Packing Number and all associated Cartons from the Shipment, highlight the Packing Number and click Delete Pack.
- The following message displays: "Are you sure you want to delete Packing Number XXXXXX from this shipment? Yes/No?". Select 'Yes' to remove the Pack from the Shipment. Select 'No' to cancel the request.
- If the Shipment has Freight associated with it, the following message automatically displays: "Freight has already been entered and distributed for this shipment. Removing a carton may affect the distribution. The freight total will automatically be re-distributed to the order with the highest shippable value and the lowest Sales Document Number (SDN). If there are no orders on this shipment, the freight amount in folder 6 (Ship) will be set to zero. OK". Click OK to close the message window and verify the Freight on the Shipment.
- If the Cartons for the Pack are assigned to a Pallet, and the Pallet has weights and/or measurements assigned to it from the Pallet Details folder, the following message displays: "Adding or deleting Cartons to the shipment will affect Pallet measurements. The Pallet measurements will now be reset to zero. OK". Click OK to close the message window and verify the Pallet measurements on the Pallet Details folder if Cartons are still assigned to the Pallet.
Note: Removing Cartons from the Shipment can affect the Weigh Sequence number. For more details on Weigh Sequences, click here.
- The following message displays: "Are you sure you want to delete Packing Number XXXXXX from this shipment? Yes/No?". Select 'Yes' to remove the Pack from the Shipment. Select 'No' to cancel the request.
- Double clicking a Packing Number in the Packing Number list box automatically opens Display Packing/Shipment Info (PS45).
- The Pallet ID section is optional. There are 3 ways to enter a Pallet ID in the Pallet ID field:
- Click Create Pallet to create a new Pallet for this Shipment.
- Scan or manually enter the Pallet ID if Pallet Labels were preprinted in Generate/Print Carton & Pallet ID Labels (PS20).
- Select an existing Pallet using the query.
If the Pallet is associated with another Shipment, the following message displays: "Pallet NNNNNN belongs to Shipment ######. OK". Click OK to close the message window and return to the Pallet ID field.
Note: Unused Pallet IDs associated with the Shipment will not be removed until the Shipment is Closed. Once they are removed from the Shipment, the Pallet IDs can be reused with other Shipments.
- To automatically link the current Pallet ID to all Cartons in the Shipment, click Link Cartons to Pallet. The following message displays: "Pallet ID NNNNNN will be assigned to ALL cartons in the shipment. Continue? Yes/No". Select 'Yes' to link the Pallet to all Cartons. Select 'No' to cancel the request. The Carton ID list box (at the bottom of the screen) includes a Pallet ID column that is visible when you scroll to the right.
Note: When the Pallet ID field contains a Pallet number, any Carton added to the Shipment will be automatically associated with that Pallet. Additional caution: if you recall a Carton that is linked to a Pallet, the Pallet ID remains in the Pallet ID field after you click Update Carton. The Pallet ID remains in the Pallet ID field until you click Clear Pallet .
- To clear the Pallet ID currently displayed in the Pallet ID field, click on Clear Pallet.
Note: When you clear Cartons from the Pallet using Clear Pallet, the Pallet's Weigh Sequence number will be retained, but the Weights and Measurements for the Pallet will be reset to zero. For more information on Weigh Sequences, click here.
Note: When the Pallet ID field is blank, any Carton added to the Shipment will not be linked to a Pallet ID.
- To remove all of the Cartons from the current Pallet, click Empty Pallet. The Pallet is still available for use with the current Shipment. The following message displays: "All cartons currently assigned to Pallet ID NNNNNN will be un-assigned. Pallet measurements will be reset to zero. Continue? Yes/No". Select 'Yes' to empty the Pallet and remove all measurements. Select 'No' to retain the Pallet and all Cartons associated with it.
Note: If the Pallet has a Tracking Number assigned to it and the Empty Pallet is invoked, the Tracking Number remains associated with the Pallet.
Note: When you empty a Pallet using Empty Pallet, the Weigh Sequence number for the Pallet is reset to '9999'. For more information on Weigh Sequences, click here.
- To print a label for the current Pallet, click on Pallet ID (Print)
 . The label prints to the printer assigned to the Operator ID as defined in Maintain Operator Controls (PS11).
- If the Pallet ID (Print) icon is unavailable, the Operator has not been assigned a Printer in PS11.
Note: If Pallet ID labels are set to Auto Print in PS11, the label automatically prints when the Pallet ID is created.
- Click Create Pallet to create a new Pallet for this Shipment.
- The Carton ID section:
The Carton ID section is optional only when the Cartons have been automatically updated to the Shipment when the Carton Entry Method is set to 'Auto'. Otherwise, Cartons are not automatically updated to the Shipment.
- To add a Carton, ensure you toggle to the Adding Carton to Packing No.
 icon.
icon.
To delete a Carton, toggle to the Removing Carton from Packing No. icon.
icon.
Note: When you recall a Carton from the list box, the Add/Delete button is disabled.
If the Add/Delete button is set to Delete and a Carton is scanned that is not on the Shipment, the following message displays: "Carton xxxx is not on this shipment. Unable to delete. OK". Click OK to close the message window.
- You can manually enter the Carton ID or you can scan the Carton ID label in the Carton ID field.
Tip: You can scan or enter a Shipment Number or a Packing Number in this field. Once entered, the Shipment Number is automatically moved to the Shipment Number field and the Packing Number is automatically added to the Pack No. list box.
- Cartons entered must be associated with a Packing Number that is already part of the Shipment. If the Carton is associated with a different Packing Number, the following message displays: "This carton is assigned to Packing No. XXXXXX which is not on this shipment. OK". Click OK to close the message window and return to the Carton ID field.
- The Carton Update Method default is set up in PS09/Shipper. The Carton Update Method determines the way in which the Weight and Volume are entered for each Carton, and determines the way the Shipper edits the measurements or adds a Tracking Number for each Carton. Prior to entering a Carton ID, you can change this field. This field is disabled when a Carton is recalled.
Note: The Carton Update Method works with the Carton Entry Method. For details on the Carton Update/Carton Entry relationship, click here.
There are four Carton Update Methods:
- Prompt-Use Estimates - the Estimated Weight and Volume are automatically moved to the 'Actual' Weight and Volume fields. The Shipper scans or enters the Carton ID and the cursor automatically moves to the Tracking Number field. The Shipper must manually click Update Carton or Delete Carton to add/delete each Carton to the list box.
- Prompt-Use Actual - the measurements (Weight, Length, Width and Height) must be entered in the 'Measurement' grid (or else remain at zero). Note: If the measurements were entered in PS30, there is no need to re-enter this information here.
- The Shipper scans or enters the Carton ID and the cursor automatically moves to the Tracking Number field. The Shipper must manually click Update Carton or Delete Carton to add/delete each Carton to the list box.
- Auto-Use Estimates - when the Shipper scans or enters the Carton ID, the Carton details automatically populate the list box and the Estimated Weight and Volume are automatically moved to the 'Actual' Weight and Volume fields. If adjustments to the Carton IDs Weight or Volume are required or if a Tracking Number is required, the Shipper can recall the Carton ID and manually enter the information.
- Auto-Use Actual - when the Shipper scans or enters the Carton ID, the Carton details automatically populate the list box and the 'Actual' Weight and Volume remain at zero. Note: If the measurements were entered in PS30, there is no need to re-enter this information here.
- The Carton ID must be recalled from the list box in order to manually enter the Actual measurements and Tracking Number for each Carton.
Note: When the Length, Width and Height are manually entered for a Carton, the Volume is automatically calculated.
Note: If the Weight entered for a Carton exceeds the Maximum Weight entered for the Box Type in PS09/Box Types, the following warning displays: "This carton has exceeded the Maximum Weight for its Box Type. OK". Click OK to close the message window. The Shipper can accept the entered Weight, thereby overriding the Maximum Weight.
- Prompt-Use Estimates - the Estimated Weight and Volume are automatically moved to the 'Actual' Weight and Volume fields. The Shipper scans or enters the Carton ID and the cursor automatically moves to the Tracking Number field. The Shipper must manually click Update Carton or Delete Carton to add/delete each Carton to the list box.
- A Tracking Number can be scanned or manually entered for the Carton ID in the Tracking Number field. This field is optional.
- Note: If Tracking Numbers are entered on the Ship folder in PS41, then the Tracking Number field is unavailable.
- Note: When using TMS with PS41, the Tracking Number field is unavailable.
- Note: If Tracking Numbers are entered on the Ship folder in PS41, then the Tracking Number field is unavailable.
- The Box Type can be entered or selected from the query. If CC00/Packing Station has a 'Default Box Type' defined, the default displays in this field. This is an optional field.
- When a Box Type is defined in CC00, the Length, Width and Height of the Box Type override the Estimates used when the Carton Update Method is set to 'Prompt-Use Estimates' or 'Auto-Use Estimates'.
- When a Box Type is defined in CC00, the default displays in this field. If the Shipper updates any of the measurements, the Box Type is removed from the Box Type field when the Carton is updated (but the new measurements remain).
- When a Box Type is defined in CC00, the Length, Width and Height of the Box Type override the Estimates used when the Carton Update Method is set to 'Prompt-Use Estimates' or 'Auto-Use Estimates'.
- The Get Weight icon is available when a Scale is defined in PS11. Select the Carton on the screen and set the actual Carton on the scale. The weight is read in the Measuring Units defined in Maintain Sales Office/Warehouse Number (CC96). The Weight field in the 'Measurement' grid flashes yellow twice to confirm the weight. For more information on messages received from the Scale, see Troubleshooting Carton Details.
Note: We recommend that the Carton Update Method be set to 'Prompt-Use Actual' or 'Prompt - Use Estimate' when using a Scale with PS41.
- If you are editing Carton Details or if you are in Prompt mode, click Update Carton when all of the information for the Carton ID is correct.
- To delete a Carton ID from the list box, recall the Carton ID and click Delete Carton.
Note: If the Carton ID is linked to a Pallet, and the Pallet has weights and/or measurements assigned to it from the Pallet Details folder, the following message displays: "Adding or deleting Cartons to the shipment will affect Pallet measurements. The Pallet measurements will now be reset to zero. OK". Click OK to close the message window and verify the Pallet measurements on the Pallet Details folder.
If there are no more Cartons related to the Packing Number, the following message displays: "No cartons left for Pack XXXX. Delete the Pack? Yes/No". Select 'Yes' to delete the Pack. Select 'No' to retain the Packing Number.
- To add a Carton, ensure you toggle to the Adding Carton to Packing No.
- When the information in the Packing Number list box and the Carton ID list box is complete, you may proceed to the Pallet Details or Review folder.
PS41/Carton Details
