Time (SE30)
|
Additional Information Overview of the SE Module |
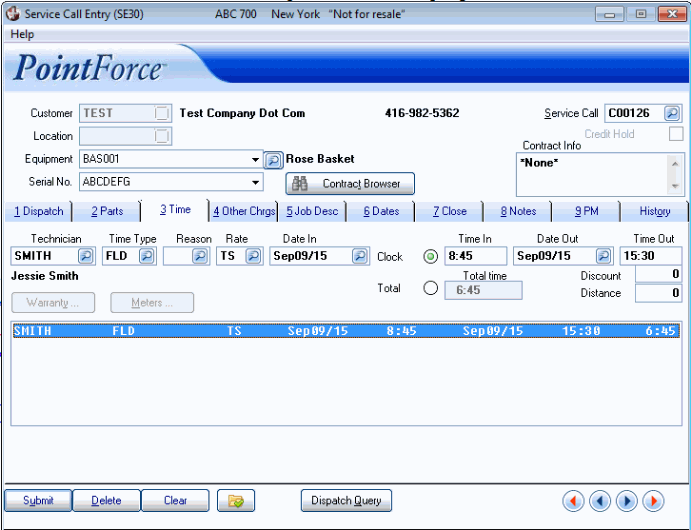
The Time folder in Service Call Entry (SE30) allows you to enter labour charges to the service call entered in the Header section.
- You must enter separate detail lines in the following scenarios:
- When multiple technicians work on the call.
- When different Time Types are required to categorize how the time was spent, for example one time detail line can be for travel time, while another is for regular field time.
- When different Rate Codes are required. Each Rate Code can, in fact, be set up with 2 rates, one for minimum time, one for extra time. If two rates are required against one Time detail line, two lines are created when an invoice is generated in Service Call Invoice Creation and Print (SE42).
- The time worked on a service call can be entered as total hours/minutes worked, or as actual start/end dates and times.
- If the Contract Billing (CT) module is installed, and if the equipment being serviced is metered, the Meter button is available. When clicked, a window opens allowing you to enter the current meter reading of the equipment. The reading is updated to the Contract Master file when the SE42 runs.
The following list defines every field on the Time folder:
- Technician - enter or select from the query the Technician assigned to the Service Call. Note: This field defaults to the Technician code that entered on the Dispatch folder.
- Time Type - enter or select from the query the Time Type. The Time Type controls how the charges are to be invoiced and categorizes the time spent on the call for statistical purposes. For more information on Time Types, see Service Call Time Types (SE12).
- Reason - enter or select from the query an appropriate Reason code for the service call. Reason Codes are primarily used to categorize down time on a service call. Assigning Reason Codes on a service call is optional unless the selected Time Type’s TAT code is 'WAR'. For more information on Reason codes, see Service Call Reasons (SE13).
- Rate - enter or select from the query the Rate code that applies to the Time entry. Service Rate codes control the dollar amount charged for time entered servicing equipment in SE30. For more information about Rate codes, see Service Call Rates (SE10).
- Date In - enter or select from the query the date on which work began for the service call.
- Clock - selecting this option enables the 'Time In', 'Date Out', and 'Time Out' fields, and disables the 'Total Time' field. Time worked by the technician on the service call must be entered as total hours/minutes worked.
- Time In
- this field is only available if you have selected the Clock option. Enter the time, in hours and minutes, that the work began. Please use a 24-hour clock.
- TIP: You can also use an 'a' to indicate AM or a 'p' to indicate PM and the system will convert the time entered to the 24 hour clock. For example, if you enter 0330a and tab out of the this field, the system converts this to 03:30 hours. You must enter all 4 digits of the time in this case.
- Date Out - this field is only available if you have selected the Clock option. Enter or select from the query the date on which the service call is completed.
- Time Out - this field is only available if you have selected the Clock option. Enter the time, in hours and minutes, at which the work ended. Please use a 24-hour clock.
- TIP: You can also use an 'a' to indicate AM or a 'p' to indicate PM and the system will convert the time entered to the 24 hour clock. For example, if you enter 0530p and tab out of the this field, the system converts this to 17:30 hours. You must enter all 4 digits of the time in this case.
- Note: If the time worked exceeds the working day entered in Service Call Technicians (SE11), the following warning message displays when you click Submit: "Time posted of xx hours and xx minutes exceeds the Technicians' working day of xx hours and xx minutes. OK". This is only a warning message; when you click OK, the number of hours entered still displays and you can leave the folder.
- TIP: You can also use an 'a' to indicate AM or a 'p' to indicate PM and the system will convert the time entered to the 24 hour clock. For example, if you enter 0530p and tab out of the this field, the system converts this to 17:30 hours. You must enter all 4 digits of the time in this case.
- Total - selecting this option opens the 'Total Time' field and disables the 'Time In', 'Date Out', and 'Time Out' fields. Time worked by the technician on the service call must be entered as total hours/minutes worked.
- Total Time - this field is only available if you have selected the Total option. Enter the Total Time it took to complete the work in hours and minutes.
- Note: If the time worked exceeds the working day entered in SE11, the following warning message displays when you click Submit: "Time posted of xx hours and xx minutes exceeds the Technicians' working day of xx hours and xx minutes. OK". This is only a warning message; when you click OK, the number of hours entered still displays and you can leave the folder.
- Discount - enter the discount that is to be applied to the entered time. If the Time Type for the line has a TAT Code of 'WAR' assigned to it, this field defaults to 100% discounted.
- Note: If the CT (Contract Billing) module is installed, this field defaults to 100% if the equipment on the service call is covered by an active contract, and the 'Labour is Included' flag on the Service folder of Contract Maintenance (CT30) is set. The 'Contract Info' box in the Header section of SE30 indicates whether Parts and Labour are included in the contract.
- Distance - enter the distance the technician traveled to get to the customer. This field is currently for information purposes only.
The following table outlines the functionality of each button on the Time folder:
| Button Label | Icon | Functionality |
| Warranty |  |
Opens the 'Manufacturer Warranty Info' window that allows you to enter manufacturing information required for warranty purposes. This button becomes available when the TAT code is set to 'WAR'. For more information on the 'Manufacturer Warranty Info' window, click here. |
| Meters |  |
Opens the 'Meter Readings' window that allows you to enter the current meter reading information. This button is only available if the 'Equipment' entered in the Header section is on a Contract in the CT (Contract Billing) module (the Equipment must be covered by an active contract, and the Equipment must be configured as being metered). For more information on the 'Meter Readings' window, click here. |
| Submit |  |
Saves the information entered for the current Time record. |
| Delete |  |
Deletes the current Time record. Note: You cannot delete Time records under the following conditions:
Note: If the Service Call is closed and/or an invoice has been issued, you can still recall the issued invoice and reverse the close. Once this is done, you can delete the part. |
| Clear |  |
Clears the current service call information allowing you to enter a new service call or recall an existing service call. |
| New Record |  |
Clears the 'Time Type' and 'Reason' fields, sets the 'Date In' and 'Date Out' fields to the current date, and sets the 'Time In' and 'Time Out' fields to the current time. |
| Dispatch Query |  |
Locates a specific service call, or dispatches calls without opening the call in SE30. The Dispatch Service Calls browser contains the following information and functionality:
Note: You cannot dispatch Service Calls in the following scenarios:
|
Service Call Entry (SE30/Time)
