Creating a new Case
In the Cases view, you can create a new case from the Search Criteria/Grid page or from the Details page. If your user id has the correct permissions to create a new Case, a Create button displays on both of these views in iTopia.
- Note: The ability to create new records is controlled by the permissions assigned to the resource within the role. Specifically, the Cases resource assigned to your role must include the 'Create' operation.
Creating a new Case record:
- From either the Search Criteria/Grid page or the Details page, click on Create.
- The Cases/Create window opens. Here is an example of the fields displayed on the Create page:
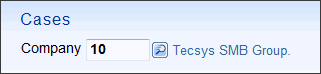
- Enter or select from the lookup
 a Company Number in the Company field. Enter the number of the current company in which you are working. This is a mandatory field. a Company Number in the Company field. Enter the number of the current company in which you are working. This is a mandatory field.
- Click Continue to continue creating the new case.
Note: You can create multiple cases for a single customer.
- The Cases-Detail page opens for the new case.
- Customer Code – enter or select from the lookup a Customer Code. Note: You cannot enter a Customer Code that is assigned to a Prospect; Cases are only available for Customers. This field is mandatory.
- Case Type - enter or select from the lookup a Case Type associated with the issue reported for the current case record. Case Types are maintained in the Case Types view. For more information, click here. This field is mandatory.
- Case Stage - enter or select from the lookup the Stage of the current case. The Stage is the phase that the case is in for the currently selected Type. This field is mandatory.
- Note: The Case Stage selected must be associated with the Case Type entered. If you select a Stage that is not related the current Type, an error occurs.
- Case Stages are maintained in the Case Stage view. For more information on Case Stages, click here.
- Owner - enter or select from the lookup the Owner of the current case. The owner is the person dealing with the case.
- Note: Case Owners must be set up in the User Master. For more information on setting up Users in the User Master, click here or see your system administrator for further information.
- The user must have 'Read Only' access to the meta database (set up through the User Master-License view) to access the User Master through the Owner lookup. Note: Even if you do not have access to the query, you can still enter a valid Owner and update the record.
- Description
- enter a short Description associated with the current case. You can enter a maximum of 128 alpha numeric characters.
- Details - enter a Detailed description associated with the current case. You can enter a maximum of 512 alpha numeric characters in this field. This field is mandatory.
- Priority - indicates the level of urgency associated with the case. You can select a priority from the drop down list. Valid options include:
- H – High
- M –Medium
- L – Low
- Current Contact - enter or select from the lookup a Current Contact for the case.
- Note: Current Contacts must be set up in the User Master. For more information on setting up Users in the User Master, click here or see your system administrator for further information.
- The user must have 'Read Only' access to the meta database (set up through the User Master-License view) to access the User Master through the Current Contact lookup. Note: Even if you do not have access to the query, you can still enter a valid Contact and update the record.
- Estimated Completion Date - enter or select from the calendar the Estimated Complete date on which the case should be resolved.
- Actual Completion Date - the Actual Completion Date remains blank until a Case Stage is selected for this Case that has the Complete Stage flag set to 'Yes'. When such a Stage is entered, then the Actual Completion Date changes to the current date.
- Complete - the Complete field is display only and displays 'No' until a Case Stage is selected for this Case that has the Complete Stage flag set to Yes. When such a Stage is entered, then the Complete field changes to 'Yes'.
- For more information about the Case Stages click here.
- Note: If you change the Case Stage from one that is flagged as Complete back to one that is not flagged as Complete, this field automatically reverts back to 'No'.
- When all of the information is entered, click Submit or Save.
- When you click Save, all of your changes are saved and you remain on the Case-Details page. Once you click Save, and the record is successfully created, the Submit button also displays on the Details page. If you click Submit, the changes are saved and you are returned to the Create page where you can enter another new Case.
- TIP: If you decide that you do not want to create the current record, you can abort the process by clicking Close or Return to Search Page
 icon. The following message displays: "Are you sure you want to navigate away from this page? Any changes will be discarded. Click OK to continue, or Cancel to stay on the current page. OK/Cancel". Only changes made prior to the record being updated using the Save or Submit action buttons will be discarded. icon. The following message displays: "Are you sure you want to navigate away from this page? Any changes will be discarded. Click OK to continue, or Cancel to stay on the current page. OK/Cancel". Only changes made prior to the record being updated using the Save or Submit action buttons will be discarded.
- Repeat these steps until all of the Cases are set up.


|
|