User Master
|
Index User Master-Search Criteria/Grid User Master-Details Page |
|
Additional Information Create a new User How To Set up New Users Literals: Frequently Asked Questions User Manager System(UMS) Overview |
The User Master is a table (md_user) in the User Management System (UMS). This table defines the persons or users that access the system and contains personal information about each user, including first name, last name, email address and home resource name. When you first access the User Master, you open the "User Master-Search Criteria/Grid" page.
In order to access the User Master table, you must be logged into iTopia as a user assigned the UMS Administrator role, or as a user with sufficient permissions to access the view. A 'system' user will be created when iTopia is installed at your site. This user will be set up to access the User Master table.
During the creation of a new user user, the system automatically creates a Personal role for the user. As a result, every user has an associated personal role.
- As with all other roles assigned to the user, this role can be viewed in the User Master-Role table. The role name for the personal role is the same as the user name. Note: the system prevents you from creating a user name that is already defined as a role in the Role Master.
- When Personalization is used to create a view, the view is assigned to the user through the personal role.
When a new user is created, a 'ums_user' role is automatically created for the user by the system. This role provides limited UMS access to each user. For details on the UMS access provided by this ums_user role, see the Role Details for the ums_user topic.
During the deletion of a user record, the system automatically deletes the personal and ums_user roles along with all other roles assigned to the user from the User Master-Role table.
Each user has an associated personal user menu, the My Views folder. When a user record is created, the system automatically creates the user’s My Views folder. When a user record is deleted, the associated My Views folder is also deleted. The My Views folder can be maintained by the user using the User Resource Group view via the user’s profile.
You can access information for an existing user or you can create a new user. The following fields are available on the User Master and are based on the order in which they appear in the grid on the search page:
- User Name - displays the name assigned to the user for login purposes.
- First Name – displays the user’s first name.
- Last Name – displays the user’s last name.
- Honor – displays the user’s title. The following options are available:
- Mr.
- Ms.
- Miss
- Mrs.
- Dr.
- Email Address – displays the user’s email address. If a valid email address is entered, it displays as a link. Double clicking on the link launches the user’s default email application with the email address automatically populated in the To field.
- Phone Number – displays the user’s telephone number.
- User Type – can be either ‘Standard’ (default) or ‘Advanced’.
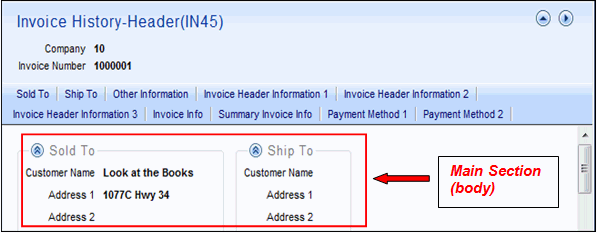
- Standard – allows users to customize a view’s ‘Main’ section only on the Personalize-Details page, i.e. when Personalizing a view, the user can select fields that will display in the body of the Details page. Using Invoice History-Header (IN45) as an example, the body section is outlined in red.
- Advanced – allows users access to a drop box on the Personalize-Details page. This drop box includes 3 selections:
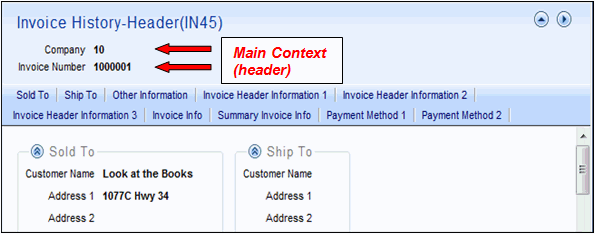
- Main Context – this option allows the user to select fields that will display in the Header of the Details page of a view. Using Invoice History-Header (IN45) as an example, the following fields are in the Header section: Company and Invoice Number.
- Main - this option allows the user to select fields that will display in the body of the Details page.
- Key – this option is reserved for future use.
- Company – displays the company name.
- Department – displays the department to which the user belongs.
- Job Title – displays the user’s job title.
- Supervisor – displays the user’s supervisor.
- Supervisor Phone – displays the supervisor’s telephone number.
- Home Resource Name – defines the resource that will be launched when the user logs in. It represents the user’s default home or main menu. The icon beside the home resource name opens the home menu for this user.
- For most non-administrative users, the home resource name entered will be ‘meta_ibis_user_home_menu’.
- For system administrators, the home resource name entered will be 'ibis_admin_home_menu'.
- For most non-administrative users, the home resource name entered will be ‘meta_ibis_user_home_menu’.
- Search Results Records per Page – displays the maximum number of records displayed on a single page when returning the results of a search. The default for this field is set to 10. This means that when a search is initiated, only 10 records are initially displayed.
- The user can override this field on a view-by-view basis using the Search Results tab while personalizing the view.
- Maximum Search Results Records to Display – displays the maximum number of records retrieved when returning results of a search. The maximum value is 9,999.
- Note: The user can adjust this field on a view-by-view basis using the Search Results tab while personalizing the view. The ‘Maximum Number of Records to Retrieve’ is set to the value entered in this field. The user can change the value in the ‘Maximum Number of Records to Retrieve’ field, but they cannot enter a value greater than the value entered in this field. If they do, an error will result and the user will be unable to Save or Submit the personalized view until the error is corrected.
- Locale – displays a valid locale. The locale sets the language that the user will use in PointForce iTopia. The locale naming convention to be used is EN_CLIENT.
Note: All of the fields, with the exception of the User Name, can be modified directly in the grid for existing users simply by double clicking in the field and entering or selecting the information from a drop down list. The new information is updated by selecting the check mark. To cancel the change request, select the 'x'.
For information on the functionality of each button on the User Master Search Criteria Results/Grid page, click here.
User Master - Details Page
When you click on the View Record Details icon for a specific record on the User Master Search/Criteria Grid page, the User Master Detail page opens for that record. The information available on the details page is very similar to the information on the Search/Criteria Grid page, with a few exceptions which are outlined below.
Warning: If you Personalize the User Master-Details page, you must include all of the required fields. If you do not include all of the required fields, you will not be able to save records in the Personalized view.
There are 5 sections on the detail page of the User Master. The following list defines every field in each section:
- In the General Section:
- First Name – enter the first name of the user. This is a required field.
- Last Name – enter the last name of the user. This is a required field.
- Honor – enter or select from the drop list the user’s title. The following options are available:
- Mr. (default)
- Ms.
- Miss
- Mrs.
- Dr.
- Email Address – enter the user’s email address. This is an optional field. If you double click on the Email Address on the search page, or if you click on the ‘Launch Email’ icon
 from the Details page, your default Email application will automatically launch with an Email created for the address entered in this field.
- Phone Number – enter the user’s telephone number. This is an optional field.
- First Name – enter the first name of the user. This is a required field.
- In the Login section:
- Is Active – the following options are available: Yes (default) and No.
- Select Yes to indicate the user is currently active.
- Select No to indicate that this user is deactivated. A deactivated user no longer has access to the system.
- User Type – select a user type from the drop list. Valid values are:
- Standard – allows users to customize a view’s ‘Main’ section only on the Personalize-Details page, i.e. when Personalizing a view, the user can select fields that will display in the body of the Details page. Using Invoice History-Header (IN45) as an example, the body section is outlined in red.

- Advanced – allows users access to a drop box on the Personalize-Details page. This drop box includes 3 selections:
- Main Context – this option allows the user to select fields that will display in the Header of the Details page of a view. Using Invoice History-Header (IN45) as an example, the following fields are in the Header section: Company and Invoice Number.
- Main Context – this option allows the user to select fields that will display in the Header of the Details page of a view. Using Invoice History-Header (IN45) as an example, the following fields are in the Header section: Company and Invoice Number.

- Main – this option allows the user to select fields that will display in the body of the Details page.
- Key – this option is reserved for future use.
- Password – enter the user’s password in this field. The password is encrypted before it is saved. This field is initially set to the value entered in the 'User Name' field by default. The password can be a minimum of 1 alpha numeric character and a maximum of 20 alpha numeric characters. Note: the password is optional. You may leave this field blank to have it default to the value in the 'user name' field.
- Confirm Password – re-enter the user’s password in this field. This field is set to the user’s name by default. This is a required field only if you enter a new password in the password field.
- Password Hint – enter a password hint for the user in this field. You can enter a maximum of 40 characters in this field. This is an optional field.
- UMS Maximum Login Attempts – enter the maximum number of consecutive unsuccessful login attempts the user has before the account becomes deactivated. Once the User Login Attempts is equal to or exceeds the value of this field, the user is deactivated and is no longer able to log in to the system. Once the user is deactivated, they must contact the system administrator.
- User Login Attempts
– this field displays the number of consecutive unsuccessful log in attempts. Upon successful login, the number of login attempts is reset to zero. After the maximum number of unsuccessful attempts is exceeded, the user is automatically deactivated.
- This field automatically resets to a value of 0 when the ‘Is Active’ flag is set to Yes and the record is updated.
- Is Active – the following options are available: Yes (default) and No.
- In the Employee section: (all of the fields in this section are optional)
- Company – enter the company name.
- Department – enter the employee’s department.
- Job Title – enter the user’s job title.
- Supervisor – enter the user’s supervisor.
- Supervisor Phone – enter the supervisor’s telephone number.
- Company – enter the company name.
- In the Portal section:
- Locale – enter a valid locale. The locale sets the language that the user will use in PointForce iTopia. The locale naming convention to be used is EN_CLIENT.
- Home Resource Name - defines the resource that will be launched when the user logs in. Enter the user’s default home or main menu. For most non-administrative users, the home resource name entered will be ‘meta_ibis_user_home_menu’. For the 'system' user, the home resource name entered will be 'ibis_admin_home_menu'.
- Locale – enter a valid locale. The locale sets the language that the user will use in PointForce iTopia. The locale naming convention to be used is EN_CLIENT.
- In the Edit section:
- Search Results Records per Page – enter the maximum number of records that display on a single page when returning the results of a search in any view. The default for this field is set to 10. This means that when a search is initiated, only 10 records are displayed.
- The user can override this field on a view-by-view basis using the Search Results tab while personalizing the view.
- Maximum Search Results Records to Display – enter the maximum number of records retrieved when returning results of a search. The maximum value is 9,999.
- Note: The user can adjust this field on a view-by-view basis using the Search Results tab while personalizing the view. The ‘Maximum Number of Records to Retrieve’ is set to the value entered in this field. The user can change the value in the ‘Maximum Number of Records to Retrieve’ field, but they cannot enter a value greater than the value entered in this field. If they do, an error will result and the user will be unable to Save or Submit the personalized view until the error is corrected.
- Search Results Records per Page – enter the maximum number of records that display on a single page when returning the results of a search in any view. The default for this field is set to 10. This means that when a search is initiated, only 10 records are displayed.
The Related section at the bottom of the page contains links to related resources for the current record. The following links are available:
- License
- Role
- Attribute
- Restriction
- Permissions Summary
- Session Status
- My Notifications
For information on the functionality of each button on the User Master Details page, click here.
