Company Entry (CC95)
|
Additional Information Multi Co. vs Multiple SO/Whse Add New Company without Replication Add New Company with Replication |
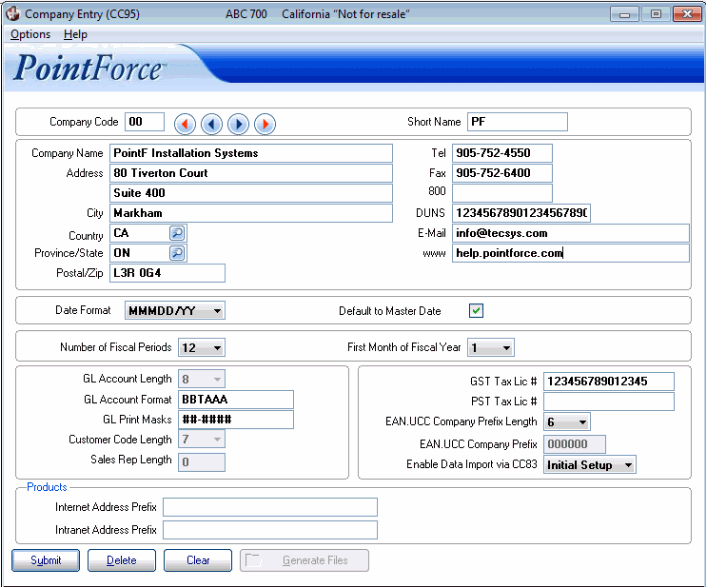
The Company Entry (CC95) program manages the table of Company codes. Company records and the data files required for a new Company are created with the assistance of your TECSYS SMB Professional Services Consultant.
Once a Company is created, CC95 allows you to edit Company wide information, such as the Address, Phone Number, E-mail Address, Date Format, the GST and PST Tax license numbers and EAN.UCC information, etc. Other fields, such as GL Account Length, Customer Code and Sales Rep Length, require consultation with your Business Consultant before changes can be made.
The following list defines every field in CC95:
- Company Code - Enterprise is capable of hosting multiple Companies within one installation of the software. If your organization is structured into two or more financial business entities, a separate Company Code is defined for each so that Enterprise is able to manage a separate set of "books" for each one.
The Company Code can be a maximum of 2 alpha-numeric characters in length. The code is usually assigned by your Professional Services Consultant during the pre-installation consultation process. Note: Company code '41' is reserved for system use and cannot be used as a company code.
- Short Name - enter the Short Name for the Company. The Short Name of a Company appears on the title bar of all Enterprise programs. The Short Name can be a maximum of 9 alpha-numeric characters in length.
Tip: The Short Name you select should be distinctive enough so that you cannot confuse one company with another. For example, if your organization named ACME is made up of an operational Company that deals in goods and services and a holding company that provides the Real Estate required by the operational company, consider short names of ACME CO. and ACMEHOLD.
- Company Name - enter the legal operating name of the company. The name can be a maximum of 36 alpha-numeric characters in length.
- Address - enter the address for the Company. There are 2 address lines available. On the first line, enter the number and street; on the second line, enter the and suite, unit or rural route as applicable.
- City - enter the city for the company.
- Country - from the drop list, select the country.
- Province/State - from the drop list, select the province or state.
- Postal/Zip - enter the postal code or zip code.
- Tel - enter the primary Telephone number, including area code, for the company.
- Fax - enter the primary Fax number, including the area code, for the company.
- 800 - enter the toll free number for the company (if applicable).
- DUNS
- the Data Universal Numbering System or DUNS number. Enter the company's unique 9-digit identification number (if applicable).
- E-mail - enter the E-mail address for the company (if applicable).
- www - enter the Internet address for the company (if applicable).
- Date Format - from the drop list, select a Date Format. The Date Format selected specifies how dates are formatted for input into all date fields throughout Enterprise, and how the dates appear on displays and reports.
Note: The Date Format can differ from Company to Company, and the Date Format can be changed from one format to another at any time without affecting the underlying dates in the data files. If the Date Format is changed while programs are in use, the previous Date Format is in effect until that program is closed.
Valid Date Format options are:
Format Example MMMDD/YY DEC31/05 DDMMMYY 31DEC05 YYMMMDD 05DEC31 DD.MM.YY 31.12.05 MM.DD.YY 12.31.05 YY.MM.DD 05.12.31 - Default to Master Date - when selected, the Company Run Date is defaulted to the Master Date in Maintain System Dates (CC30) when the 'Update All Companies' option in CC30 is selected.
- Number of Fiscal Periods - from the drop down list, select 12 as the number of fiscal periods in the fiscal year for your Company.
- First Month of Fiscal Year - from the drop down list, select the number that corresponds to the first month of the Company's fiscal year (where 1 represents January and 12 represents December).
The value of this field is used to label the fiscal periods properly for table entries, displays and reports. For example, if the First Month of the Fiscal Year is set to 2, representing February, the Maintain Fiscal Dates (CC90) program labels the fiscal periods beginning with February.
- GL Account Length - the GL Account Length is set up for your Company prior to the installation of the Enterprise software at your site. This field is not available for editing. The GL Account Length determines the length of the General Ledger Account codes. This field can be set to 5, 6, 7 or 8 digits. Each of the number of characters specified by this value can then be configured by the GL Account Format to represent the GL coding hierarchy of Branch, Account Type and Account Number. Once the Length and Format are established, a Print Mask is defined to control the appearance of the GL Code.
The Length selected directly impacts the Formatting and Mask options of a GL Code. Reviewing the examples of GL Account Formats and GL Print Masks assists in selecting the most appropriate Length for the installation. Typically your Enterprise Business Consultant assists in selecting the most appropriate GL Format and Print Mask for your installation.
- GL Account Format
- the GL Account Format identifies which characters within a General Ledger account code represent the Branch (cost center), the Account Type and the actual Account number. The format is entered using the following characters:
- B - Branch
- T - Account Type
- A - Account
The following table outlines examples of GL Account Formats:
Length Format # Branches Supported # Accounts Supported 5 BBTAA 99 99 6 BBTAAA 99 999 7 BBTAAAA 99 9,999 8 BBTAAAAA 99 99,999 - GL Print Masks - the GL Print Masks identify any special characters that can be used to separate or space out the Account code and the position of those characters whenever an Account code is printed or displayed. The Print Mask is helpful in breaking down a complicated GL account structure into a recognizable pattern. The GL Account Format characters are represented in the Print Mask by # characters while the separators or spaces can be either period or dash characters (. or -). For example: ##-##-####
- Customer Code Length - from the drop down list, select the length of the Customer code. You can select a maximum of 7 characters. Once you run the Generate Files option, this field is no longer available for editing, for any Company.
- Sales Rep Length - the Sales Rep Length is set up for your Company prior to the installation of the Enterprise software at your site. The Sales Rep can be from 2 to 7 characters in length. This field is not available for editing. Sales Reps are defined in Maintain Support Tables (SU09/Sales Reps).
- GST Tax Lic # - enter the GST Tax License Number for your Company.
- PST Tax Lic # - enter the PST Tax License Number for your Company.
- EAN.UCC Company Prefix Length - from the drop down list, select the length of the EAN.UCC Company Prefix used by your Company. Valid options are 6, 7 or 8.
Caution: Once CC95 is updated, this field is no longer available. - EAN.UCC Company Prefix - this field is available once the EAN.UCC Company Prefix Length is selected. Enter the EAN.UCC Company Prefix used by your Company.
Note: The number of digits entered in the Company Prefix field must match the value entered in the 'EAN.UCC Company Prefix Length' field.
Caution: Once CC95 is updated, this field is no longer available. - Enable Data Input via CC83 - this field is only visible to Tecsys operators. This field determines whether or not non-Tecsys operators have access to Import File Mapping
(CC83). There are 3 options available from the drop down list:
- Initial Setup - this option is the default when the Customer is being installed. Access to CC83 is available with this option.
- Enable - once the installation is complete, and the client has signed the necessary CC83 authorization document, a Tecsys operator can select this option to enable CC83 at the client site. For more information on the authorization document, click here.
- Disable - once the installation is complete, if the client has not signed the necessary CC83 authorization document, a Tecsys operator can select this option to make CC83 inaccessible to users at the client site. For more information on the authorization document, click here.
Note: Tecsys operators will have access to to CC83 regardless of the flag setting in CC95.
- Initial Setup - this option is the default when the Customer is being installed. Access to CC83 is available with this option.
- In the Products section:
- Internet Address Prefix - this field works with the 'Internet' field in Maintain Inventory Master (IM13/Misc folder 'e-Address' section). Enter the URL to which the hyperlink value (entered in IM13) will be added. For example, the exact web page you want to point to is http://www.tecsys.com/products/wms.shtml. In this field, you enter http://www.tecsys.com/products/ which is the Prefix Address for all Product references, and in the IM13 'Internet' field for the appropriate Product, you enter wms.shtml.
Products on the Internet can be viewed via:
- Display Product Availability (IC45/'More' menu item/'Web' option)
- Enter Orders/Quotes (OE30
 icon)
icon)
- Enter Inv/Direct Bills/Credits (IN41 icon)
- Enter Cash Counter Invoices (RS41 icon)
You do not have to use this feature. You can enter all of the URL information directly into IM13; however, should the URL change you will have to change the reference on every Product. Utilizing CC95 ensures that you will only have to make the change once.
- Intranet Address Prefix - this field works with the 'Intranet' field in IM13/Misc folder. Enter the URL to which the hyperlink value entered in IM13 will be added. For example, the exact Intranet page you want to point your staff to is http://www. intranet.com/products/showcase.html. In this field, you enter http://www. intranet.com/products/ which is the Prefix Address for all Product references, and in the IM13 'Intranet' field for the appropriate Product, you enter showcase.htm.
Products on the Intranet can be viewed via:
- Display Product Availability (IC45/'More' menu item/'Intranet' option)
- Enter Orders/Quotes (OE30
 icon)
icon)
- Enter Inv/Direct Bills/Credits (IN41 icon)
- Enter Cash Counter Invoices (RS41
icon)
You do not have to use this feature. You can enter all of the URL information directly into IM13; however, should the URL change, you will have to change the reference on every Product. Utilizing CC95 ensures that you will only have to make the change once.
- Internet Address Prefix - this field works with the 'Internet' field in Maintain Inventory Master (IM13/Misc folder 'e-Address' section). Enter the URL to which the hyperlink value (entered in IM13) will be added. For example, the exact web page you want to point to is http://www.tecsys.com/products/wms.shtml. In this field, you enter http://www.tecsys.com/products/ which is the Prefix Address for all Product references, and in the IM13 'Internet' field for the appropriate Product, you enter wms.shtml.
Company Entry (CC95)
