Personalize a View
|
Index Search Criteria Search Results Sort Details "Save As" Functionality |
|
Additional Information Identifying Personalization Sections Setting up Permissions |
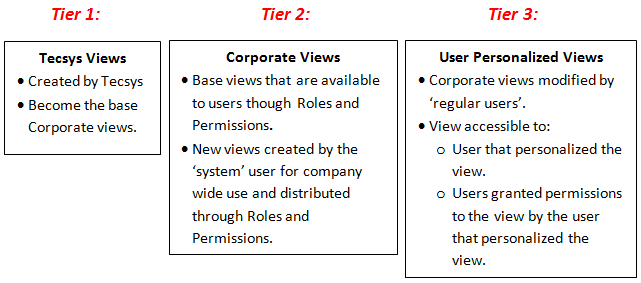
The views in PointForce iTopia are based on a 3-tier structure:
- Tecsys Views - views created by Tecsys as part of the base package and are assigned to Roles with read, execute, customize and export Permissions.
- Corporate Views - views created by Tecsys and the 'system' user that are used within your company and are assigned to Roles or Users with the appropriate Permissions.
- Personalized Views - views that are personalized by 'regular' users for their use.
The diagram below outlines how the three views fit into the 3-tiers in iTopia:
Once iTopia is installed at your site, only the 'system' and 'regular' users can create and/or modify views. New or modified views created by Tecsys must be 'pushed' out to your sight.
Note: If the system operator wants to delete a view and other users have personalized that view, the system operator can use the User View (user_view) view to determine the users that have personalized the view. Before the deletion can take place, the users must restore their personal views to the original view.
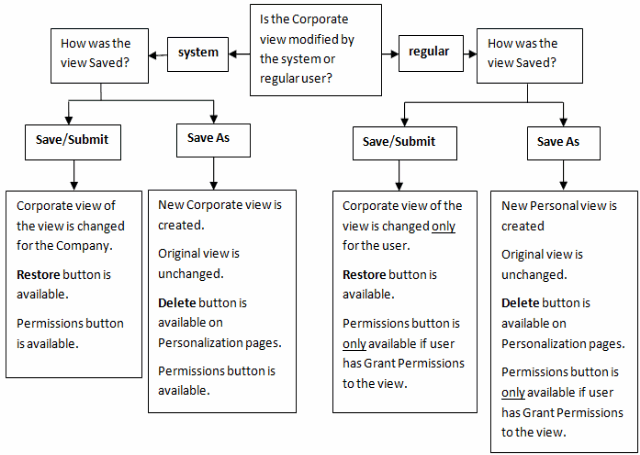
Restore/Delete Functionality:
When a view is modified the 'Delete' or 'Restore' buttons become available on the Personalization pages of the view depending on how the view was saved. The following diagram illustrates:
- The effect of modifying a view and saving the view using Save/Submit or Save As options from both the 'system' and 'regular' users point-of-view.
- When the Delete and Restore buttons are available.
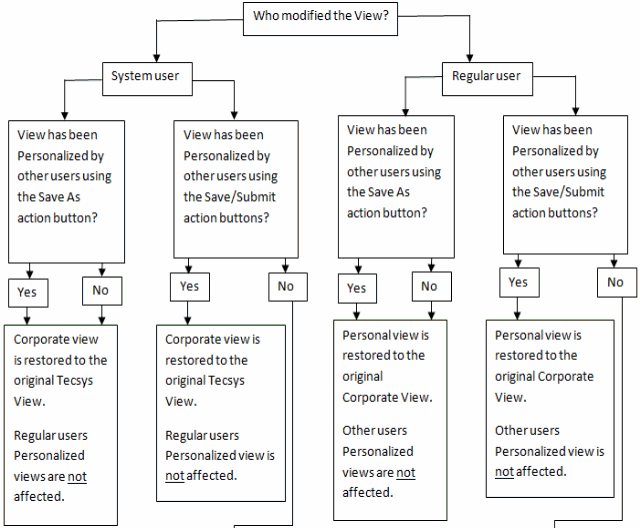
- Using the Restore action button:
The following diagram illustrates what occurs when the Restore action button is used from both the system and regular users point-of-view. The Restore button is only available when the view is saved using the Save or Submit action button on the Personalization pages.

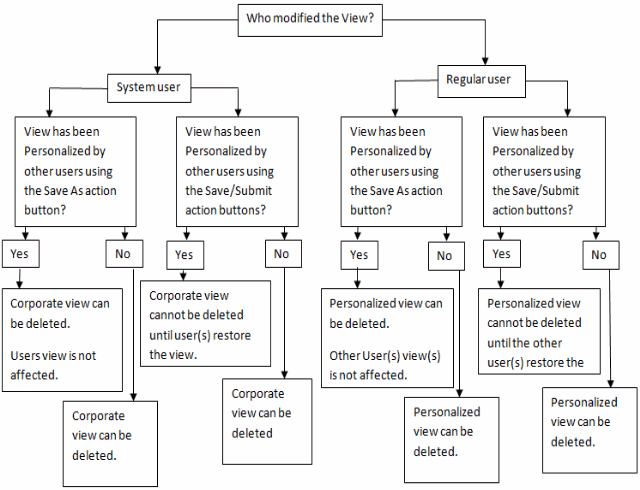
- Using the Delete action button:
The following diagram illustrates what occurs when the Delete action button is used from both the system and regular users point-of-view. The Delete button is only available when a view is saved using the Save As action button on the Personalization pages
Identifying a View's Personalization 'sections':
To personalize a view, click the Personalize action button available in the lower right-hand corner of the view's search criteria/grid page. Note: The Personalize action button is only available if you have the Customize operation for the selected view. See your system administrator if you require this functionality.You are presented with a page containing the four main criteria data elements in a view that can be tailored to suit your needs:
Select the folder that corresponds to the data elements that you want to personalize. You can personalize all four elements as required, but you must select one folder at a time.
The following screen captures from Display Orders/Orders-Products (OE45) in iTopia illustrate each section of the view that you can personalize:
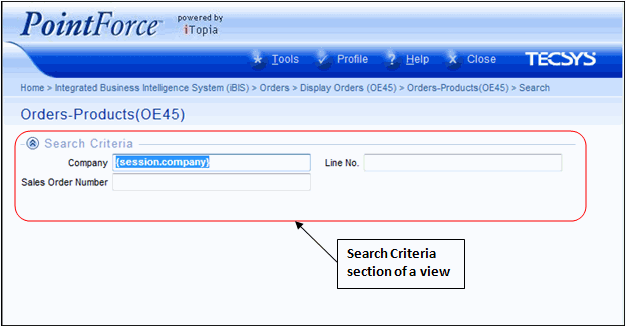
- The Search Criteria section is found at the top of the search criteria/grid page of a view and is used to search for information within the selected view. You can enter data into one or more of the available fields to narrow your search to particular results. The following example displays the Search Criteria section of a view:
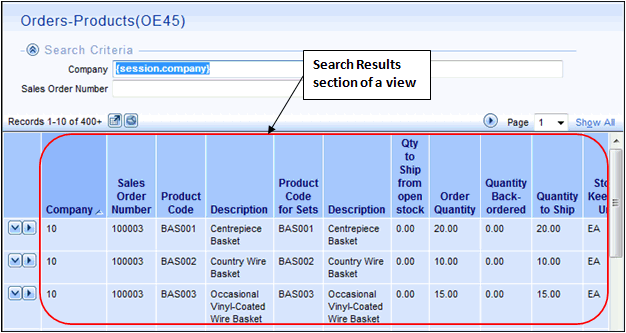
- The Search Results section is the grid section in the bottom section of the search criteria/grid page of a view. The columns are displayed in the order that they appear in on the Search Results folder. The following example displays the Search Results section of a view:
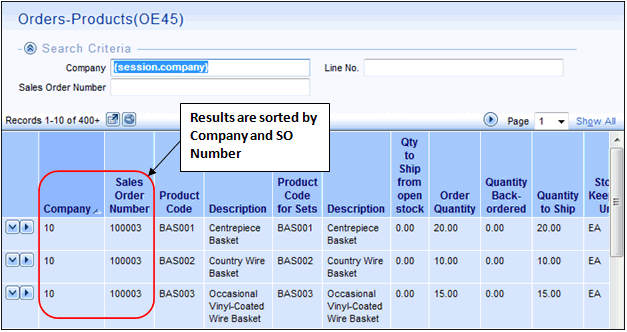
- The Sort, in the case of the Orders-Products (OE45) view, is currently set to sort the results by 'Company' and then by 'Sales Order' sequence (both in ascending order); in this example, there are no sub-totals selected with either sort field. The columns may be resorted to ascending or descending order by clicking on the column title of the view. The following example displays the Sort in the OE45 view:
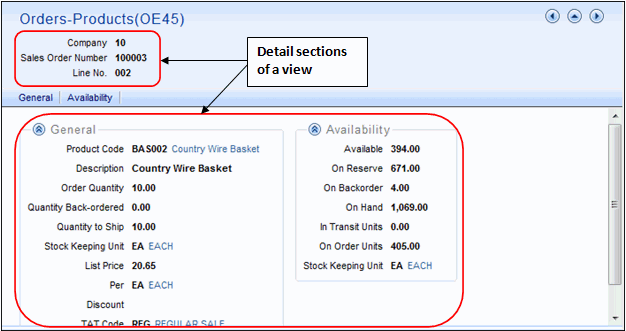
- There are two Detail sections which are found on the Details page of a view. The Main Context section (if any) displays key information about the selected detail row, for example the Company, Sales Order Number and Line No. The Main section displays the detail information for the selected detail row. The following example displays the Detail sections of a view: (depending on your user set up, you may or may not have access to personalize both sections)
Examples of a Personalized View:
In order to demonstrate the concept of personalizing view within the 3-tier structure of iTopia, we will walk through a very simple example using the Product Master (IM13) view. When you receive iTopia, the Tecsys version of IM13 looks like this (the data will be specific to your company):
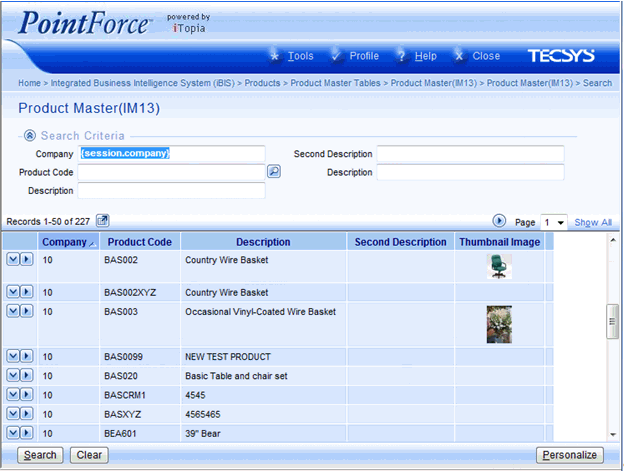
Tecsys View of Product Master (IM13)
- Let's say that at your company, you also want to see the Primary Supplier Code in both the Search Criteria and the Search Results sections of the IM13 view. In order to do this, the 'system user' will need to personalize the corporate view of IM13. Once the system user has personalized the Tecsys view, IM13 looks like this:
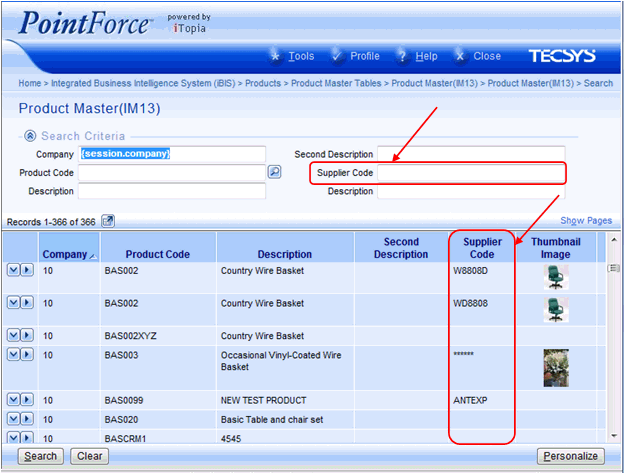 Personalized Corporate View of Product Master (IM13)
- All users at your site, that have access to the view, will see the Corporate view of the Product Master that includes the Supplier Code.
- With the Corporate view of the Product Master available at your site, anytime a user wants to personalize IM13, they will be working with the Corporate view that includes the Supplier code. Note: In order to personalize a view, the user must be assigned to the appropriate role with the correct permissions. For a detailed example on setting up a user with the appropriate permissions to access a view, click here.

