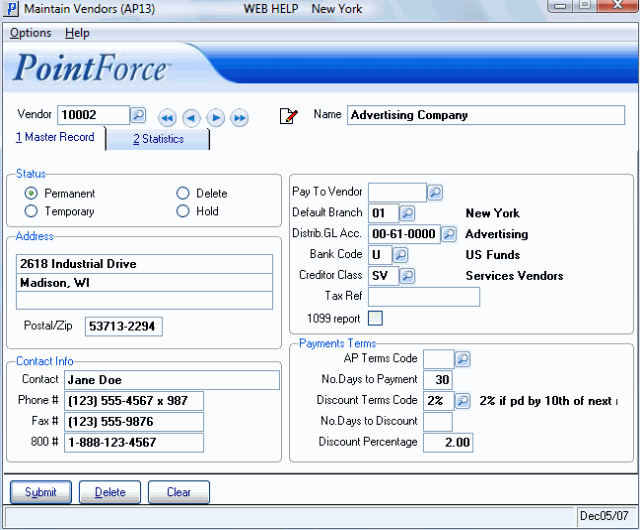
Master Record (AP13)
|
Additional Information Deleting Vendors Maintain Creditor Class Terms Condition Code Maintenance Vendor Account Coding Conventions |
The Master Record folder in Maintain Vendors (AP13) allows you to enter and/or update Vendor specific information for the Vendor selected in the Header record. You can delete Vendor records on this folder only when there are no Invoices or Check history on file for the Vendor.
The following list defines every field on the Master Record folder of AP13:
- In the Status section:
- You can assign one of the following status' to each Vendor:
- Permanent - Permanent vendors remain on file until they are deleted.
- Temporary - Temporary vendors with no invoice or check activity or this year (TY)/last year (LY) purchases history are automatically deleted by the Close AP Fiscal Period (AP89) program at month end.
- Delete - Vendors flagged for deletion area automatically deleted by AP89 at month end if no invoice/check activity or TY/LY purchases history are on file for that Vendor.
- Hold - Vendors on hold are excluded from check printing.
If a computer generated Check is required for a 'one-time' Vendor, that Vendor should be created with a Temporary status. This defines the Vendor record for Name and Address purposes, which are required for Check printing. The Vendor is automatically deleted once the Invoice/Check history is cleared (by Purge AP Invoice History (AP88)).
Manual Checks for one-time Suppliers can be processed as 'paid' Invoices against Vendor code 'MISCEL' using Enter Manual Checks/Adjustments (AP50). The Vendor code 'MISCEL' is automatically defined by the system. AP50 does not open folder 1 - Invoice; it goes directly to folder 2 for entry of the GL distribution accounts. If you enter the Payee name in the GL description field, the name will display on AP51.
A Vendor can be flagged for deletion by selecting Delete or by changing the Vendor Status to 'Delete', but the Vendor record is only deleted immediately if no Invoice/Check activity or history exist. AP89 will delete Vendors flagged for deletion automatically when they become eligible for deletion. AP89 will delete Vendors flagged for deletion automatically when they become eligible for deletion, meaning no invoice/check activity or TY/LY purchases history.
- Permanent - Permanent vendors remain on file until they are deleted.
- You can assign one of the following status' to each Vendor:
- In the Address section:
- Enter the Vendor's Address in the 3 available address lines. Excluding the Postal/Zip code.
- Postal/Zip - the Vendor's Postal or Zip code. A maximum of 10 characters can be entered in this field.
- Enter the Vendor's Address in the 3 available address lines. Excluding the Postal/Zip code.
- In the Contact Info section:
- Contact
- the name of the Contact for this Vendor. A maximum of 30 characters can be entered in this field.
- Phone # - the telephone number for the Vendor. A maximum of 20 characters can be entered in this field, for example (416) 756-1896 x 282.
- Fax # - the fax number for the Vendor. A maximum of 20 characters can be entered in this field.
- 800 # - the toll-free number for the Vendor. A maximum of 20 characters can be entered in this field.
- Contact
- the name of the Contact for this Vendor. A maximum of 30 characters can be entered in this field.
- Pay To Vendor - allows you to purchase goods and be Invoiced by one Vendor but re-direct the payment to a different Vendor for those goods. The Invoice is posted to and purchasing history is updated against the source Vendor's code. Invoices to be paid will report on the Cash Requirements report under the Pay To Vendor. The payment details are recorded against the Pay To Vendor. If a Pay To Vendor is established in AP13 for a Vendor, the Pay To Vendor will be used as the default Pay To Vendor in Enter Balances Forward (AP95), Enter Invoices (AP30) and Enter Manual Checks/Adjustment (AP50). If the Pay To Vendor is left blank, payments will be directed to the source Vendor.
- Enter or select from the query the Vendor code that will be the 'Pay To Vendor'. Note: The vendor entered in the Pay To Vendor field cannot be the same as the vendor entered in the header section.
- To delete a Vendor code from the 'Pay To Vendor' field, highlight the code and press the Delete key on the keyboard.
Vendor Pay To ABC XYZ Vendor ABC's invoices will be staged for payment to Vendor XYZ; they will not chain down to be paid to Vendor VISA. XYZ VISA Vendor XYZ's invoices will be staged for payment to Vendor VISA. VISA Vendor VISA will receive payment for XYZ's invoices only. - Enter or select from the query the Vendor code that will be the 'Pay To Vendor'. Note: The vendor entered in the Pay To Vendor field cannot be the same as the vendor entered in the header section.
- Default Branch - for Vendors that issue Invoices which are applied to the same Branch/Division every time an Invoice is processed, setting up a Default Branch in this field causes the 'Branch' field in AP30 to automatically display this default whenever the current Vendor is selected. AP83 can be restricted to report only those Vendors assigned to a specific branch.
- Distribution GL Account - when entering Invoices in AP30, the value of the Invoice is typically distributed across one or more General Ledger Accounts. If Invoices for this Vendor are consistently distributed to the same GL Account, enter that GL Account in this field and it will automatically display in AP30. Otherwise, leave this field blank. (The predefined GL Account can be overridden at any time in AP30.)
-
Note: If you attempt to delete a Distribution GL Account for a Vendor that is linked to a Royalty Rate in Maintain Royalty Rates (SA05), the following message displays: "This Licensor is linked to a royalty rate record from SA05. Deletion of the GL Account (Account Number displays) is not permitted. OK". Click OK to close the message window. To delete the Distribution GL Account, you must first remove the Vendor from all Royalty Rate codes in SA05.
- Bank Code - when Invoices are processed against this Vendor using AP30, the default Bank Code is taken from the Bank Code entered here. Note: The Bank Code assigned to a Vendor and a Pay To Vendor must be the same for the Check writing process.
- Creditor Class - Creditor Classes are created in Maintain Creditor Classes (AP07) and are assigned to Vendors in order to group them into logical classes for the AP83 report, which can be restricted by Creditor Class to study the liabilities by creditor type. Examples of creditor classification strategy include domestic versus foreign Vendors or inventory versus service Vendors.
- Tax Ref - the Tax Reference number, if applicable, for the Vendor. The information entered in this field prints on the 1099 report.
- 1099 Report - when this check box is selected, the 1099 report can be generated via 1099 Report (AP62) for this Vendor. The 1099 Report is a U.S. tax report that reports the details of payments made to Vendors for a specific date range. The 1099 Report can be produced for any Vendor at any time by simply turning this flag on.
- In the Payments Terms section:
The Cash Requirements Report (AP40) selects Invoices for payment based on their Payment Due date and qualifies Invoices for discount based on their Discount Date. Both dates are initially calculated from the 'Invoice Date' entered in in Enter Invoices (AP30). The calculation examines the Vendor's Payment Terms in AP13 to determine the initial setting of those dates. Once accurate Payment and Discount Due Dates are assigned, then you can take advantage of the automated Cash Requirements process.
Enterprise supports two methods of calculating the Payment and Discount Due Dates for a Vendor's Invoice:
- The 'Terms Condition Code' method allows you to calculate Payment and Discount Due Dates on 'X day of Y month following' values in the Terms Condition Code Maintenance (AP02) program. The Terms Code from AP02 is then assigned to the Vendor in AP13. An example of this type of Term is an Invoice due on the 30th of the following month.
- The 'Number of Days' method allows you to calculate Payment and Discount Due Dates by adding 'X number of days' to the Invoice date. And example of this type of Term is '2% 10, Net 30'.
Both the Payment and Discount Due Dates can be overridden on an Invoice by Invoice basis, if necessary.
Vendors that offer no Terms (i.e. payment is due upon receipt of Invoice) are set up with zero 'No. Days to Payment' and zero 'No. Days to Discount'. Any Invoices posted to a Vendor with no Terms generate a Payment Due Date in AP30 equal to the Invoice Date and are selected for payment in the next Cash Requirements cycle.
The following fields are available in the Payments Terms section:
- AP Terms Code - if the Vendor's normal payment Terms are based on 'X day of Y month following', for example the Invoice is due on the 30th of the following month, then those parameters are defined in AP02 and the Terms Code is assigned to the Vendor in this field.
- Enter or select from the query the appropriate Terms Condition Code for payment.
- If you want to use the 'Number of Days' method, leave this field blank and enter a value in the 'No. Days to Payment' field.
Note: An 'AP Terms Code' cannot be entered if the 'No. Days to Payment' field has a value in it and vice versa. You are allowed to assign one field or the other, but not both.
- No. Days to Payment - if this Vendor uses the 'Number of Days' method of calculating the Payment Due Date, then enter the number of days from the Invoice Date to determine the default Payment Due Date for this Vendor's Invoices.
- If the Invoice is due immediately, set this field to zero. The Payment Due Date will default to the Invoice Date and will be selected for payment in the next Cash Requirements cycle.
- If you want to use the 'AP Terms Code' method, leave this field blank and enter a value in the 'AP Terms Code' field.
Note: You cannot enter a value into the 'No. of Days to Payment' if the 'AP Terms Code' field has a value in it and vice versa. You are allowed to assign one field or the other, but not both.
- Discount Terms Code - If the Vendor's normal discount Terms are based on 'X day of Y month following', for example discount is eligible if paid on or before the 10th of the following month, then those parameters are defined in AP02 and the Terms Code is assigned to the Vendor in this field.
- Enter or select from the query the appropriate Terms Condition Code for payments.
- If you want to use the 'Number of Days' method, leave this field blank and enter a value in the 'No. Days to Discount field'.
Note: A 'Discount Terms Code' cannot be entered if the 'No. Days to Discount' field has a value in it and vice versa. You are allowed to assign one field or another, but not both.
- No. Days to Discount - if this Vendor uses the 'Number of Days' method of calculating the Discount Due Date, then enter the number of day s from the Invoice Date that are eligible. AP30 automatically adds the 'No. of Days to Discount' to the Invoice Date to determine the default Discount Due Date for this Vendor's Invoices.
- If no discount is offered, set this field to zero. The Discount Due Date defaults to the Invoice Date.
- If you want to use the 'Discount Terms Code' method, leave this field blank and enter a value in the 'Discount Terms Code' field.
Note: 'No Days to Discount' cannot be entered if the 'Discount Terms Code' field has a value in it and vice versa. You are allowed to assign one field or another, but not both.
- Discount Percentage - if this Vendor offers a standard discount for early payment, enter the Discount Percentage in this field. AP30 will apply the discount percent to the Net Invoice Amount (Gross Invoice Amount less any Taxes, as defined in CC00/Accounts Payable/Input Tax Credits). The anticipated Discount Amount is displayed but may be overridden, as required.
- The Discount Amount is memo information at this point. The expectation is that accurate Payment and Discount Due Dates will be assigned to the Invoice and that the Cash Requirements cycle will automatically select Invoices in time to take advantage of Vendor discount offerings. Based on that expectation, when the Invoice is paid, the discount will be taken even if the Discount Due Date has passed.
- The 'Terms Condition Code' method allows you to calculate Payment and Discount Due Dates on 'X day of Y month following' values in the Terms Condition Code Maintenance (AP02) program. The Terms Code from AP02 is then assigned to the Vendor in AP13. An example of this type of Term is an Invoice due on the 30th of the following month.
The Options drop down list on the top menu bar includes the 'Defaults' option. The 'Defaults' control the default field settings for new records created in AP13. You have two options:
- Set Operator
- Set Company
Depending on the option selected, each time a new Vendor is created, the defaults are retrieved from the Operator defaults if they exists, or from the Company defaults if they exist. If the option selected does not exist, the standard Enterprise defaults are used.
- Select 'Delete Operator' to stop the Operator's Defaults from being applied to the next Vendor created.
- Select 'Delete Company' to stop the Company's Defaults from being applied to the next Vendor created.
The following table outlines the functionality of each button on this folder:
| Button Label | Icon | Functionality |
| Submit |  |
Saves the information entered for the current Vendor. |
| Delete |  |
Deletes the current Vendor. Note: You cannot delete a Vendor if:
|
| Clear |  |
All fields on the Master Record folder of AP13 clear and you can begin adding a new Vendor. |
Maintain Vendors (AP13/Master Record)
