Search Criteria/Results Page
The Search Criteria/Results page consists of the following four sections:
- Search Criteria
- Grid Toolbar
- Search Results
- Actions Toolbar
Here is an example of the Search page:
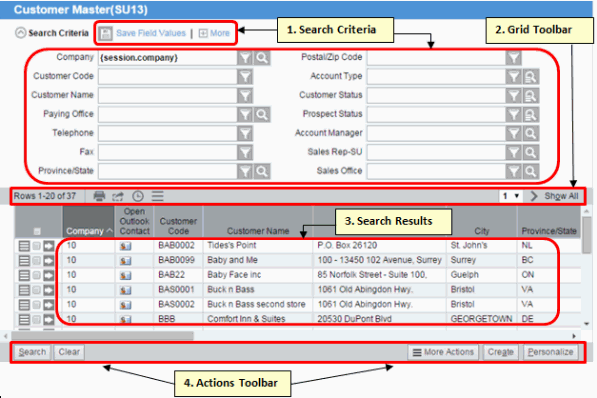
The following list defines each section on the Search page:
- Search Criteria - the fields in the search criteria section are used to filter the search results. If no criteria are specified, then the search result section displays all data. The following 'actions' allow you to modify the fields in the search criteria section:
- Save Field Values - allows you to save a value for a specific field in a specific view so that whenever to return to the view it is easy to retrieve the data you require. For example, let's assume that you always search for customers in sales office 01 in the Customer Master (SU13) view. Using the save field values action, you can save '01' in the sales office field so that every time you open the Customer Master view, you can quickly search for all customers with a sales office of 01.
To create a saved field value, follow these steps:
- Enter the value you require in the appropriate search criteria field. Following our example, enter 01 in the sales office field.
- Click on Save Field Values and the Save Field Values window opens. Enter the field and value you wish to save in the Name field, and then click Save. For example:

- Once the field value is saved, the action changes to:

- Click on the drop arrow and select the field/value saved. For example:

The following options are available by clicking on the
 icon:
icon:
- Save Field Values - follow the steps above to save a field value.
- Save Field Value As - allows you to modify the saved field value.
- Delete - deletes the saved field value.
Note: The save field values functionality is set up on a view by view basis and is only available for the user that set up the save field.
- Enter the value you require in the appropriate search criteria field. Following our example, enter 01 in the sales office field.
- More - this action toggles to Less; click More in order to display the complete list of search criteria available. To return to the original search criteria list, click Less.
The fields in the search criteria section may contain the following search tool icons:
- Show Criteria Helpers
 - each field in the search criteria section of every view has the show criteria helpers icon. When you click on this icon, a list of options displays, depending on the type of criteria selected. For example, if you click on this icon and the field is a character based field, such as Customer Code, the following list of 'helpers' displays:
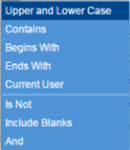
There are different helpers available for the different data types (character, date, number and time stamp).
- Execute Lookup
 - fields that are validated against an existing table have the execute lookup icon. When you click on the icon, the table view associated with the field opens allowing you to select a value from the base table.
- For example, the Province/State field in the Customer Master view has the execute lookup icon. When selected, the States and Provinces view opens.
- Calendar Tool
 - fields that pertain to date related data include the calendar tool icon. Use this icon to select a single date.
- Valid Values
 - fields with predefined fields include the valid values icon. Use this icon to display the valid selections for the search field.
- For example, the Account Type field in the Customer Master view has the valid values icon. When selected, the following options display: C - Customer, P - Prospect.
- Save Field Values - allows you to save a value for a specific field in a specific view so that whenever to return to the view it is easy to retrieve the data you require. For example, let's assume that you always search for customers in sales office 01 in the Customer Master (SU13) view. Using the save field values action, you can save '01' in the sales office field so that every time you open the Customer Master view, you can quickly search for all customers with a sales office of 01.
- Grid Toolbar - the Grid Toolbar identifies the number of records on the current page out of the total available records and offers one or more of the following options (depending on the view):
- Print
 - prints the records (and all of the fields) displayed in the search results section of the view.
- Export to Excel
 - enables you to export the current results set into Microsoft Excel, so that the data can be manipulated and/or formatted from within that application. The maximum number of records will be exported, in this case 400 records can be exported to Excel. If the current View has 400+ records, and you want to retrieve all the records, you must change the Maximum Records to Retrieve on the Search Results folder. Note: This option is only available to user names with permission to Export data to Excel.
- Timeline
 - displays events in a chronological order. When the icon is selected, each record becomes a timeline event. If a grouping is defined, the top-level group is used as the timeline band. The time scale adjusts automatically.
- Generate Graph
 - enables you to create a graph from the search results of any view that includes math-enabled fields. Depending on the relationship of your data-set and number of math-enabled fields in your search results, the characteristics of the graph generated will vary. Note: This option is only available when the View includes math-enabled fields.
- Use Selected Records as Criteria for Action
 - (this option is only available for views with 'Create', 'Update' and 'Delete' functionality) when you click on this icon, one or more of the following options display from the drop list:
- Edit All Records with Excel – opens an editable Excel spread sheet that contains all of the records retrieved from the search up to the quantity entered in the 'Maximum Search Results Records to Display' field for this user. Note:
This option is only available if Excel is installed on your PC and the user has been assigned the Web Services license.
- Update Field for All Records - a window opens with the following message: "Updating xxx Records in current view name)". The window includes a Field drop list that allows you to select the field you want to update. An input field automatically opens allowing you to enter the new information. Click Submit to update all of the records.
- Edit with Excel – opens an editable Excel spread sheet that contains all of the records selected from the grid. Note: This option is only available if Excel is installed on your PC and the user has been assigned the Web Services license.
- Delete – a window opens with the following message: "Are you sure you want to delete these records? Yes/No". If you select 'No', the window will close and the record is not deleted. If you select 'Yes' the record is be deleted. Note: Records will not be deleted if they are in use anywhere else in the system.
- Update Field – a window opens with the following message: "Updating x Records in (the current view name)". The window includes a Field drop list that allows you to select the field you want to update. An input field automatically opens allowing you to enter the new information. Click Submit to update the record.
Note: When using any of these options, you may inadvertently delete or modify records that you did not mean to change. The records can only be recovered to their original state from a backup of the system.
When you have multiple results pages, the Grid Toolbar offers you page/record navigation. Here is an example of the Grid Toolbar with multiple results pages:

- Records 21 - 40 of 400+ - displays the records listed on the current page, for example 'Records 21-40', and the total number of records found, for example 'of 400+'. The number of records that are initially retrieved and the maximum number to retrieve can be controlled through the Personalization of the view on the Search Results folder. For more information on Personalizing the Search Results folder, click here.
- Note: when a '+' displays beside the total number of records, then more records are in the View but only the indicated number of records are displayed in the View when 'Show All' is selected.
- Previous
 - performs one of the following:
- Displays the previous page of search results, when on a search criteria/results page;
- Is disabled/hidden if the first page is being accessed;
- Is not displayed if there is only one page in the search result set.
- Next
 - performs one of the following:
- Displays the next page of search results, when on a search criteria/results page;
- Is disabled/hidden if the last page is being accessed;
- Is not displayed if there is only one page in the search result set.
- Show All - displays all records in the current search result up to the maximum number of records. This option is not available if there is only one page in the search result set.
- Show Pages - appears once you click Show All, and returns you to the page-by-page navigation. Clicking on 'Show Pages' brings you back to 'Show All'. This option is not available if there is only one page in the search result set.
- Edit All Records with Excel – opens an editable Excel spread sheet that contains all of the records retrieved from the search up to the quantity entered in the 'Maximum Search Results Records to Display' field for this user. Note:
This option is only available if Excel is installed on your PC and the user has been assigned the Web Services license.
- Print
- Search Results - displays the records that match the search criteria query. The search results section is the bottom half of the view. Here's an example:

- Every column within the search criteria/Results can be sorted by ascending or descending order. Simply clicking on the column title, for example
 , allows you to change the sort from ascending to descending (and vice versa). An arrow displays next to the column title to indicate the sort order.
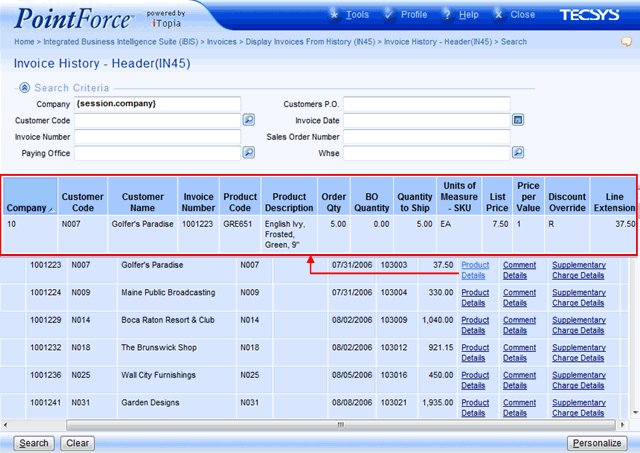
- When you hover over a link type field in the search results, the first 10 records (maximum) of the related view display. In the following example, the Product Details, Comment Detail and Supplementary Charge Details link type fields offer this hover over functionality. When you hover over the Product Details link, you will see the following information display:
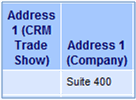
- If you include a column in the Search Results section that exists in more than one table, the table name also displays in the column name. For example, the Address 1 field exists in two tables. When you add this column (field) through personalization, the table name displays beside the field name. Here is an example from the Customer Master search results section which illustrates that the Address 1 column exists in the CRM Trade Show table and in the Company table:
The following icons are available in the Search Results section of a view:
- Use Record as Criteria for Action
 - click this icon to open the Link To list. The 'Link To' list is unique for each View and offers an easy method to navigate to related views using key data elements from the current record. Here is an example of the menu that displays when you click 'Link To':
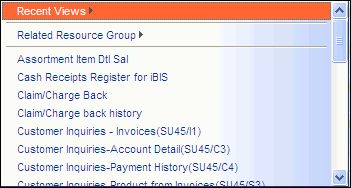
Example of the Link To menuNote: If the Search Results line is a Subtotals Only, Subtotals and Grand Totals or Grand Totals Only, the 'Use Record as Criteria for Action' icon is not available.
- Related Resource Group - when you click on this option, a list of views related to the current view through the Related Resource Group assigned on the Details folder on the Personalization pages display. For example, if you are in the 'Invoice Register' View, the Related Resource Group include the Invoice Register GL Detail, Invoice Register GL Summary, EFT Invoice Register and IN44 EFT Log. (These represent elements of the IN44 Register that were previously separated by page breaks in the hard copy report.) Note:
Not all Views will have a Related Resource Group set up.
- A list of views displays below the Related Resource Group. This is an alphabetical listing of related views, both personal and system, that have some relationship to the Search Results detail record display. For example, when you are on an Invoice Register detail record, you can link to the Customer Master View for the Customer on the Invoice.
- Edit with Excel – opens an editable Excel spread sheet that contains all of the records selected from the grid. Note: This option is only available if Excel is installed on your PC and the user has been assigned the Web Services license.
- Delete – a window opens with the following message: "Are you sure you want to delete these records? Yes/No". If you select 'No', the window will close and the record is not deleted. If you select 'Yes' the record is be deleted. Note: Records will not be deleted if they are in use anywhere else in the system.
- Update Field – a window opens with the following message: "Updating x Records in (the current view name)". The window includes a Field drop list that allows you to select the field you want to update. An input field automatically opens allowing you to enter the new information. Click Submit to update the record.
- Related Resource Group - when you click on this option, a list of views related to the current view through the Related Resource Group assigned on the Details folder on the Personalization pages display. For example, if you are in the 'Invoice Register' View, the Related Resource Group include the Invoice Register GL Detail, Invoice Register GL Summary, EFT Invoice Register and IN44 EFT Log. (These represent elements of the IN44 Register that were previously separated by page breaks in the hard copy report.) Note:
Not all Views will have a Related Resource Group set up.
- View Record Details
 - click this icon to open the Details Page for the current record in the Search Results list box. Note: If the Search Results line is a Subtotals Only, Subtotals and Grand Totals or Grand Totals Only, the 'View Record Details' icon is not available.
- Actions Toolbar - the Actions Toolbar for the search criteria/Results page contains the following icons:
- Search - initiates a database search for records matching the criteria selected in the search criteria section.
- Clear - clears the search criteria input fields.
- More Actions - allows you to select the 'Create Records with Excel' option which opens a blank Excel spread sheet. This blank spread sheet page only contains the headings from the search results page. The More Actions button is available on the Actions Toolbar only if the view has 'Maintain List' functionality.
- Create - if the view has 'Create', 'Update' and 'Delete' functionality, the Create button displays on the Actions Toolbar. When you click on Create, the 'Create' view opens allowing you to create a new record.
- Personalize - opens the Personalize window in a separate browser. This enables you to create custom or personalized output for the current View. Note: this option is only available to users with permission to customize Views.
- Search - initiates a database search for records matching the criteria selected in the search criteria section.

