How to Create a New Resource Group
In this topic, we will create a new resource group into which an individual resource (view) or another resource group can be added. Resource groups are used to group individual resources or other group resources. Resource groups are displayed on the PointForce iTopia menu system as folders.To create the new group resource, you must be logged in as the system administrator.
- You create a resource group using the Resources (md_resource) view (the Resource Group view is used to link a resource group to an individual resource or to another resource group). To open the Resources view, enter md_resource in the search field on the home menu page and then click Go.
- Click Create.
- The Resources > Create page opens.
- In the Resource Name field, enter the new resource group name. In this example, our resource group name is pfitopia_customer_express.
- Note: When assigning resource group names, we recommend that you prefix the name with your client code. Prefixing resource group names with your client code differentiates the resource groups that you create for your company from those created by PointForce iTopia. After your client code, seperate the text with underscores.
In this example, pfitopia is the client code and customer_express is the remainder of the resource name.
- When the resource name is entered, click Continue.
- The Detail page opens. There are only 2 mandatory fields on this page; for details on each field in the Resources view, please see the Resources topic.
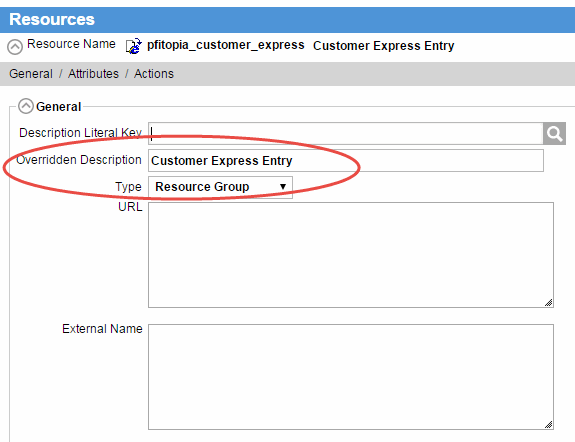
- Overridden Description - enter the actual name of the resource group. The text entered here displays on the iBIS menu for the resource group. For our example, we will enter Customer Express Entry
- Type - the type indicates the kind of resource being created. Using the drop arrow, select Resource Group.
Here is an example of the Details page:

- Overridden Description - enter the actual name of the resource group. The text entered here displays on the iBIS menu for the resource group. For our example, we will enter Customer Express Entry
- Click Submit.
- Close the Resources view.
- Next, we must add permissions to the resource group in order for other users to access this resource using the Role Permissions (md_permission) view. Specifically, we must add the Execute permission to the new Customer Express Entry resource group for the roles that we want to have access to this resource Group.
- To open the Role Permissions view, enter md_permission in the search field and then click Go.
- Click Create.
- On the Role Permissions > Create page, enter information for the following 3 fields. For details on each field in the Role Permissions view, please see the Role Permissions topic.
- Role Name - enter or select from the lookup the Role Name that you want to have access to the resource group. In this example, we will enter ibis_oe (Order Entry). Note:
You can only enter one Role name at a time. If you have multiple Roles to enter, you should use the Edit with Excel functionality.
- Resource Name - enter or select from the lookup the resource group to which the role will have access. In this example, we will enter pfitopia_customer_express.
- Operation Name - enter or select from the lookup the operation the role is granted for the resource group. In this example, we will enter Execute. Note: This is the only operation required for resource groups because users only need to open the resource to access the individual resources contained within the group.
Here is an example of the Role Master-Permission view:

- Role Name - enter or select from the lookup the Role Name that you want to have access to the resource group. In this example, we will enter ibis_oe (Order Entry). Note:
You can only enter one Role name at a time. If you have multiple Roles to enter, you should use the Edit with Excel functionality.
- Click Submit.
- Close the Role Permissions view.

