Bulk E-Mail (SU22)
|
Additional Information Maintain Customer Contacts (SU20) Maintain Customer Mailing List (SU21) |
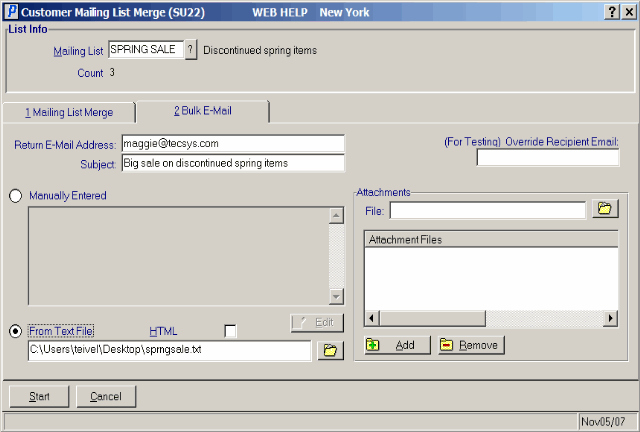
The Bulk E-Mail folder in Customer Mailing List Merge (SU22) program is used to create Bulk E-mail for the contacts assigned to the Mailing List entered in the header section.
The following list defines every field on the Bulk E-Mail folder:
- Return E-Mail Address: - enter the return e-mail address. The return e-mail address is automatically placed in the 'To:' line of a contact's reply to bulk e-mail messages sent to the current mailing list. You can enter a maximum of 64 alpha numeric characters in this field. Enter a valid e-mail address.
- A copy of the e-mail is also sent to the e-mail address entered in the return e-mail address field.
- Note: This field defaults to the e-mail address entered in the 'Return E-Mail Address' field in Maintain Customer Mailing List (SU21).
- A copy of the e-mail is also sent to the e-mail address entered in the return e-mail address field.
- Subject - this field is pre-populated with text entered in the 'E-Mail Subject' field from SU21 for the current mailing list. You can edit or override this text. You can enter a maximum of 64 alpha numeric characters in this field.
For more information on SU21, click here.
- (For Testing) Override Recipient Email: - this field allows you to send the bulk email to a 'test' e-mail address prior to sending the e-mail to the mailing list. Enter a valid e-mail address in this field.
- When an e-mail address is entered in this field, SU22 works as it normally would, except that the e-mail message only goes to the e-mail address entered in this field.
- Manually Entered - select this radio button to enter the body of the e-mail in the adjoining text box (located below this field). If you want a separate, larger window in which to manually enter the e-mail text, click Edit. For details on using the editor, click here.
- From Text File - select this radio button to send the bulk e-mail message from a file. When the 'From Text File' radio button is selected, you can enter the path to the file directly in the field below, or you can use the Browse File icon
 to browse to the file location.
- The file selected must have a .txt extension. Note: If you enter an invalid file, the following message displays when you click Start to begin the Bulk E-Mail : "Invalid File: file path\text file name. File not found or an error occurred while opening it. Please Correct File Name. OK". You must correct the problem and click Start again.
- When the 'From Text File' radio button is selected, the 'Manually Entered' radio button, associated text input area and Edit button are disabled.
- The file selected must have a .txt extension. Note: If you enter an invalid file, the following message displays when you click Start to begin the Bulk E-Mail : "Invalid File: file path\text file name. File not found or an error occurred while opening it. Please Correct File Name. OK". You must correct the problem and click Start again.
- HTML
- when this check box is selected, you can include HTML in your e-mail and it will be resolved and displayed correctly for the recipients. If you don't select this check box, then any HTML will appear as it is and will not be resolved.
- Note: This check box works with both the 'Manually Entered' and 'From Text File' options.
- In the Attachments section you can add attachments that will be included with the Bulk E-Mail:
- File - if you have any attachments for your bulk e-mail, including pictures, sounds, documents, etc., you can enter the file name and location in this field OR you can click on the Browse File icon
 to browse to the file location.
- Click Add to add the file name to the Attachment Files list box. If you want to remove a file from the list box (and the bulk e-mail), click on Remove.
- You can add multiple attachment files to the bulk e-mail.
- Click Add to add the file name to the Attachment Files list box. If you want to remove a file from the list box (and the bulk e-mail), click on Remove.
- File - if you have any attachments for your bulk e-mail, including pictures, sounds, documents, etc., you can enter the file name and location in this field OR you can click on the Browse File icon
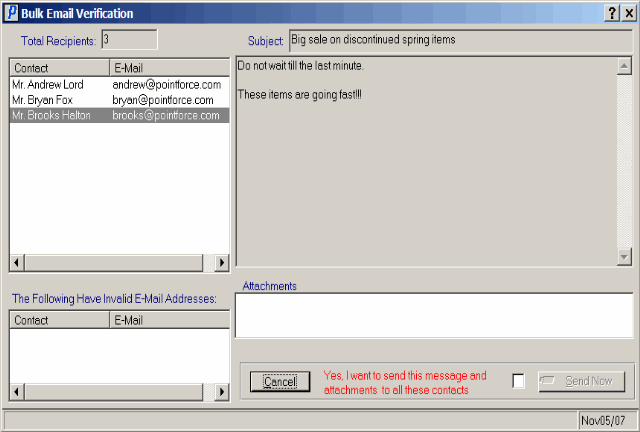
Once you click Start, the 'Bulk Email Verification' window opens:
- This window summarizes the action that is about to take place.
- The following information is provided:
- Total Recipients
- Subject
- Contact
- E-Mail Address
- Invalid Email Addresses
- Subject
- Text that makes up the body of the e-mail
- Attachment files
- If you are satisfied with the information displayed on the window, select the 'Yes, I want to send this message and attachments to all these contacts' check box and then click Send Now.
- If you want to cancel the bulk e-mail transaction, click Cancel. You are returned to the SU22/Bulk E-Mail folder where you can make any corrections that are required, and then re-start the process.
The following table outlines the functionality of each button on the Bulk E-Mail folder:
| Button Label | Icon | Functionality |
| Edit |  |
Opens the Editor window where you can enter the text for the bulk e-mail. For details on using the editor, click here. |
| Add |  |
Adds the current file attachment to the list box. Attachment files in the list box are added to the bulk e-mail. |
| Remove |  |
Removes the current file attachment from the list box. |
| Start |  |
Starts the Bulk E-Mail process. The Bulk Email Verification window opens. This windows displays the Total Recipients, Contacts, E-mail Address, Invalid E-mail addresses, Text and Attachments.
At the bottom of the window the follow options are available:
Once you click Send Now, SU22 sends the email to the contacts. A progress bar displays the email is processed. The time it takes to complete the process depends on the number of contacts the email is being sent to and the size of the email. |
| Cancel |  |
Closes SU22. |

Bulk E-Mail folder in Customer Mailing List Merge (SU22)

Bulk E-Mail Verification window

