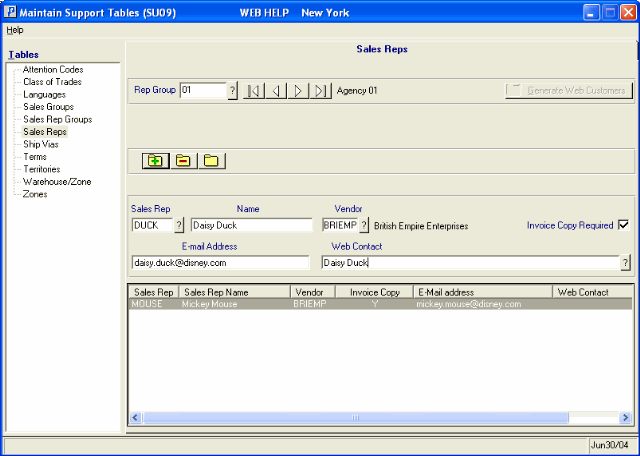
Sales Reps (SU09)
|
Additional Information Disqualification Messages |
Sales Reps are defined in SU09 and are assigned to the Customer in Maintain Customer Master (SU13/Info). This enables Customers to be reviewed and reports to be printed in Sales Rep/Customer sequence. The Sales Rep assigned to an Invoice is used to extract the appropriate Commission Rate.
The 'Sales Rep code' is made up of a Rep Group and a Sales Rep. The 'Rep Groups' are defined in SU09/Sales Rep Groups. The length of both fields is determined during your initial Enterprise set up. The Rep Group/Sales Rep combination can be a maximum of 8 alpha-numeric characters in length. Note: The Sales Rep field length can be from 4 to 7 characters and is displayed in Maintain Company (CC95). If a Sales Rep has a length of 6 and the total length of the Rep Group/Sales Rep is 8, then the Rep Group can be maximum of 2 characters in length.
Note: A Sales Rep can be assigned to multiple Rep Groups.
Creating or Modifying Sales Rep Codes:
- Enter or select from the query the Rep Group to which the Sales Rep belongs. The Rep Groups are defined in SU09/Sales Rep Groups. The Rep Group description automatically displays.
- Enter or select from the query the Sales Rep code. If no Sales Reps are in the Group, the query will be empty. The Sales Rep field length is defined in CC95. You may use an alpha-numeric combination. Each Customer is assigned a Sales Rep code in SU13, which becomes the default Sales Rep code on all new Sales Orders and Invoices. (This default can be overridden in OE30, IN41 and RS41.) The Sales Rep code is used to extract the appropriate Commission Rate and capture Commission statistics.
- Enter the Sales Rep name in the Name field. The name can be a maximum of 20 characters in length. You may use an alpha-numeric combination. This prints as a report sub-heading whenever an Account Receivable or Sales Analysis report is printed in Sales Rep sequence.
- Enter or select from the Query the Vendor code associated with this Sales Rep. The Vendor name automatically displays. Sales Reps can be set up as Vendors in Maintain Vendors (AP13) in order for their Commission to be run in an AP batch and a cheque prepared automatically. This interface occurs upon acceptance of the Unpaid Commission Report (SA56). Note: If you enter a Vendor that does not have a GL Account for Distrbution setup in Maintain Vendors (AP13) the message 'This vendor does not have a GL Account for Distribution. Please re-enter or add GL Account through AP13. OK' displays. Click 'OK' to clear the message and correct the problem.
- Select the Invoice Copy Required checkbox when printed copies of Invoices are required for the Sales Rep. You can print the Sales Reps copy of the Invoice through Print Sales-Rep Copy (IN51). Note: Invoice copies print for the Primary Salesrep only.
- Enter the Sales Rep's E-mail Address in the E-mail Address
field. When IN51 is set up to 'print' to E-mail, the Sales Rep's E-mail address entered here is the destination to which the E-mail is sent.
- The Web Contact field is optional. To link a Sales Rep code to a Web Contact enter or select from the query the appropriate Web Contact. The 'Contact Browser' window opens when you use the Web Contact query.
- Once a Web Contact is entered, the Sales Rep is associated with the Web Contact and the Generate Web Customers button becomes available.
- Click on the Generate Web Customers button in the Header section. The system searches through the entire 'Customer Masterfile' (SU13) for Customers that the Sales Rep is attached to. Each Customer found is automatically linked to the Web Contact and can be used with the Evolve-based web site. The following message displays: "### web accounts checked or added to Web Contact Name. Please review via CM10 - Customer Accounts folder. OK". Click OK to close the message window.
- If less than 10 Customers are linked to the Web Contact, then each Customer's Statement of Account, Invoice History, Sales Orders in Process and Account-based Favourites lists are available for viewing. (This assumes that all of the systems are active on the Web Contact's profile.)
- If more than 10 Customers are linked to the Web Contact, then the Web Contact can search for each Customer by Account ID, Account Name or Postal/Zip Code.
- Once a Web Contact is entered, the Sales Rep is associated with the Web Contact and the Generate Web Customers button becomes available.
- Click Update to add this code to the system. The Sales Rep list box displays the new/edited information.
Note: If a Sales Rep is assigned to multiple Groups, modifications made to the Sales Rep in one Group will not affect the Sales Rep in the other Groups. For example, Sales Rep AB is in Group XX and YY. Modifications made to Sales Rep AB in Group XX will not affect Sales Rep AB in Group YY.
- Modifications made to the initial set up of the Sales Rep i.e. Sales Rep AB is originally set up in Group ZZ, will cause the defaults for Sales Rep AB to also change whenever AB is used in a new Rep Group/Sales Rep combination.
Deleting a Sales Rep Code:
- Enter or select from the query the appropriate Rep Group.
- Double click on the Sales Rep line from the list box or you can enter or select from the query the appropriate Sales Rep code.
- Click Delete to remove the code from the system.
Note: If this code is in use by another program(s) in Enterprise, you may not be able to delete it. In this case, a message displays indicating the reason why the code cannot be deleted. For a list of disqualification messages, click here.

SU09/Sales Reps
