Maintain Operator Controls (PS11)
|
Additional Information Packing Station Scale Setup Troubleshooting PS11 |
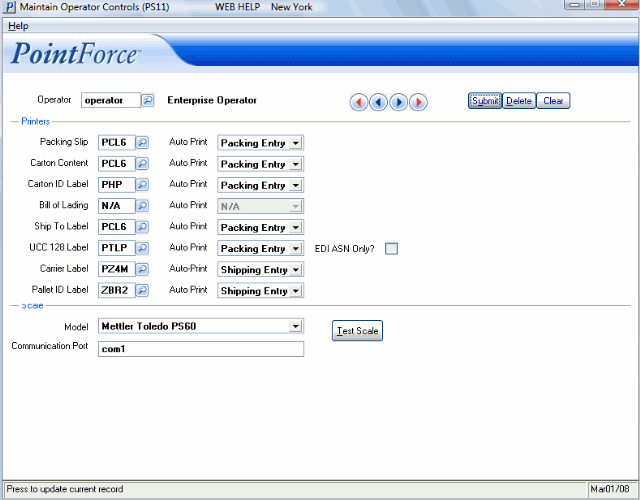
The Maintain Operator Controls (PS11) assigns the printer control for Packing Entry (PS30) and Shipping Entry (PS41) forms and labels to each Operator ID. In addition to defining the printers, you can also set the option to have the form or label automatically print in PS30 or PS41 using the Auto Print setting. If you are using a Scale with PS41, the Scale specifications are entered here.
In order to make Packing Station easy and efficient to use, PS11 predefines the list of printers associated with each workstation. When the Packer/Shipper initiates a request to print a form or label during Packing Entry (PS30) or Shipping Entry (PS41), the normal Enterprise printer selection screen is bypassed. Instead, the print request is sent directly to the printer associated with the Operator ID. When the Packer or Shipper clicks the form or label Print button in PS30 or PS41, the form/label is sent directly to the selected printer (as defined by the Operator ID). There is no secondary window requesting the Packer or Shipper to select a printer.
The list below defines every field on the Maintain Operator Controls screen:
- Operator - identifies the Operator ID maintained in Maintain Operator Password/Privilege (CC03).
- Enter or select from the query the Operator ID for which the printers are defined.
- Printers - identifying the Printers and setting up Auto Print are two related components:
- To identify the form(s) and label(s) that you want to print, click on the query associated with the appropriate form/label and select a printer from the list. The printer list is defined in Maintain Printer Defaults (CC97).
- The printer list is utilized by the Operator ID from Enterprise and not by the Packer ID/Shipper ID.
Note: If you leave the field set to N/A, then no printer is assigned to the form/label. The form/label print button is disabled in PS30, PS41 and Display Packing/Shipment Info (PS45).
The selection of forms and labels that have Operator specific printers are:
- Packing Slip
- Carton Content
- Carton ID Label
- Bill of Lading
- Ship To Label
- UCC128 Label
- Carrier Label
- Pallet ID Label
- Auto Print indicates whether the form will be sent to print automatically in PS30/PS41. When the Auto Print is selected, the form/label is sent to the assigned printer without Operator input. Auto Print options are:
- N/A - Auto Print is inactive and the form can only be printed using the appropriate print button in PS30/PS41.
- Packing Entry - form/label prints automatically only in PS30. This includes Quick Ship.
- Shipping Entry - form/label prints automatically only in PS41.
- The Auto Print feature is invoked for the forms/labels as outlined in the table below:
Form/Label Trigger Packing/Shipping Packing Slip Close Pack/Review folder
Hold Pack/ReviewPacking Carton Content Close Pack/Review
Hold Pack/ReviewPacking Carton ID Label New Carton/Carton Details Packing Bill of Lading Close Quick Ship
Close ShipmentPacking
ShippingShip To Label Close Quick Ship
Close ShipmentPacking
ShippingUCC128 Label Close Quick Ship
Close ShipmentPacking
ShippingEDI Only? If you are using the EDI module in Enterprise, this check box displays. When 'EDI Only' is selected, the UCC128 Label prints automatically for EDI Shipments only in either Packing Entry or Shipping Entry. Note: you must have Auto Print set to Packing or Shipping in order to have access to this check box. Carrier Label TMS Save Shipment Shipping Pallet ID Label Create Pallet/Carton Details Shipping
- To identify the form(s) and label(s) that you want to print, click on the query associated with the appropriate form/label and select a printer from the list. The printer list is defined in Maintain Printer Defaults (CC97).
- Scale - identifies the specifications for the Scale used with PS30/PS41.
- Enter or select from the query the model of the Scale in the Model field, for example Mettler Toledo PS60 or Triner PC Series.
-
Note: The serial communication on the must be configured to use:
- Baud rate - 9600
- Bits - 8
- Parity - none
- Stop bits - 1
For more information on Packing Station scale set up, click here.
- Enter the Communication Port through which the Scale is connected to the local PC in the Communication Port field. TIP: The Communication Port is usually COM1 or COM2.
- When the Model and Communication Port are entered, click Test Scale. If the Test is successful, the following message displays: "Communication test with the scale was successful! OK". Click OK to close the message window.
The following message displays when Scale is not hooked up to the PC, when the wrong Com Port is entered, or when the Scale is not turned on: "No or invalid response received from the scale. Please check the following: The test must be performed from the computer that has the scale connected. The scale must be on the communication port specified. The scale must be turned on. OK". Click OK to close the message window. Correct the error(s) and perform the test again.
- Enter or select from the query the model of the Scale in the Model field, for example Mettler Toledo PS60 or Triner PC Series.

