The Batch Control in Enter Receipts/In-Transits (PO60) allows you to create new or modify existing Receipt or In-Transit batches (please note that Receipts can be modified only for Batches that are updated but not Received, and In-Transit batches can be modified only when they have not been Received using Receive In-Transits to Stock (PO63)). The Batch Control window automatically launches every time you open PO60.
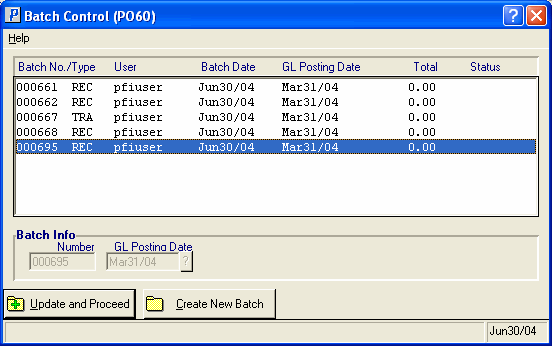
The list box displays the open batch number, type, user-ID used to create the batch, batch date, GL posting date, batch total and current status of the batch i.e. if the Batch in use by another operator.
Creating a New Batch:
- Click on Create New Batch.
- The GL Posting Date automatically populates with the system date when this date is within the current or next fiscal AP periods (as updated by AP89). If the date is outside of these periods, then the date defaults to either the 1st day of the current period or the last day of the next period. You can Tab through this field to accept the current date or you can enter/select from the query a new date.
For Receipt type Batches (selected later in this process) the GL Posting Date is also the inventory movement date.
- Click on Update and Proceed to continue creating the new Batch. The following message displays: "You are using batch # xxxxxx. OK". Click OK to close the message window.
- A confirmation message automatically displays: "The default batch type is 'RECEIPT'. Do you wish to switch to an 'INTRANSIT' batch type? Yes/No".
- Select Yes to create an in-transit batch type, meaning that when this batch is updated, the quantity in transit will be increased and quantity on order will be reduced; the receipt of an in-transit receipt is completed in Receive In-Transit to Stock (PO63).
- Select No to create a receipt batch type, meaning that when this batch is updated, quantity on hand will be increased and quantity on order will be reduced.
- Select Yes to create an in-transit batch type, meaning that when this batch is updated, the quantity in transit will be increased and quantity on order will be reduced; the receipt of an in-transit receipt is completed in Receive In-Transit to Stock (PO63).
- For Receipt Batch types, when the current Warehouse uses the Multi-Bin system, the following confirmation message displays: "Should all receipts be assigned to the General Receiving Area? Yes/No". Select Yes to receive all Receipts into the general receiving area. Select No to assign each Receipt line to one or more of the Multi-Bin locations.
Using an Existing Batch:
- From the batch number list box, highlight the batch with which you want to work. The list box contains the following fields:
- Batch No./Type - the batch number that was assigned when the batch was created and the batch type, either 'Rec' (Receipt) or 'Tra' (In-Transit).
- User - the operator-ID logged into PointForce Enterprise (PFE) when the batch was created.
- Batch Date - the batch date is the PFE system date on the day the Batch was created.
- GL Posting Date - the GL posting date is the date on which the receipt type batches will be journalized. This is the default GL Posting Date for all entries in this Batch. If you need to use multiple posting dates within the same batch, the GL posting date field can be changed for each invoice in the batch.
- Status
- the status displays the operator ID of the operator currently using the the batch. This field is blank if the batch is not currently in use by another operator.
- If an existing batch is in use by another operator, the following message displays: "Batch is in use by Operator ID. Select another batch. OK". Click OK to close the message window.
- If you open a batch created by another operator ID that is not in use, the following message displays: "Batch ###### belongs to UserID. Do you still wish to access this Batch? Yes/No". Select Yes to continue opening the batch. Select No to cancel the request and close the message window.
- If an existing batch is already in use by your operator ID, the following message displays: "Batch xxxxxx is in use. Are you sure you want this batch? Yes/No". Select No to cancel the request. Select Yes to open the batch.
- Caution: If you open the Batch a second time and try to access the same Invoice record that is already open, the following message displays: "Open invoice record ###### is locked by Operator ID (PO60) mmddyy hhmmss. You are not allowed access at this time. If your operator code is listed above, check the Windows Taskbar on your PC to see if you are running a second copy of PO60 and end the program. If another operator has set the lock, ask them to complete the update. If no one is running program PO60 listed above, then the PC running the program must have crashed or was shutdown without ending the program. Have our System Administrator release (end) the task in program CC48. OK". Click OK to close the message window.
- If an existing batch is in use by another operator and you wish to access that batch, confirm that the Batch is no longer in use by the operator and then open the batch as that same operator ID to access it.
- If an existing batch is in use by another operator, the following message displays: "Batch is in use by Operator ID. Select another batch. OK". Click OK to close the message window.
- Batch No./Type - the batch number that was assigned when the batch was created and the batch type, either 'Rec' (Receipt) or 'Tra' (In-Transit).
- Click on Update and Proceed to open the existing Batch.
- Note: The Batch Control record cannot be deleted. You can remove receipts from the Batch in PO60, but you cannot delete the Batch Control record. Once all receipts are removed from the Batch, the Batch no longer displays.
PO60 Batch Control
