Working With In-Transits
|
Additional Information Troubleshooting In-Transits |
Editing In-Transits that have been Updated in PO60:
If you have updated an In-Transit batch, but you have not processed the In-Transit through Receive In-Transits to Stock (PO63), you can recall the In-Transit for further editing in PO60.
- To open the In-Transit Batch, you must create a new Batch on the Batch Control (PO60) screen.
- Click Create New Batch and then click Update and Proceed.
- The following message displays: "The default batch type is 'RECEIPT'. Do you wish to switch to a 'INTRANSIT' batch type? Yes/No". Select Yes to switch to an In-Transit Batch type.
- In the Header section of Enter Receipts/In-Transits (PO60), enter the Receipt number for the In-Transit in the Receipt field. The following message displays: "This Intransit is currently active. Do you want to modify it? Yes/No". Select Yes to modify the active In-Transit.
- Make the necessary changes to the In-Transit and when all of the changes are complete, click Update Batch.
Note: If the in-transit you want to edit is currently being flushed in PO60, you cannot recall it.
Editing In-Transits that have NOT been Updated in PO60:
- On the Batch Control (PO60) screen, select the In-Transit from the list box and click Update and Proceed.
- In the Header section of PO60, enter the Receipt number in the Receipt field or enter the Supplier in the Supplier field and find the Receipt required using the VCR buttons.
- Make the necessary changes to the In-Transit and when all of the changes are complete, click Update Batch.
Deleting and Re-Instating Recalled In-Transits:
You can delete an In-Transit, and you can also re-instate the deleted In-Transit.
- Once an In-Transit is recalled, and you want to delete the transaction using the
 icon, the following message automatically displays: "Delete Header and all its details? Yes/No".
- Select No to cancel the delete request and return you to PO60.
- Select Yes to delete the Receipt for the In-Transit. The following message displays: "This is a recalled INTRANSIT. Do you want to Remove from Batch only? Yes/No/Cancel".
- Select Yes to remove the In-Transit from the current Batch only. The In-Transit will remain as an active In-Transit transaction, still available in PO63. You are simply undoing whatever you did to the In-Transit after you recalled it.
- Select No to remove the In-Transit from the Purchasing system entirely. The In-Transit will no longer be available in PO63. The products will remain on order.
- Select Yes to remove the In-Transit from the current Batch only. The In-Transit will remain as an active In-Transit transaction, still available in PO63. You are simply undoing whatever you did to the In-Transit after you recalled it.
- If you remove the In-Transit record from the current Batch only (i.e. select Yes
in step 3), and then you try to recall the In-Transit again, the following message displays: "This Intransit is currently active. Do you want to modify it? Yes/No".
- Select Yes to bring the In-Transit back into PO60.
- If you remove the In-Transit from the Purchasing system entirely (i.e. select No in step 3), and you try to recall the In-Transit again, the following message displays: "This INTRANSIT is scheduled to be deleted. Do you want to re-instate it? Yes/No".
- Select Yes to bring the In-Transit back into PO60.
In-Transits used with Order Management:
- This procedure involves recalling an In-Transit that has been guaranteed against an Order line. You must follow the first 3 steps for 'Editing In-Transits that have been Upated in PO60'. As a recap, here are the steps again:
- To open the In-Transit Batch, you must create a new Batch on the Batch Control (PO60) screen.
- Click Create New Batch and then click Update and Proceed.
- The following message displays: "The default batch type is 'RECEIPT'. Do you wish to switch to a 'INTRANSIT' batch type? Yes/No". Select Yes to switch to an In-Transit Batch type.
- In the Header section of Enter Receipts/In-Transits (PO60), enter the Receipt number for the In-Transit in the Receipt field. The following message displays: "This Intransit is currently active. Do you want to modify it? Yes/No". Select Yes to modify the active In-Transit.
- To open the In-Transit Batch, you must create a new Batch on the Batch Control (PO60) screen.
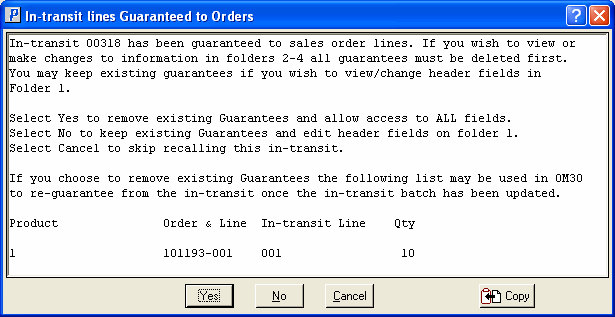
- When a Product on an In-Transit has been guaranteed against an Order line, the following message automatically displays:

The message includes 4 options:
- Yes
- No
- Cancel
- Copy
Select Yes to remove the Guarantee from the Order lines and open all fields for editing.
Select No to keep the existing Guarantees in OM30 and access to all fields on folder 1 in PO60.
Select Cancel to close the message window and clear PO60. The request has been cancelled.
Select Copy to copy the message to a clip board. The message also contains the Products that are guaranteed and other information that can be used to re-guarantee the Products to the Orders once the edits have been made.
- Once you have completed the edits to the In-Transit, click Update Batch.

