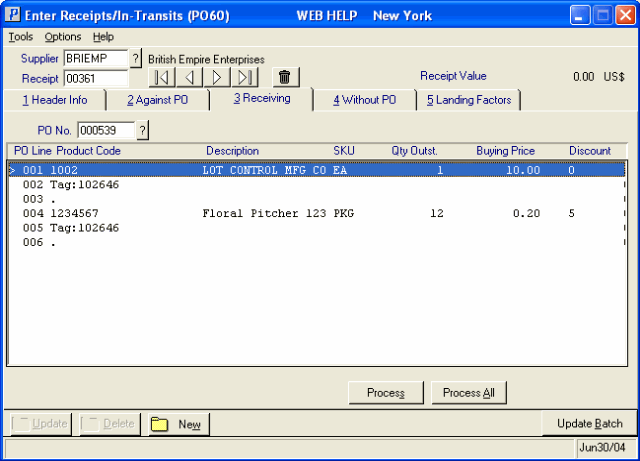
Receiving (PO60)
The Receiving folder in Enter Receipts/In-Transits (PO60) provides the most efficient way of processing transactions automatically based on existing Purchase Orders when there are minimal exceptions to the PO lines being received. For example, the PO lines on the Purchase Order are fully filled by the Supplier and pricing differences between the Purchase Order and the Supplier's documentation are minimal (or non existent).
- The Receiving folder allows you to select a Purchase Order and process one or more of the PO Lines displayed in the list box into a Receipt. Lines selected from the list can be Received by themselves using the Process option or all of the lines can be received using the Process All option.
The following list defines the fields on the Receiving folder:
- PO No. - enter or select from the query the Purchase Order number you want to Receive for the Supplier entered in the Header section. Once a valid Purchase Order is entered, the detail lines from the Purchase Order automatically display in the list box.
- If you try to access a Purchase Order that was created in a Warehouse other than the current Warehouse, the following message displays, "PO ## is for Warehouse x'. You can change Warehouses by clicking on Warehouse under the Options menu. You cannot, however, change Warehouses within the same Receipt.
- If you enter a PO number that is not associated with the current supplier, the following message displays: "Invalid PO Number for this Supplier. OK."
- If you enter a PO number for a product(s) in a different currency than the supplier (defaults from PO11; displayed on PO60/Header Info), the following message displays: "PO xxxxxx is in CA$ currency. It may not be added to the receipt. OK". You can change the currency on the Header Info folder and then re-enter the PO number.
- If you try to access a Purchase Order that was created in a Warehouse other than the current Warehouse, the following message displays, "PO ## is for Warehouse x'. You can change Warehouses by clicking on Warehouse under the Options menu. You cannot, however, change Warehouses within the same Receipt.
- PO Line List box - the list box displays all detail lines for the PO that are not yet processed or are not processed completely.
- If all of the detail lines are to be processed into a Receipt or In-Transit, click Process All.
- If not every detail line in the list box is to be processed, you must select the lines to be processed by double-clicking each line. As each line is selected, a ">" symbol displays to the left of the PO Line column. To de-select a line, double-click it again. When all of the lines are selected, click Process and only those lines selected are eligible for Receipt.
- Note: If one or more of the Products being processed is Lot or Serial controlled, the 'Receive Lot & Serial Numbers' window automatically opens to capture the required information. For more information on 'Receive Lot & Serial Numbers', click here.
- Note: If the current Warehouse is a Multi-Bin Warehouse and the General Receiving Area option is not selected, the 'Receive Lots & Serial Numbers' screen automatically opens to assign the Received quantities to Bin locations.
- If all of the detail lines are to be processed into a Receipt or In-Transit, click Process All.
The following table outlines the functionality of each button on the Receiving folder:
| Button Label | Icon | Functionality |
| Process |  |
Adds selected lines from the PO Line list box to the current Receipt. (Once the first line is Processed, a Receipt number is assigned to the transaction.) The List Box will no longer display the selected lines while the List Boxes on the 'Against PO' and 'Header Info' folders will display the Processed line(s). Note: Comment lines from the PO are not processed onto Receipts. |
| Process All |  |
Adds all of the lines from the PO Line list box to the current Receipt. (If the Receipt number has not been assigned, once the processing begins, the Receipt number is assigned to the transaction.) The List Box will no longer display the lines while the List Boxes on the 'Against PO' and 'Header Info' folders will display the Processed line(s). Note: Comment lines from the PO are not processed onto Receipts. You must enter a PO on the Receiving folder before you click Process All. If you leave the PO No. field blank, the 'Automatically Receive Inventory' window opens requiring you to enter the Purchase Order Number. |
For information on the functionality of the buttons in the header/footer sections of PO60, please see the PO60 Header section topic.

