Receive Lots and Serial Numbers
The Receive Lots and Serial Numbers window processes Receipts entered in Enter Receipts/In-Transits (PO60) for Products that employ the Lot/Serial Control features and/or for Warehouses that use the Multi-Bin system, when the 'General Receiving Area' option is not selected.
- Caution: If you interrupt the assignment of Lots/Serials/Multi-Bins while using one of the automatic Receiving methods, the processing will stop at that point. You will need to re-start the Receipt to process the remaining Purchase Order lines.
The following list defines every field on the 'Receive Lots and Serial Numbers' screen:
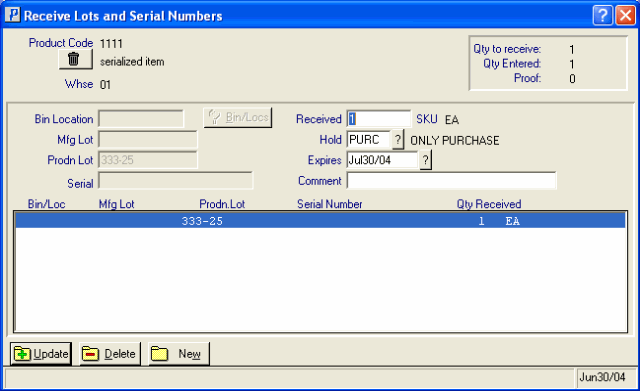
- Header Section - the 'Receive Lots and Serial Numbers' screen automatically opens with the Product Code, Description and Warehouse information displayed in the Header section.
- Proof Display section - the Proof Display section (in the top right corner of the window) includes the 'Qty to receive', 'Qty Entered' and 'Proof' fields. The information in this section informs you of the number of units from the Receipt Line that need to be assigned to Lots/Serials/Multi-Bins, the Quantity that are already entered, and the remaining Proof quantity that need to be assigned.
- Depending on the set up of the Product in Maintain Inventory Master (IM13/Stock), one of the following fields is available for data entry:
- Bin Location - click on Bin/Locs to select an existing Location.
- Mfg Lot
- Prodn Lot
- Serial - if you enter a serial number that already exists in the system the message 'That serial number is already in use' OK' displays. Click 'OK' to clear the message and enter a different serial number.
Enter the Bin Location, Lot or Serial Number into the available field.
- If you enter a Serial Number that already exists, the following message displays, "That serial number is already in use. OK". Click OK to close the message window and enter another Serial Number.
- If you enter a Lot Number that already exists, the following message displays, "This Lot exists. Add to it? Yes/No". Click Yes to proceed or No to enter a different Lot Number.
- Once a Lot or Serial designation has been assigned, you cannot modify it. If a change is required, you must delete the line from the list and then re-enter it.
- If you are receiving goods in the In-Transit mode for a Multi-bin Warehouse, you will not be able to select a Bin location for Products that are not Serialized or or Lot controlled. The Bin location will be assigned when Receive In-Transit to Stock (PO63) runs.
- If you are entering a Bin Location for a product in a Multi-bin Warehouse and the capacity of the Bin has been exceeded, the following message displays: "The capacity of this bin has been exceeded. Continue? Yes/No". Select No and then enter a new bin location or select Yes to continue with the current bin location.
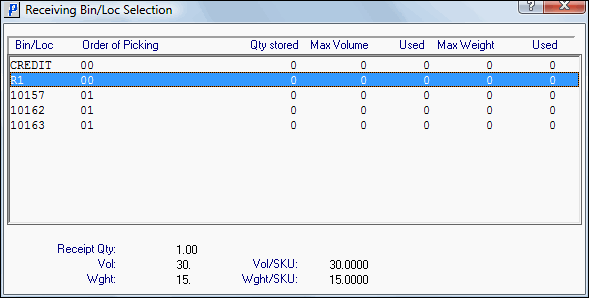
- In a Multi-bin Warehouse environment, when you click on the Bin/Locs button, the following window opens allowing you to select the appropriate bin location for the product being received:

- Received - enter the number of units being assigned to a Lot and/or Bin location. When processing Products under Serial Control, the quantity in this field is fixed at one unit as Serial Numbers are assigned to each Product unit.
- Hold - enter or select from the query a Hold flag associated with the current product's Bin/Lot/Serial Number. This allows the unit(s) to be held for the reason specified by the Hold flag. Hold flags are defined in Product Hold Flags (IM98).
- Selecting a Selling Hold represents the portion of the current on hand stock that is not available for sale because a serial number/lot/bin has been put on hold. The Quantity Available displayed at the top of IC45 is not reduced by this value, but it stops the Bin/Lot/Serial number from being selected in Order Entry/Invoicing.
- Selecting a Purchase Hold represents the portion of the current on hand stock that is not to be considered in repurchasing decisions because that product has been put on hold. The Quantity Available calculated by repurchasing routines will be reduced by this quantity.
- Once a Hold is selected, the Hold description appears to the right of the field.
- Note: The Hold applied to the Product displays on Enter Inventory Adjustments (IC50) and on Display Product Availability (IC45/V2).
- Selecting a Selling Hold represents the portion of the current on hand stock that is not available for sale because a serial number/lot/bin has been put on hold. The Quantity Available displayed at the top of IC45 is not reduced by this value, but it stops the Bin/Lot/Serial number from being selected in Order Entry/Invoicing.
- Expires - enter or select from the query the Expiration date associated with the Lot or Serial Number being processed.
- Note: The Expiry date associated with the Product displays on IC50 and on IC45/V2.
- Comment - enter a Comment for a Bin/Lot/Serial number. You can enter a maximum of 30 characters in the Comment field. Comments appear with the Lot/Serial for display and reporting purposes.
- Note: The Comments associated with the Product display on IC50 and on IC45/V2.
- Lot/Serial/Bin List Box - the list box displays the assignments made for this Receipt line. You can select an updated assignment for review or editing by double-clicking the line in the list box. You must update any changes before moving to the next item or exiting from this window.
Once all of the information is entered, either of these options occurs:
- If the Quantity to Receive equals the Quantity Entered, the following message displays: "The received quantity balances with the entered quantity. Continue entries? Yes/No". Select Yes to continue entering additional quantities received or select No to close this message window and return to the 'Against PO' or 'Without PO' folder (depending on the folder you entered the Bin/Lot/Serial Product from).
- If the Quantity to Receive does not equal the Quantity Entered, a message displays advising you of the difference (positive or negative) and asks either:
- "Add the difference of xx? Yes/No". Select Yes to add the difference or select No to return to PO60.
OR - "Cancel the difference of xx? Yes/No". Select Yes to cancel the difference and return to PO60 or select No to continue entering additional quantities.
- "Add the difference of xx? Yes/No". Select Yes to add the difference or select No to return to PO60.
The following table outlines the functionality of each button on the Receive Lots and Serial Numbers window folder:
| Button Label | Icon | Functionality |
| Delete All Records |  |
Deletes the record in the header section and all associated details. |
| Update |  |
Adds the detail line to the transaction. |
| Delete |  |
Removes the detail line from the transaction. |
| New |  |
Clears the Bin/Lot/Serial information so you may enter new a Bin Location, Lot or Serial number. |


