PointForce Enterprise 6.3 Client Update
(Version 1.0 as of September 2014)
| Important Note: You may require further consultation on the content of this document. You may not have the in-house expertise or the time to apply the instructions included with this document. Either way, Tecsys can help: just contact our support team at SMBSupport@Tecsys.com with a brief description of your issue(s) and one of our technical specialists will contact you directly. |
Overview
The PointForce Enterprise (PFE) Client Update makes the upgrade and installation process easy to perform. The following features have been added to the PointForce Enterprise Client Setup program:
- Single setup.exe performs all necessary installations.
- Employs the PVX Plus WindX Plug-in for Windows. No tracking of client-side licensing is required.
- Installation can be performed from network share using any one of the following:
- UNC path (Start, Run: \\Server\Share\Directory\Setup.exe).
- Mapped drive.
- CD-ROM.
- The first use of the installation program creates a WCSetup.ini file that retains the required connection information for the PointForce Enterprise Client. Once the WCSetup.ini has been created, the required information will be the defaults for subsequent installs. Novice end-users can perform their own installation/upgrade simply by pressing Enter a few times.
- The WCSetup.ini setup file can be edited like any other ini file or deleted if changes to the Client settings must be made.
- Creates PointForce Enterprise icons on the Start menu and on the Public Desktop.
- Program shortcuts & icons work out of the box, i.e. property editing is not necessary.
- Provides an uninstall option through the Add/Remove Control Panel.
PointForce Enterprise Client Setup Directory
All software required to install the PointForce Enterprise Client should be stored in a shared network folder so it is accessible to the workstations. This location will be known as the PointForce Enterprise Client Setup directory. For example, if you have a server named "Enterprise" and a shared directory on that server named "Install" where all your setup programs are stored, you can install the Enterprise Client simply by accessing the \\Enterprise\Install share using Microsoft Explorer.
This share is usually set up by Tecsys staff during the PointForce Enterprise installation.
PointForce Enterprise Client Deployment
There are two very important rules you must follow when installing the PointForce Enterprise Client:
- You must be logged onto the workstation with an account that has administrative privileges. This account can be a Local Administrator or a Domain Administrator.
- You must use "Run as administrator" to launch any setup program.
Starting with Vista, Microsoft has introduced the User Account Control (UAC) feature which is active by default. This feature provides added security for the users but does restrict access to system resources even for administrators. These restrictions include write access to certain areas of the Registry and the ability to break inherited file permissions.
The PointForce Enterprise Client Setup program includes a convenient configuration feature that remembers where your PointForce Enterprise Server is and how to connect to it. It makes deploying PointForce Enterprise Clients a simple and reliable process. To configure this feature you need only create or update a single PointForce Enterprise Client workstation by running the PointForce Enterprise Client Setup program (see below).
PointForce Enterprise Client Installation
Launch Microsoft Explorer (explorer.exe) and navigate to the PointForce Enterprise Client network share using either the server name or IP address:

- Right-click on the ECU_PXP10.2-6.exe program and select "Run as administrator".

- Click Next.

- Enter a User Name and Company and then click Next.

- Select 'Complete' (default) and then click Next.

- Click Install.

- The panel above displays and the installation process stops here. Note: In order to see the next panel, you must click and hold on the Title Bar on the panel above and move this panel aside. The panel below is hiding behind this panel.

- Click Next

- Select the radio button for the type of server on which Enterprise is installed and then click Next.

- Enter the NetBIOS name of the Enterprise server and its IP Address and then click Next.

- The Site Path is the location of the Enterprise files on the Enterprise server. The Port No is the base TCP port to be used by Enterprise (default=12000). This is the port that the NTHOST program is "listening" on. These fields are required when Enterprise is installed on a Windows server but are not required when Enterprise is installed on a Linux server. When the information on this panel is entered (as required), click Next.

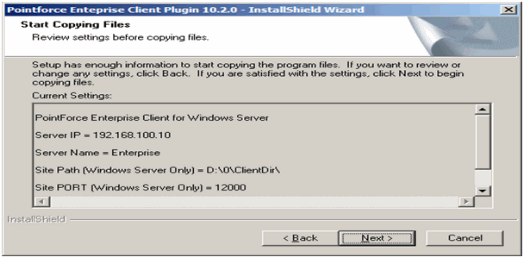
- This is a confirmation screen. Click Next.

- The client installation is now complete. Click Finish.
The first time you run the PointForce Enterprise Client Setup program, the WCSetup.ini file will be created in the PointForce Enterprise Client Setup directory. This assumes that the share permits writes to the directory on the server. The WCSetup.ini file will store the information entered during the first installation and will be used by the program to provide defaults on subsequent PointForce Enterprise Client installs.
On the next installation the responses will be: Next, Next, Next, Install, (move panel) Next, Next, Next, Next, Next, Finish.
WCSetup.ini Site Configuration File
The WCSetup.ini file can be edited if necessary using a text editor such as Notepad or it can be simply deleted so that these prompts will reappear and a new WCSetup.ini will be created. An example of the contents of the WCSetup.ini file for Windows server configuration follows:
-The Type is either "NT" (for Windows) or “UNIX” (for Linux/Unix).
-The PATH key in [Data] is only used for NT servers.
[Server]
IP=192.168.100.10
TYPE=NT
NAME=Enterprise
[Data]
PATH=D:\0\ClientDir
[Port]
PORT=12000

