Renaming UDFs for use in Existing Views
|
Index Adding a UDF to an Existing View Removing an Unused UDF |
This topic will walk you through the steps required to rename a UDF and make it available for use in an existing view. For a list of existing views that support UDFs, click here. Note: The UDF columns for package (existing) tables are also used by the custom developers at Tecsys SMB to accommodate any custom fields used at your site for tables maintained in iTopia. If the Client Specific Text does not match the Column Name, it may have been used by Tecsys SMB. Before modifying such columns, please contact Tecsys SMB Support. Please also note that any columns/fields that are related to tables associated with the CRM module will NOT be available in PointForce Enterprise.
-
Note: This topic assumes that you are logged into PointForce iTopia as the 'system' user.
Adding a UDF to an Existing View:
In this section, we will add a UDF which we will call "Current Vendors" to the Account Notes view (an existing view).
Follow these steps to rename a UDF and add it to an existing view:
- Open the Column-UDFs view using one of the following methods:
- Enter column.udfs in the Search field and then select Go
OR - From the menu, select Metadata Administration and then select the Column-UDFs view.
- Enter column.udfs in the Search field and then select Go
- When you initially open the Column-UDFs view, a warning message displays. Click OK to continue.
- Enter the Table Name you want to work with. In this case, we want to add the UDF to the Account Notes view. The table name for the Account Notes view is accnot (found by hovering over the Account Notes view on the 'Customer/Prospect Account Management' menu), so we will enter accnot in the Table Name field in the Search Criteria and initiate the search.
- Once the search is complete, the Search Results display in the grid. Here is an example of the Column-UDFs Search Results grid:
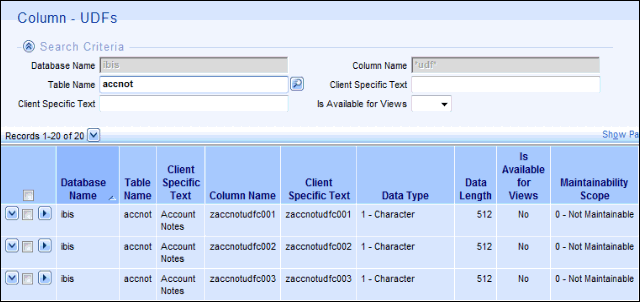
- For details on each of the columns in the grid, see the help for the Column-UDF view.
- Five character based fields that allow you to define fields of up to 512 characters of input.
- Five date based fields that allow you to define calendar date input fields.
- Five fixed decimal fields that allow you to define numeric value input fields with 2 decimal places.
- Five boolean character fields that allow you define Yes/No input fields.
You must know the type of UDF you want to use in the table. Each table contains the following types of UDFs:
In this example, we want to make a Character field in the 'accnot' table available and maintainable in the Account Notes view, so we will use the 'zaccnotudfc001' column.
- In the Column-UDFs grid, we are going to edit the 'zaccnotudfc001' row:
- Change the Is Available for Views field to 'Yes' by double clicking on this cell in the grid. This will allow the column to be selected from the 'Available Fields' list on the Personalization folders within the Account Notes view.
- Change the Maintainability Scope field to 'Maintainable' by double clicking on this cell in the grid and then clicking on the drop list. This will allow the column to be maintained in both create and edit modes.
- Make note of the Client Specific Text. Following our example, the Client Specific Text is 'zaccnotudfc001'. We will use this information to change the text to a more meaningful description in the Literal-Text view.
- Change the Is Available for Views field to 'Yes' by double clicking on this cell in the grid. This will allow the column to be selected from the 'Available Fields' list on the Personalization folders within the Account Notes view.
- Open the Literal-Text view which can be found under the Metadata Administration menu.
- In the Search Criteria section, enter the Client Specific Text in the Text field for the column we want to add to the view and then initiate the search. In this case, we will enter 'zaccnotudfc001' in the Text field:

- We are now going to open the Details page to edit a field. Note: You can edit the text directly in the Search Criteria results grid as well.
- Click on the 'View Record Details' icon
 to the left of the Text column.
- In the Text field, we will enter 'Current Vendors' (without the quotes). This will be added to the Account Notes view.
- Click Save to save the record.
- In the Search Criteria section, enter the Client Specific Text in the Text field for the column we want to add to the view and then initiate the search. In this case, we will enter 'zaccnotudfc001' in the Text field:
- Open the Refresh Data Dictionary and Literals view found under the Metadata Administration menu.
- Run this program by clicking on the 'Launch Reload Agent' link.
- When the Refresh is complete, you can close this view.
- Run this program by clicking on the 'Launch Reload Agent' link.
- We will now open the view we added the UDF column to. In this case, we will open the Account Notes view.
- From the 'Customer/Prospect Account Management' menu, select the Account Notes view.
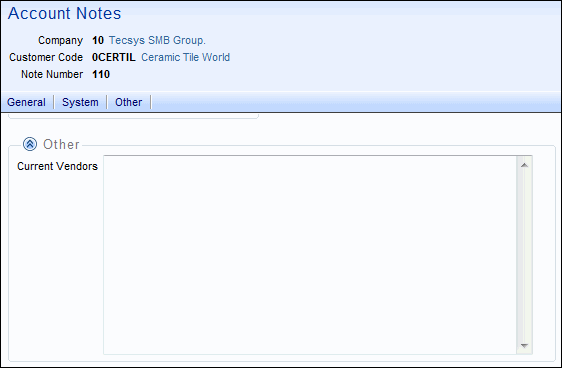
- Click on the Personalize button. The new field is now listed in the 'Available Fields' list box and can be added to the Search Criteria, Search Results and/or Details page of the view. In this case, we are going to add the new 'Current Vendors' column to the Details page in a new section called 'Other'.
- Click Submit to save you changes and return to the Search Results page.
- Click 'Search' on the search results page and select the 'View Record Details' icon for any record.
- The new field has been added to the Details page of the Account Notes view:
- From the 'Customer/Prospect Account Management' menu, select the Account Notes view.
Removing an Unused UDF:
You can remove a UDF field from a view in a PFE/iTopia table or in a User Defined table because the field is unused or for any other reason. Caution: Once the field is removed, all data entered for that field will be lost.
In this section, we will remove the "Current Vendors" UDF we added to the Account Notes view in the previous section.
Follow these steps to remove a UDF field(s) from an existing view:
- Using the Personalization option on the view in which the UDF field resides, remove the UDF field from the Search Criteria, Search Results and/or Detail pages. Warning: You must remove the UDF field from the view before you execute steps 3 and 4.
- Following our example, open the Account Notes view found under the 'Customer/Prospect Account Management' menu and then click on the Personalization button.
- We added the 'Current Vendors' field to the Details page, so we must remove it from this page. Click on the Details folder and move the 'Current Vendors' field from the 'Show These Fields in this Order' list box back to the 'Available Fields' list box. Note: If you have added the UDF field to the Search Criteria and/or Search Results page, you must also remove it from these locations.
- Click Submit to save this change and return to the Search Results page.
- Following our example, open the Account Notes view found under the 'Customer/Prospect Account Management' menu and then click on the Personalization button.
- Open the Literal Text view which can be found under the Metadata Administration menu.
- We want to change the 'Text' for the en_CLIENT record back to the text used for the original UDF. If you do not recall what the original client specific text was, the following steps from our original 'Current Vendors' example will explain how to retrieve the information:
- Open the Column-UDFs view which can be found under the Metadata Administration menu.
- In the Column-UDFs view, search for the affected table. Following our example, we will search for the accnot (Account Notes) table. You will see the record with a 'Client Specific Text' field of 'Current Vendors'. The original client specific text is identical to the 'Column Name' for this record, but in upper-case.
- Open the Column-UDFs view which can be found under the Metadata Administration menu.
- We want to change the 'Text' for the en_CLIENT record back to the text used for the original UDF. If you do not recall what the original client specific text was, the following steps from our original 'Current Vendors' example will explain how to retrieve the information:
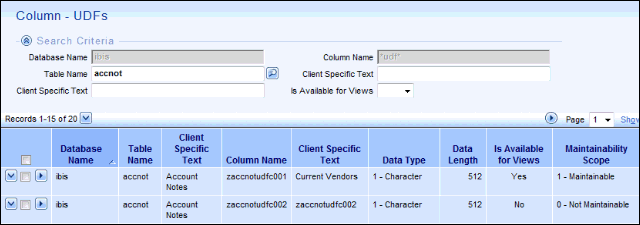
- You can see from the screen capture above that the Column Name associated with the Current Vendors record is 'zaccnotudfc001'.
- In the Literal Text view, enter 'ZACCNOTUDFC001' (without the quotes) in the 'Text' field for the en_CLIENT record.
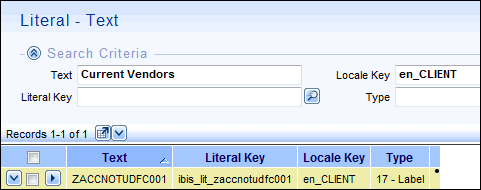
Here is an example of the Literal-Text view before the Text field is updated:
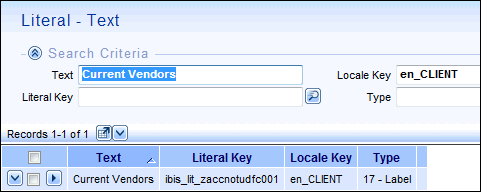
Here is an example of the Literal Text view after the original information is returned to the Text field:
-
Open the Column-UDFs view which can be found under the Metadata Administration menu (you may still have this view open from the previous step). Search for the affected table; following our example, we will search for the 'accnot' table (Account Notes).
- Change the 'Is Available for Views' field to No.
- Change the 'Maintainability Scope' field to 0 - Not Maintainable.
- Change the 'Is Available for Views' field to No.
- Open the Refresh Data Dictionary and Literals view found under the Metadata Administration menu.
- Run this program by clicking on the 'Launch Reload Agent' link.
- When the Refresh is complete, you can close this view.
- Run this program by clicking on the 'Launch Reload Agent' link.
- Once the refresh is complete, the 'Client Specific Text' will be restored back to the original data.
Note: If you have not removed the UDF field(s) from the view before modifying the 'Is Available for Views' and/or 'Is Available for Results' fields (in the Column–UDFs view) and running the Refresh Data Dictionary and Literals process, you will have issues on the personalization pages of the view in which the UDF field(s) reside. To correct the situation:
- Change the 'Is Available for Criteria' and/or 'Is Available for Results' fields in the Column – UDFs view for the affected table back to Yes
- Run the Refresh Data Dictionary and Literals again.
- You can now remove the UDF field from the view (start at step 1 and repeat all steps).

