How To Set up New Users
|
Additional Information User Master User Master – License User Master – Attribute User Master – Role Role Master Role Master – Permissions Summary |
The purpose of this help topic is assist you in setting up new users in PointForce iTopia (PFiT). Once created, the new user will be able to log into PFiT, perform the functions and access the views assigned to that user.
In order to correctly configure a user, you must add the user to the following views: (see details below)
- Create the user in the User Master view.
- Add licenses to the user in the User Master – License view.
- Add attributes to the user in the User Master – Attribute view.
- Add roles to the user in the User Master – Role view.
Prerequisites:
- Ensure that you are logged into PFiT as the user 'system'.
Procedure:
- Create the user in the User Master (md_user) view.
The new user will be set up using the copy function. Note: This topic describes requirements for setting up a new user. For more information on each of the fields in the User Master view, please see the User Master topic.
In order to create a new user, follow these steps:
- Open the User Master view using either of the following methods:
- Enter md_meta_user in the search field and click Go,
OR
- Select from the menu User Management System/Master Tables/User Master.

- Enter md_meta_user in the search field and click Go,
- Copy an existing user:
- Enter the user you wish to copy from in the user name field, and click Search. For example, we will use the user 'system' as the template from which to create (copy) the new user.

- Click the View Record Details
 icon to open the detail page for the record.
- When the detail page opens, click Copy.
- Creating the new user:
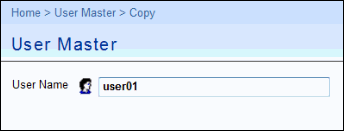
- On the copy page, enter the new user name in the user name field. For example, enter user01.
- Click Continue.

- On the copy page, enter the new user name in the user name field. For example, enter user01.
- Adding details to the new user:
-
Enter the mandatory fields for the user and any other information required. The mandatory fields are:
- First name
- Last name
- Locale (should always be en_client)
- Home resource name (should always be meta_ibis_user_home_menu)
- Click Submit.
- Note: If you do not enter a password, the user name is used as the password.
-
Enter the mandatory fields for the user and any other information required. The mandatory fields are:
- Open the User Master view using either of the following methods:

- Add licenses to the user in the User Master – License (md_user_license) view.
All licenses are from the ibis database.
There are 3 different types of licenses available:
- web_services – for users using edit with Excel in PFiT with maintainable views.
- full – for users allowed to view and maintain views in PFiT.
- read_only – for users allowed to view views in PFiT only. Note: The read_only license should never be combined with either the full or web_services licenses.
For more information on the User Master – License view, please see the User Master - License topic.
In order to add licenses to a user, follow these steps:
- Open the User Master – License view using one of the following methods:
- Enter md_meta_user_lic in the search field and click Go,
OR
- Select from the menu: User Management System/Master Tables/User Master-License
OR
- Select the License related resource from the User Master Detail page:

- Enter md_meta_user_lic in the search field and click Go,
- We are going to create license records for our new user (user01) based on the existing system user. On the User Master – License view:
- Enter system in the user name field and ibis in the database name field.
- Click Search.
- Two records will display:

- Select the records required for the new user. In this case, we want the full and web_services licenses.
- Click Use Selected Records as Criteria for Action
 icon, and then select the Edit with Excel option.
- Enter system in the user name field and ibis in the database name field.
- Excel opens with the records selected from the view:

- In this example, we are setting up user01. Change the User Name column from system to user01 and then click Save . Here is what the spread sheet looks like after clicking save:

- Once the records have been created, close the Excel spreadsheet (without saving it).
- When you return to iTopia, you must refresh the data in the User Master – License view to see the new licenses created for user01. Here are the licenses for the new user:

- Add attributes to the user in the User Master – Attribute (md_user_att) view.
Each user must be set up with two attribute keys:
- session.company – this attribute key determines the company that displays first when searching for records within views, for example, company 01 or company 10.
- session.ibis_client – this attribute key represents the environment or SQL database accessed by users in your company. When you enter your client code as the attribute value for the 'session.ibis_client', every user is then set up to default to your unique ibis_client code when data is retrieved from the database for every view. You may notice that the search criteria field for 'ibis_client' does not exist in any view; this is because the default is set here in the User Master-Attribute table to return only information that pertains to your client code.
For more information on the User Master – Attribute table, please see the User Master - Attribute topic.
In order to add attributes to a user, follow these steps:
- Open the User Master – Attribute view using one of the following methods:
- Enter md_user_att in the search field and click Go,
OR
- Select from the menu User Management System/Master Tables/User Master – Attribute,
OR
- Click on the Attribute link from the User Master detail page:

- Enter md_user_att in the search field and click Go,
- We are going to create attribute records for our new user (user01) based on the existing system user. On the User Master – Attribute view:
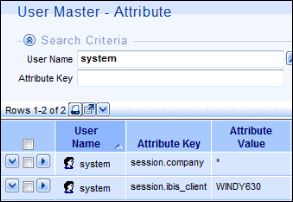
- Enter system in the user name field.
- Click Search.
- Two records will display:

- Select the checkbox for each record, click the Use Selected Records as Criteria for Action
 icon, and then select the Edit with Excel option.
- Enter system in the user name field.
- Excel opens with the records selected from the view:

- In this example, we are setting up user01. Change the User Name column from system to user01 and then click Save . Here is what the spread sheet looks like after clicking save:

- Once the records have been created, close the Excel spreadsheet (without saving it).
- When you return to iTopia, you must refresh the data in the User Master – Attribute view to see the new attributes created for user01. Here are the attributes for the new user:

- session.company – this attribute key determines the company that displays first when searching for records within views, for example, company 01 or company 10.
- Add roles to the user in the User Master – Role (md_user_role) view.
- Roles are applied to users to enable access to specific views.
- All roles that come preloaded with PFiT begin with ibis.
- Roles are created and maintained in the Role Master (md_role) view.
- Roles are based on resources (views) and the permissions granted to each resource. You can view all roles, resources and permissions supplied with PFiT, in the Role Master – Permissions Summary view.
- For example, PFiT ships with an AP role entitled: ibis_ap.
- This role is based on every resource (or view) that is associated with the AP module. This includes the ibis_ap33 (Freight Invoice Audit Trail) resource.
- The ibis_ap33 resource has the following permissions associated with it: execute, read, export and customize. You can see the permissions associated with this resource in the Role Master – Permissions Summary view:
- For example, PFiT ships with an AP role entitled: ibis_ap.
- Roles are applied to users to enable access to specific views.

- When a user is assigned the ibis_ap role, that user will have access to all of the resources (views) assigned to the role, including the ability to execute, read, export and customize AP33.
- Open the User Master – Role view using one of the following methods:
- Enter md_user_role in the search field and click Go,
OR
- Select from the menu User Management System/Master Tables/User Master – Role,
OR
- Click on the Role link from the User Master detail page:

- Enter md_user_role in the search field and click Go,
- To add a single role, use the create functionality by clicking on the Create button at the bottom right of the window.
- Enter the user name in the user name field, for example user01.
- Enter the role name in the role name field, for example ibis_ap.
- Click Submit.

- Enter the user name in the user name field, for example user01.
- To add multiple roles to a new user, use the edit with excel functionality:
- Open the User Master - Role view.
- Enter the user name from which you want to copy the roles in the user name field. For example, enter sample_user.
- Enter ibis* in the role name field.
- Click Search.
- The following results are returned (based on the sample_user):

- Open the User Master - Role view.
- Select the roles you want to apply to the new user by clicking the check box on each row.

- Click Use Selected Records as Criteria for Action
 icon, and then select the Edit with Excel option.
- Click Use Selected Records as Criteria for Action
- Excel opens with the records selected from the view:
For more information on the Role Master view, please see the Role Master topic, and for more information on the Role Master – Permission Summary view, please see the Role Master – Permissions Summary topic.
In order to add roles to a user, follow these steps based on both the create and edit with excel functionality:

- In this example, we are setting up user01. Change the User Name column from sample_user to user01 and then click Save. Here is what the spread sheet looks like after clicking save:

- Once the records have been created, close the Excel spreadsheet (without saving it).
- When you return to iTopia, you must refresh the data in the User Master – Role view to see the roles added to user01. Here are the roles for the new user:


