Creating User Master-Role Records via 'Copy':
Using the 'copy' method to create new User Master-Role records allows you to create records quickly and efficiently as only the fields that require a change from user to user need to be entered for each new record. You can, however, only copy one record at a time. If you want to create multiple records at the same time, we recommend that you use the 'edit with excel' method.The following list outlines the steps required to create a new User Master-Role record using the 'copy' method:
- Signed on as the system user, open the User Master-Role view by:
- Entering user_role in the Search field and then clicking Go.
OR - Selecting the User Management System folder on the main menu, then selecting the Master Tables folder and then selecting 'User Master-Role'.
- Entering user_role in the Search field and then clicking Go.
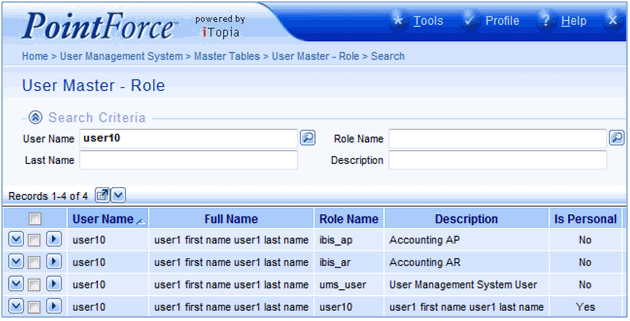
- Enter an existing user name in the User Name field in the Search Criteria section and then click Search.

User Master-Role - Search for an existing User record
- When using the Copy method of adding Roles to users, you should select a user that contains the same roles that you want to apply to the new user. You can also use the Copy method to add new roles to the current user.
- All users automatically own the 'ums_user' and 'personal' Role Names. These roles are automatically created when the user is set up in the User Master view:
- The 'personal' role cannot be deleted or added to another user.
- The 'ums_user' role cannot be deleted. This role enables the user some UMS capabilities like re-sequencing their personal views, setting portal parameters and setting display options for their views.
All other Roles can be applied to other users.
- Click on the View Record Details
 icon to open the Details page for the selected record.
- When the Details page opens, click the Copy button (found at the bottom right corner of the view).
- A new User Master-Role page displays with two mandatory fields (User Name and Role Name) and a Submit button.
Both of these fields contain the information copied from the original record. You can change either field as required:
- User Name - enter the user name to which the role is being applied or leave this field as is.
- Role Name - you can enter or select from the lookup a new Role Name or leave this field as is. Roles are created and maintained in the Role Master view. If you search through the existing roles and find that an appropriate role is not currently defined, then you must create a new role in the Role Master view before you can assign it to the new user. For more information on the Role Master view, click here.
- User Name - enter the user name to which the role is being applied or leave this field as is.
- When all of the changes are complete, click Submit.

User Master-Role - Modify the copied record
- Once the record is updated, you are returned to the User Master-Role page that contains the Submit button. At this point you can:
- Continue entering information and updating the records. Note: If you want the new user to have the same roles as the original user, you must repeat these steps for any remaining roles.
- Return to the Search Criteria/Results Grid.
- Close the User Master-Role view.
- Continue entering information and updating the records. Note: If you want the new user to have the same roles as the original user, you must repeat these steps for any remaining roles.

