Creating User Master-Restriction Records via 'Copy':
Using the 'copy' method to create new User Master-Restriction records allows you to create records quickly and efficiently as only the fields that require a change from user to user need to be entered for each new record. You can, however, only copy one record at a time. If you want to create multiple records at the same time, we recommend that you use the 'edit with excel' method.The following list outlines the steps required to create a new User Master-Restriction record using the 'copy' method:
- Signed on as the system user, open the User Master-Restriction view by:
- Entering user_domain_rls in the Search field and then clicking Go.
OR - Selecting the User Management System folder on the main menu, then selecting the Master Tables folder and then selecting 'User Master-Restriction'.
- Entering user_domain_rls in the Search field and then clicking Go.
- Enter an existing user name in the User Name field in the Search Criteria section and then click Search.
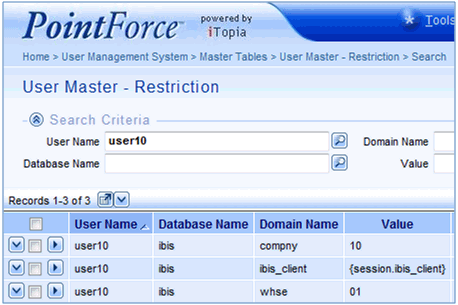
Search for an existing User/Restriction record
-
Note: When using this method of adding Restrictions to users you should select a user that contains the restrictions that you want to apply to another user.
- Click on the View Record Details
 icon to open the Details page for the selected record.
- Click on the View Record Details
- Click the Copy (found at the bottom right corner of the view).
- A new User Master-Restriction page opens with three mandatory fields (User Name, Database Name and Domain Name) and a Continue button.
All of these fields contain the information copied from the original record. You can change any of these fields:
- User Name - enter the user name for to which the restriction will be applied or you can leave this field as is.
- Database Name - enter or select from the lookup a new Database Name or you can leave this field as is. The following databases are available for use in the PointForce iTopia environment:
- ibis - contains your PointForce Enterprise data that resides in iTopia along with data generated and maintained in iTopia. The iBIS database contains all of the views available from the data stored in the tables. Note: For a typical user, enter the ibis database.
- meta - contains information about information. There are a series of tables which define all of the databases used by iTopia. These metadata tables define the database itself, along with the tables, columns and relationships between the tables. This information is also used by iTopia to generate views of data that are stored in the iBIS database.
- etrac - this database is available only if it is purchased separately. The etrac database is the shipment tracking database that is used for companies that have their own trucks for deliveries. The database tracks shipments, routes, etc.
- ibis - contains your PointForce Enterprise data that resides in iTopia along with data generated and maintained in iTopia. The iBIS database contains all of the views available from the data stored in the tables. Note: For a typical user, enter the ibis database.
- Domain Name
- enter or select from the lookup a Domain Name. The Domain Name is a unique identifier for a given domain and qualifies the domain usage or reflects the column that is referring to it. A single Domain Name can be related to several different Column Names, however the type of information in the columns, within the related tables, is all the same.
- For example, the Domain 'salrep' is associated with the Column Names 'salrep', 'sash1', and 'saso1'. The Column Name 'salrep' is located in the 'inih', 'sas' and 'sauc' tables (just to mention a few) while the Column Name 'sash1' is located in the 'sash' table and the Column Name 'saso1' is located in the 'saso' table.
- Even though the column names are different, they are all associated with the same domain. If you enter 'salrep' as the Domain Name, the restriction 'Value' that you enter affects the search results in all the tables/views containing the columns associated to that Domain Name.
- For example, the Domain 'salrep' is associated with the Column Names 'salrep', 'sash1', and 'saso1'. The Column Name 'salrep' is located in the 'inih', 'sas' and 'sauc' tables (just to mention a few) while the Column Name 'sash1' is located in the 'sash' table and the Column Name 'saso1' is located in the 'saso' table.
- User Name - enter the user name for to which the restriction will be applied or you can leave this field as is.
- When all of the changes are complete, click Continue.
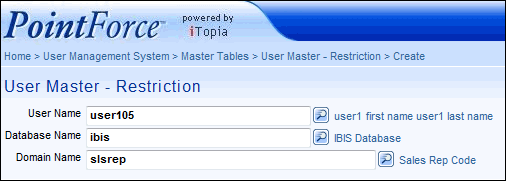
User Master-Restriction - Mandatory Fields
- A new User Master-Restriction page opens that contains the Value from the original record.
- Value - you can enter a new value or leave the original Value in this field. Values represent the actual data contained in the Columns.
- You can enter any QBE (Query by Example) expression, including processing instructions that represent the value(s) to which the user is restricted. For more information on QBE expressions, click here.
- For example, let's say you have entered user105 in the User Name field, ibis in the Database Name field, slsrep in the Domain Name field and =GRLA as the sales representative in the Value field. When user105 logs into iTopia and accesses any view/table that contains a column that is related to the Domain Name 'slsrep' only informaton for sales rep GRLA is displayed.
- Note: Most of the Values that you enter will be based on an actual data value in the column, however, if you are creating user restrictions for the 'ibis_client' Domain, you must enter the value as {session.ibis_client}. This value refers to the Attribute Value for the user in the User Master-Attribute view.
Adding a restriction puts an extra layer of security that prevents the user from accessing data from any other client site.
- You can enter any QBE (Query by Example) expression, including processing instructions that represent the value(s) to which the user is restricted. For more information on QBE expressions, click here.
- When all of the changes are complete, click Submit.
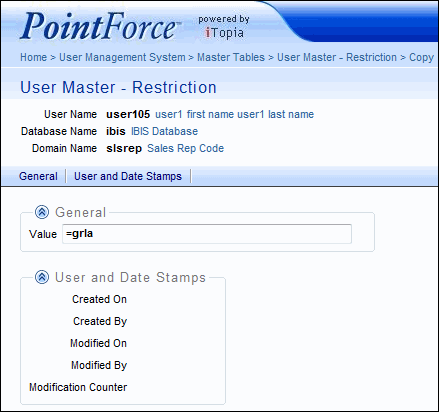
Enter a Value
- Once the record is updated you are returned to the User Master-Restriction page that contains the User Name, Database Name and Domain name. At this point you can:
- Continue entering information and updating the records.
- Return to the Search Criteria/Results Grid.
- Close the User Master-Restriction view.
- Value - you can enter a new value or leave the original Value in this field. Values represent the actual data contained in the Columns.

