Creating User Master-Attribute Records via 'Copy':
Using the 'copy' method to create new User Master-Attribute records allows you to create records quickly and efficiently as only the fields that require a change from user to user need to be entered for each new record. You can, however, only copy one record at a time. If you want to create multiple records at the same time, we recommend that you use the 'edit with excel' method.The following list outlines the steps required to create a new User Master-Attribute record using the 'copy' method:
- Signed on as the system user, open the User Master-Attribute view by:
- Entering user_att in the Search field and then clicking Go.
OR - Selecting the User Management System folder on the main menu, then selecting the Master Tables folder, and then selecting 'User Master-Attribute'.
- Entering user_att in the Search field and then clicking Go.
- Enter an existing user name in the User Name field in the Search Criteria section and click Search.
Note: Every user is comprised two Attribute Keys: 'session.company' and 'session.ibis_client' along with the appropriate Attribute Values. We recommend that you copy both of these records for a new user.
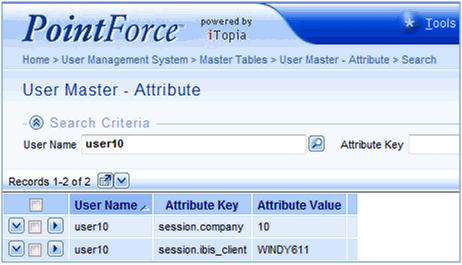
User Master-Attribute - Search for an existing User record
- Select the 'View Record Details' icon
 to open the Details page for the selected record.
- Select the 'View Record Details' icon
- When the User Master-Attribute Details page opens, click Copy (found at the bottom right corner of the view).
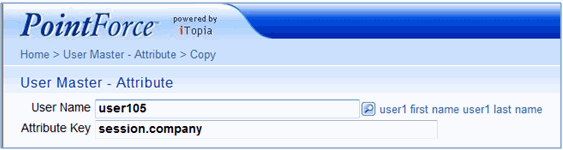
- A new User Master-Attribute page opens with two mandatory fields (User Name and Attribute Key) and a Continue button. Both of these fields contain the information copied from the original record. Since you are using the 'Copy' method, you only need to enter the User Name.
- User Name - enter the user name to which the Attribute Key will be applied.
- Attribute Key - leave this field as is. Note: We recommend that each user is set up with the following Attribute Keys:
- session.company - refers to the company number(s) set up for your Company. The attribute session.company is visible in the 'Company' field in the Search Criteria section of all views and displays as {session.company}.
- session.ibis_client - refers to your client code. The attribute session.ibis_client sets the default client that the user can access. Unlike the attribute session.company, this attribute is not visible in any view.
- User Name - enter the user name to which the Attribute Key will be applied.
- When the changes are complete, click Continue.
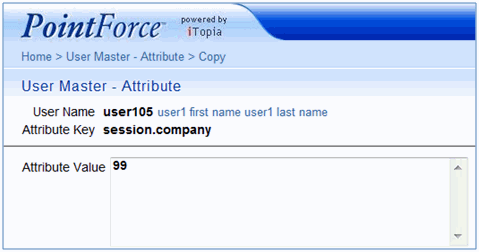
User Master-Attribute - Modify the copied record
- The User Master-Attribute Details page opens with the Attribute Value from the record that you are copying.
- Attribute Value
- enter the appropriate value in the text box or leave the existing value as is. The values entered are dependent on the Attribute Key you entered on the previous page. For example:
- 'session.company' - enter the company number(s) you want the user to have access to. You can enter an asterisk '*' for all companies, a single company number, or multiple company numbers separated by a comma(s). The values entered do NOT restrict the user from accessing information for various companies. The value(s) entered for the Attribute Key session.company only set the default for the company in each view. For example, if your business consists of companies 10, 99 and 20, and you enter:
- '10' as the Attribute Value, the user only sees records for company 10 based on the entered criteria when a search is initiated in any view, but the user can search for information on any company.
- '10' and '99' as the Attribute Value, the user sees records for both company 10 and 99 based on the entered criteria when a search is initiated in any view.
- '*' as the Attribute Value, the user sees records for all companies based on the entered criteria when a search is initiated in any view.
- '10' as the Attribute Value, the user only sees records for company 10 based on the entered criteria when a search is initiated in any view, but the user can search for information on any company.
- 'session.ibis_client' - enter your client code. Note: The 'session.ibis_client' Value is the same for all users.
- 'session.company' - enter the company number(s) you want the user to have access to. You can enter an asterisk '*' for all companies, a single company number, or multiple company numbers separated by a comma(s). The values entered do NOT restrict the user from accessing information for various companies. The value(s) entered for the Attribute Key session.company only set the default for the company in each view. For example, if your business consists of companies 10, 99 and 20, and you enter:
- Attribute Value
- enter the appropriate value in the text box or leave the existing value as is. The values entered are dependent on the Attribute Key you entered on the previous page. For example:
- When the changes are complete, click Submit.
User Master-Attribute Details page
- You are returned to the User Master-Attribute page that displays the User Name and Attribute Key. At this point you can:
- Continue entering information and updating the records. Note: Remember you must enter both of the Attribute Keys and appropriate Values for each user.
- Return to the Search Criteria/Results Grid.
- Close the User Master-Attribute view.

