Adding Child and Parent Resources
|
Additional Information Creating a New System View Adding New View to Existing Resource Creating a New Resource Adding Permissions to Resource/Assigning Resource to Menu |
In this topic, we are going to create a new system view (child resource) and then we are going to add this new system view to:
- an existing Group Resource
AND - a newly created Group Resource
As we work through our examples, you will have an opportunity to see various modules within the UMS section of iTopia in action. The On-line Help system provides information on how each module works and what information is to be added to each module and field. In this topic, you will see how various modules work together to bring about the required results.
Our example begins with the creation of a new system view. This new view is entitled 'Outstanding Orders by Customer' and is based on the current Orders-Products (OE45) view.
To create a new system view, you must be logged in as the system administrator.
- Our new system view 'Outstanding Orders by Customer' is based on the existing view, 'Orders-Products (OE45)'. To create our new system view we will personalize the base view.
- The 'Orders-Products (OE45)' view is found by clicking on the following menu items:
- 'iBIS' -> Orders -> Display Orders (OE45) -> Orders-Products (OE45)
With this view open, we can click on Personalize at the bottom right of the page.
- We will modify the Search Criteria, Search Results and Sort folders. Note: Rather than document the changes we are making to the original view, this topic will outline only what we want the new system view to look like. If you are following this example, the screen captures should provide you with enough detail to create the exact same view at your site.
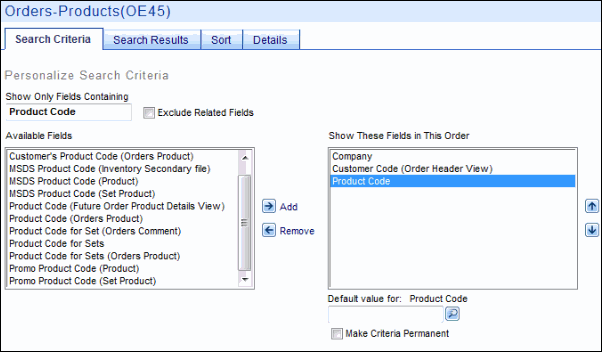
- Within the Personalize section of 'Orders-Products (OE45)', the Search Criteria folder opens by default. We want to have the following fields available in the search criteria section of our new view:
- Company
- Customer Code (Order Header View)
- Product Code
Here is what the Search Criteria folder looks like once our changes are made:
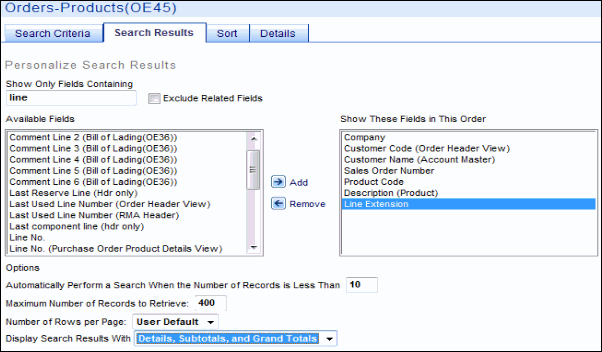
- On the Search Results folder, we want to have the following fields available in the search results grid section of the view:
- Company
- Customer Code (Order Header View)
- Customer Name (Account Master)
- Sales Order Number
- Product Code
- Description (Product)
- Line Extension
We also want the Display Search Results With field set to 'Details, Subtotals, and Grandtotals'.
Here is what the Search Results folder looks like:
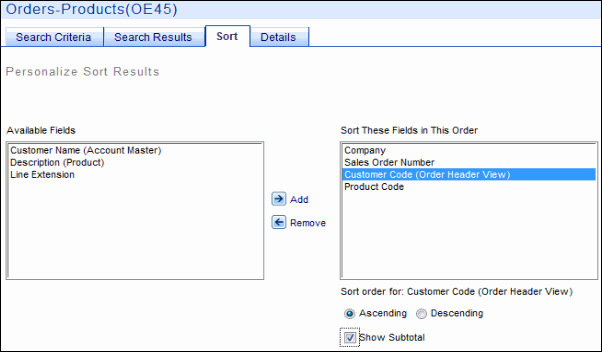
- On the Sort folder, we want to have the following fields sorting in ascending order:
- Company
- Sales Order Number
- Customer Code (with the 'Show Subtotal' check box selected)
- Product Code
Here is what the Sort Folder looks like:
- When you have made all of the changes on the required folders, click on Save As to save the new view. A new window opens with 2 fields: 'New Title' and 'New View Name'.
- The New Title field contains the information that displays on the menu for this view. Following our example, we will enter 'Outstanding Orders by Customer' in this field.
- The New View Name field contains the literal that is used throughout the system for this view.
- This field defaults to the literal that belongs to the original view, 'Orders-Products (OE45)'.
- We recommend that you prefix the New View Name for all system views with your client code and use the resource as part of the New View Name to identify the base resource of the view. In this case, the base resource is v_oeoop. The resource should be followed by a description of the the view with each word separated by an underscore to make it easy for you to find.
- We will use 'client' as our client code for this example, and enter client_v_oeoop.outstanding_orders_by_customer in the New View Name field.
- Note: If you leave the view name the same as the original view name, a '.1' extension is automatically added to the end of the view name in the New View Name field.
- This field defaults to the literal that belongs to the original view, 'Orders-Products (OE45)'.
- Click Submit to save the changes and return to the Search Criteria/Grid page of the newly created view.
- On the Search Criteria/Grid page of the Outstanding Orders by Customer view, you can click Search to review the new view.
- Before we continue, we must add Permissions so that other users can access this new view.
- From the new view, 'Outstanding Orders by Customer', click Personalize. On the Personalize folders, click on Permissions. The Permissions grid or Add a Role view opens for the 'client_v_oeoop.outstanding_orders_by_customer' view.
- The only role assigned to this new view is 'system' and the operations assigned are Customize, Execute, Export, Grant and Read.
- We will enter 'ibis_oe' in the Add a Role field so that users with the Order Entry role assigned to them will be able to access this role. Click Add.
- The role is now added to the grid, but there are no permissions applied to the role. We will assign the Customize, Execute and Read permissions to the Order Entry (ibis_oe) role so that all users that belong to the Order Entry role will be able to access this view.
- In order to save the changes and automatically return to the Personalization folders, we must click Submit.
- Once you are returned to the Personalize folders page, you must click Submit in order to save the changes and automatically return to the Search Criteria grid page.
- From the new view, 'Outstanding Orders by Customer', click Personalize. On the Personalize folders, click on Permissions. The Permissions grid or Add a Role view opens for the 'client_v_oeoop.outstanding_orders_by_customer' view.
Adding the New View to an Existing Resource:
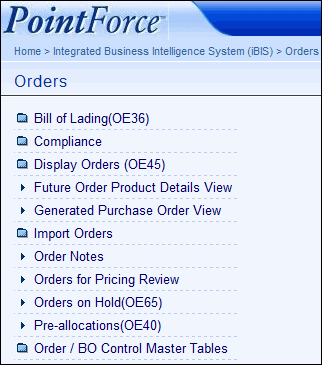
In this section, we are adding the new view, 'Outstanding Orders by Customer', to an existing resource. In this case, we will be adding the new view to the 'Orders' menu. The Orders menu is, in fact, a group resource or a menu from which other resources are available. Here is an example of the 'Orders menu before our new view is added:
- In the menu system, 'Orders' is found by clicking on the following menu items:
- iBIS -> Orders
- The Orders menu has a resource name of 'ibis_order_menu' and we know that our new view, 'Outstanding Orders by Customer' has a resource or literal name of 'client_v_oeoop.outstanding_orders_by_customer'.
- In this case, the Orders menu is going to be the Parent Resource and the view, 'Outstanding Orders by Customer' is going to be the Child Resource.
- On the Resource Master-Group Item Search Criteria/Grid page, click Create.
- A new Resource Master-Group Item page opens with the Parent Resource Name and Child Resource Name fields. We'll enter 'ibis_order_menu' in the Parent Name field and we'll enter 'client_v_oeoop.outstanding_orders_by_customer' in the Child Resource Name field:

- Click Continue at the bottom of the page.
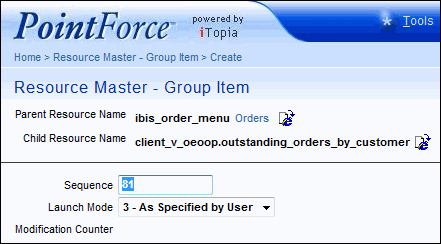
- A new Resource Master-Group Item page opens for the parent/child combination just entered:
- We will leave the Sequence at the value displayed on this view so that the resource displays as the last item on the Orders menu.
- We will also leave the Launch Mode set to '3-As Specified by User'.
- Click Submit to save the addition and return to the previous Resource Master-Group Item page. On this page, click on the Go to Search Page
 icon to return to the Resource Master-Group Item Search Criteria/Grid page.
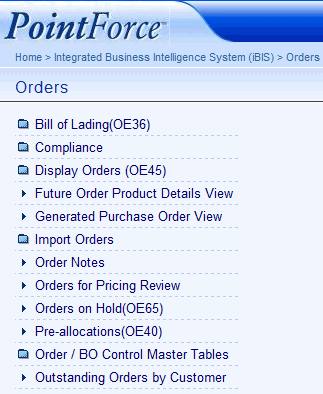
- If we sign on as 'user10' we can see that the new view, 'Outstanding Orders by Customer' is available on the Orders menu as the last menu item:
- When 'user10' clicks on 'Outstanding Orders by Customers', the new view will display.
Creating a New Resource: (and then adding the new system view to this resource)
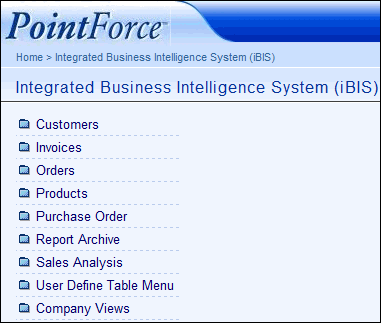
In this scenario, we will create a new Group Resource that will become the Parent Resource for our new system view 'Outstanding Orders by Customer'. This new group resource is entitled 'Company Views' and will be added to the home (iBIS) menu.
- In the Resource Master module, we will create a new Group Resource by clicking on Create
.
- This opens a new Resource Master/Create page. In the Resource Name field, we are going to enter 'client_company_views.resources'.
- We are prefixing this resource with our client code 'client' and we are adding a suffix of '.resource' to help us easily identify this resource as a group resource or a folder on the menu system.
- Click Continue to save the new resource name.
- A new Resource Master page opens with blank fields. We will enter the following information:
- Description Literal Key - leave blank as Literal Keys are not required for group resources.
- Overridden Description - enter 'Company Views'. This is the description of the group resource that is displayed on the menu system
- URL - leave blank. Because this is a group resource, there is no need to enter a URL.
- Type - from the drop down list, select '1-Resource Group'.
- Description Literal Key - leave blank as Literal Keys are not required for group resources.
- To save this record, we will click Submit and return to the Resource Master/Create page. We will return to the Search Criteria/Grid page by clicking on the Go to Search Page
 icon. The Resource Master Search Criteria/Grid page opens with the new record, 'client.company_views.resource', displayed. We will close this view.
- We now have to add our new system view, 'Outstanding Orders by Customer' to this new group resource. On the Resource Master-Group Item page, click Create. The Resource Master-Group Item/Create page opens. On this page, enter the following:
- Parent Resource Name - enter 'client_company_views.resource'.
- Child Resource Name - enter 'client_v_oeoop.outstanding_orders_by_customer'.
Click Continue
- Parent Resource Name - enter 'client_company_views.resource'.
- A new Resource Master-Group Item page opens for the parent/child combination we just entered. We will key in the following information:
- Sequence - since we are only adding this one child resource to the parent resource, we will leave this field set to 1.
- Launch Mode - we will leave the launch mode set to '3-As specified by User'.
We will click Submit to save the changes.
- Sequence - since we are only adding this one child resource to the parent resource, we will leave this field set to 1.
- We are returned to the Resource Master-Group Item/Create page. If we had more child resources to add, we would continue adding them using this page. However, we have no further resources to add, so we will click Go to Search Page
 icon to return to the Resource Master-Group Item/Search Criteria Grid page.
Adding Permissions to the New Resource and Assigning the New Resource to a Menu:
Now we need to add Permissions to the "new" Parent Resource (client_company_views.resource) so that the user can access Company Views from the menu system. Also in this step, we will assign Company Views to an existing menu (the iBIS menu) so that it will be available from the menu system.
- On the Resource Master-Group Item/Search Criteria Grid page, recall the Parent/Child resource combination of 'client_company_views.resource' and 'client_v_oeoop.outstanding_orders_by_customer'. From the 'Use Record as Criteria for Action' icon
 , we will click Link To and then select Role Master; from Role Master, select 'Permissions'.
- The Role Master-Permission module automatically opens with the following message: "No results were found which matched the search criteria." We must create permissions for this Resource Name. To do this, click Create at the bottom of the page.
- The Role Master-Permission/Create page opens:
- Role Name - enter 'user10' so that only 'user10' will have access to the group resource.
- Resource Name - already displays the Parent Resource name, 'client_company_views.resource'.
- Operation Name - since this resource is a Group Resource, the only operation we need to add is 'Execute'. From the lookup icon, select 'execute' by clicking on the check mark. The Operation field is automatically populated with the execute operation.
- Click Submit to save this information.
- Role Name - enter 'user10' so that only 'user10' will have access to the group resource.
- Click on the Go to Search Page
 icon to return to the Role Master-Permission page. You can see that 'user10' has execute access to our new resource, 'client_company_views.resource'.
- The next step is to attach this new Resource ('Company Views') to an existing Parent Resource Name so that the folder will display up on the user's menu. If we are continuing from the previous step: from the 'Use Record as Criteria for Action' icon
 , we will click Link To and then select Resource Master-Group Item. Otherwise, you must open the Resource Master-Group Item.
- On the Resource Master-Group Item Search Criteria/Grid page, click Create. This opens the Resource Master-Group Item/Create page.
- In the Parent Resource Name field, enter 'ibis_home_menu' (the iBIS menu resource name).
- In the Child Resource Name field, enter 'client_company_views.resources' (the Company Views resource).
- Click Continue.
- In the Parent Resource Name field, enter 'ibis_home_menu' (the iBIS menu resource name).
- The Resource Master-Group Item page opens.
- Sequence - the sequence number displayed places the group resource as the last item of the parent resource.
- Launch Mode - leave this set to '3-As Specified by User'.
- Click Submit to save this information.
- Sequence - the sequence number displayed places the group resource as the last item of the parent resource.
- This opens the previous Resource Master-Group Item page. To return to the Search Criteria/Grid page, click on the Go to Search Page
 icon.
icon.
- The Resource Master-Group Item looks like this:
- On the Resource Master-Group Item Search Criteria/Grid page, click Create. This opens the Resource Master-Group Item/Create page.
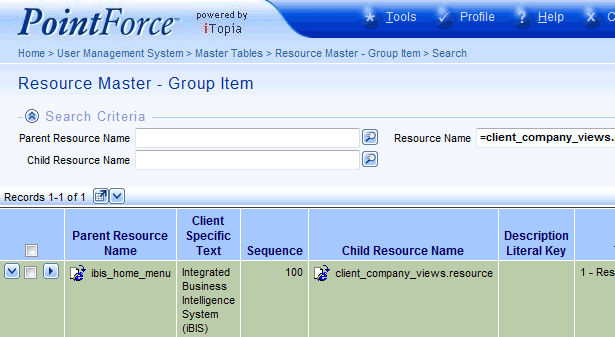
- When we log in as 'user10', we can see that the new resource, Company Views, has been added to the iBIS menu as the last item:
