Export Invoice Print (IN52)
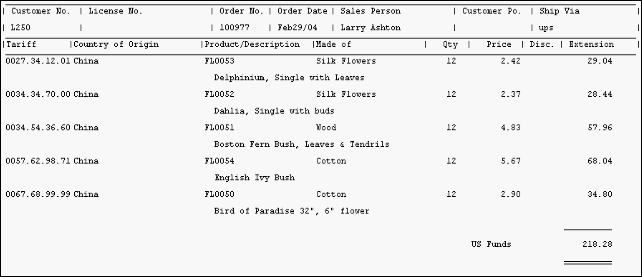
The Export Invoice is printed when Products are exported. The Export Invoice is similar to the regular Invoice except it includes additional export-specific information. The export-specific fields are:
- Tariff (Harmonized Tariff Number - IM13)
- Country of Origin (PO13)
- Made of (Primary Material - IM13)
- Currency (IM13)
Note: The Invoice must be processed through Schedule Invoices/Credits (IN43) before the Export Invoice can be printed.
Follow these steps to run IN52:
- The Printer Selection screen automatically opens. Select the device destination and click OK.
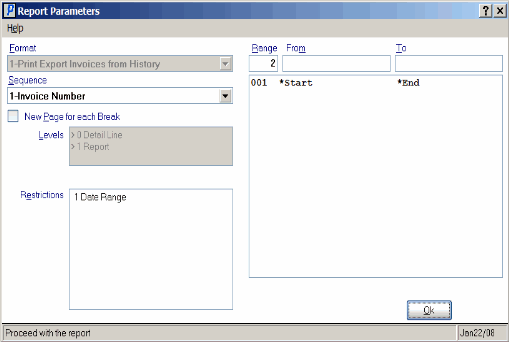
- The Report Parameters screen automatically opens:
- The Format field defaults to 'Print Export Invoices from History'. You cannot modify the Format field.
- Select one of the following options in the Sequence selection field:
- Invoice Number
- Customer/Order Number
- Sales Rep Code
- Customer Code
- Customer/P.O. Number
- If a New Page for each Break is required, select the check box.
- The Levels list box displays the various Levels of detail available for the report. All Levels are automatically selected in IN52; the '>' before each Level option indicates the Level is selected. Double click on the line to remove the selector. IN52 includes the following Levels:
- Detail Line
- Report
- Select the Restrictions that apply to the Export Invoice by double clicking on the line in the list box. Restrictions allow you to tailor IN52 to your specific needs. The '>' before a Restriction indicates the Restriction is selected. Once a Restriction is selected, it can be de-selected but the '>' remains. An '*' before a Restriction means the Restriction is mandatory. IN52 includes the following Restrictions:
- Date Range - select a date range for the report. Invoices within the entered date range are eligible for printing.
- Note: Once the Date Range Selection screen is open, you cannot exit without entering a date range.
- Select the Range From and To for the report. The Range must match the Sequence selected. Multiple Ranges may be entered.
- In the From field, enter the starting 'code' for the report.
- In the To field, enter the ending 'code' for the report.
- The information displays in the list box below.
- To add additional Ranges, repeat these steps.
Note: To print the entire file, simply tab through the From and To fields. The list box displays *Start and *End in the From and To fields.
- To delete a Range from the list box, double click on the line. The following message displays, "Do you wish to delete this range? Yes/No". Click Yes to delete the range.
- In the From field, enter the starting 'code' for the report.
- When all of the information on the Report Parameters screen is complete, click OK to run the report.
- The Format field defaults to 'Print Export Invoices from History'. You cannot modify the Format field.
- The Report Complete screen opens when the report is generated. Enter the OK to accept the report, click Restart to restart the printing of the report, or click Abort to cancel the report.
Here is a sample of the Export Invoice:

Sample Export Invoice (IN52)

