The Enter Inv/Direct Bills/Credits (IN41) program program offers 3 menu options, located at the top of each folder in IN41. Each menu option contains various items.
The following list defines the contents of each menu:
- Options - the Options menu contains the following option:
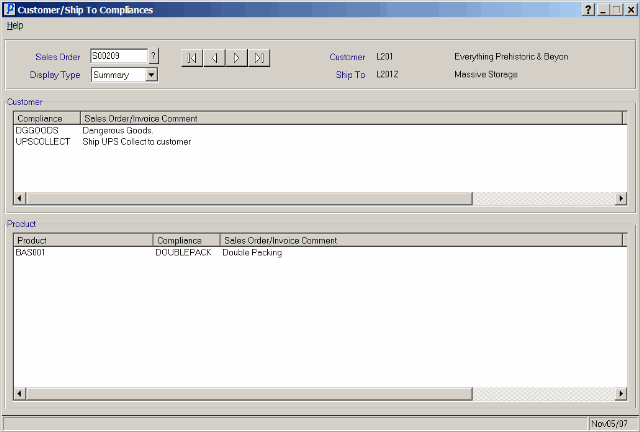
- Compliances - when you select this option, the Customer/Ship To Compliances (OE08) window opens. This window, by default, displays the Customer/Ship To Compliance and Product Compliance information for the current invoice/credit note in 'Summary' format. You can change the Display Type field to 'Detail' if you wish to display the detail text of the Compliances.
For more information on OE08, click here.
- Compliances - when you select this option, the Customer/Ship To Compliances (OE08) window opens. This window, by default, displays the Customer/Ship To Compliance and Product Compliance information for the current invoice/credit note in 'Summary' format. You can change the Display Type field to 'Detail' if you wish to display the detail text of the Compliances.
Compliance option
- Goto - the Goto menu contains the following options:
- Customer Inquiry – when you select this option, the Customer Inquiries (SU45) program opens on the Contacts (C1) folder. For more information on SU45/C1, click here.
- Customer Orders - when you select this option, SU45 opens on the Order/Quotes/Invoices (I1) folder. For more information on SU45/I1, click here.
- Product Inquiry - when you select this option, the Display Product Availability (IC45) program opens on the Purchase Orders (C1) folder. Note: Opening this option from the "Lines' folder in IN41 automatically displays the current Product code in the 'Product' field of the C1 folder. If you select this option from any other folder in IN41 (or a product is not selected on the 'Lines' folder), the C1 folder still opens but the Product field is blank.
For more information on IC45/C1, click here.
- Invoices History - when you select this option, IC45 opens on the Invoice Lines By Customer (I2) folder. Note: Opening this option from the "Lines' folder in IN41 automatically displays the current Product code in the 'Product' field and the Customer Code in the 'Customer' field in the of the I2 folder. If you select this option from any other folder in IN41 (or a product is not selected on the 'Lines' folder), the I2 folder still opens, however, the Customer is displayed in the 'Customer' field, but the Product field is blank.
For more information on IC45/I2 folder, click here.
- Price Inquiry - when you select this option, SU45opens on the Pricing and Costs (R1) folder. Note:
Opening this option from the 'Lines' folder in IN41 automatically displays the selected Product code in the 'Product' field and the Customer Code in the 'Customer' field in the of the R1 folder. If you select this option from any other folder in IN41 (or a product is not selected on the 'Lines' folder) the R1 folder still opens, however, the Customer is displayed in the 'Customer' field, but the Product field is blank.
For more information on SU45/R1, click here.
- Customer Inquiry – when you select this option, the Customer Inquiries (SU45) program opens on the Contacts (C1) folder. For more information on SU45/C1, click here.
- Tools - the Tools menu contains the following options:
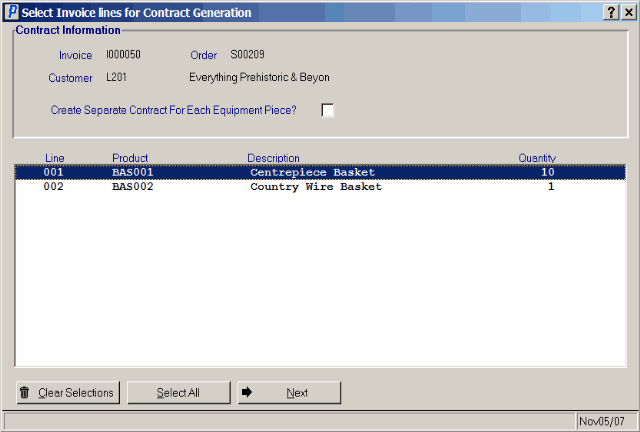
- Generate Contract - this option is only available if you have the Contracts module installed on your Enterprise system and if the record in IN41 is an Invoice or Direct Bill. When you select this option, the Select Invoice Lines for Contract Generation window displays.
The following list defines every field on the Select Invoice Lines for Contract Generation window:
- Invoice - displays the current Invoice number.
- Order - displays the Order number associated with the Invoice number.
- Customer - displays the Customer code entered on the Invoice. The name of the customer displays to the right of the Customer code.
- Create Separate Contract For Each Equipment Piece? - when this check box is selected separate contracts will be generated in the Contract Maintenance (CT30) program for each piece of equipment in the list box.
- List box - displays the Line number, Product code, Product Description and Quantity of products entered in IN41. You can select specific lines that you wish to create contract for by double clicking on the line.
- Clear Selections
 - clears the section of all criteria.
- Select All
 - automatically selects all of the lines listed in the list box.
- Next
 - opens the Generate Contracts window. Note: You must select as least one detail before you can continue generating contracts. If no details are selected, the following message displays: "No Invoice detail lines have been selected, please one or more detail lines before continuing to the next part of the contract generation. OK". Click OK to clear the message and select at least on detail line.
- Invoice - displays the current Invoice number.
- Generate Contract - this option is only available if you have the Contracts module installed on your Enterprise system and if the record in IN41 is an Invoice or Direct Bill. When you select this option, the Select Invoice Lines for Contract Generation window displays.
Generate Contract Option
- Invoice - displays the Invoice number entered in IN41.
- Order - displays the Order number associated with the Invoice number.
- Ship To
- displays the Ship To code associated with the Customer entered on the Invoice.
- Customer - displays the Customer code associated with the invoice. The Customer name displays to the right of the Customer Code.
- Sales Office - by default the Sales Office for the current invoice displays. You can enter or select an alternate Sales Office from the query.
- Each Item as Separate Contract? - this check box is automatically selected if you have selected the 'Create Separate Contract For Each Equipment Piece?' check box on the Select Invoice Lines for Contract Generation window. You cannot edit this field.
- Sort by - the drop list offers you two options by which to sort the items in the list box:
- Invoice Line Number
- Product
- Line# - displays the line number for the current record.
- Index - displays the Index associated with the line. An index number is assigned to each quantity of 1 for each line. For example, if you enter a detail line for a product with a quantity of 10 in IN41, you will see the product listed 10 times in the list box each with a unique index. This allows you to enter a serial number for each piece. Contracts allow you to enter Serial numbers for products even though they may not be flagged as serialized in the Maintain Product Master (IM13) program.
- Product - displays the Product code for the current record.
- Serial - enter the Serial Number associated with the product/index. This is not a mandatory field.
If you enter a serial number for a product that is not serialized or the product/serial combination is not on file, the following message displays: "This PRODUCT & SERIAL are not on file! OK to continue? Yes/No". Select Yes to accept the entered serial number or select No to reject entry.
If the product /serial number combination already exists on a Contract, the following message displays: "The following contract(s) exist with this product + serial: XXXXXXX. Do you wish to continue? Yes/No". Select Yes to continue or select No to reject the action.
- Update
 - saves the current record.
- Delete
 - deletes the current record.
- New
 - clears all of the input fields.
- Refresh List
 - refreshes the list box.
- Generate Contract(s)
 - opens CT30 and automatically generates contracts according to the selected options and lines. Note: If you have entered the same serial number for more than one product, the following message displays: "Line: XXX Index X Product XXXXXXXXX Has the same serial number as Line: YYY Index Y. Please change one of the serial numbers. OK". Click OK
to clear the message and make the necessary modifications.
- opens CT30 and automatically generates contracts according to the selected options and lines. Note: If you have entered the same serial number for more than one product, the following message displays: "Line: XXX Index X Product XXXXXXXXX Has the same serial number as Line: YYY Index Y. Please change one of the serial numbers. OK". Click OK
to clear the message and make the necessary modifications.
-
If you select Next, the Generate Contracts window opens. The following defines every field on the Generate Contracts window:

Generate Contracts
- Product Labelling - the Product Labelling option opens the Print Product Labels (IM42) program. This program automatically display all of the products in entered on the Lines folder of IN41. For more information on IM42, click here.
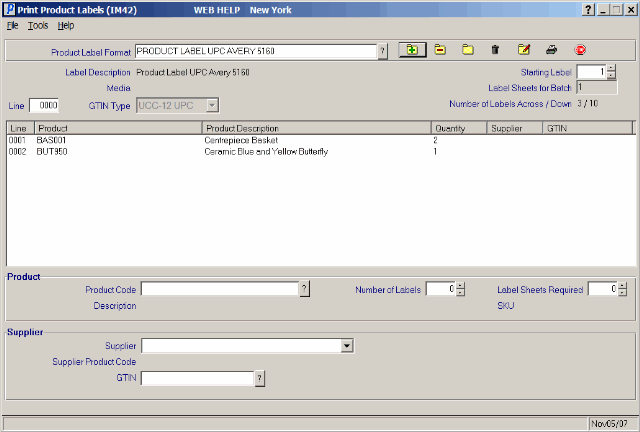
Print Product Labels

