Auto Credit (IN41)
When you select 'Credit Note' or 'Floor Charge Credit' as the Transaction Type in IN41/General, the Auto Credit button activates.Creating an Auto Credit for an Exiting Invoice:
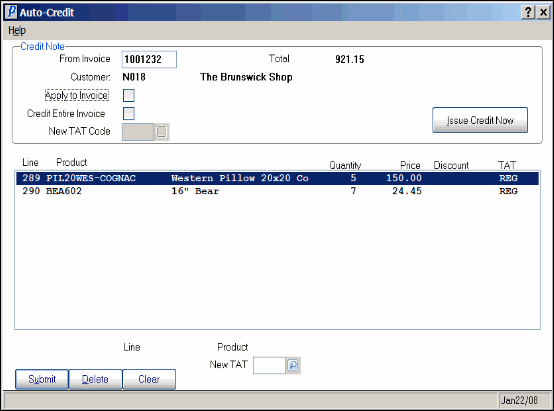
To create an Auto Credit for an existing Invoice (IN41), click Auto Credit. The Auto Credit screen automatically opens:
The following list outlines the steps required to complete an Auto Credit transaction:
- Enter the Invoice number you want to Credit in the From Invoice field. Once the Invoice number is entered, the Total field, Customer code and Customer Name automatically display.
Note: If you select an Invoice that is deleted, the following message displays: "No invoice lines in history file. OK". Click OK to close the message window and select another Invoice.
- To apply the Credit to the current Invoice, select the Apply to Invoice check box.
Note: If the current Invoice is not in the Open Invoices file due to one of the following conditions:
- Was paid by an EFT method, or
- Has not completed the Invoice cycle (IN42/43/44), or
- Is a Warehouse transfer, or
- Has already been paid and purged by AR87
then the following message displays: "Invoice not in A/R file, you can't apply credit. OK". Click OK to close the message window.
- To Credit only a portion of the current Invoice, double click on the appropriate line(s) in the list box. The line number and Product code display at the bottom of the screen. To reverse the selection, double click on the line and then click Delete.
- Enter or select from the query a TAT code for the line from the New TAT code field at the bottom of the screen.
- Click the Update to complete the transaction. A '>' displays beside the updated line in the list box. Continue this process until all the lines required for the Credit are updated.
- Enter or select from the query a TAT code for the line from the New TAT code field at the bottom of the screen.
- To Credit all lines on the current Invoice, select the Credit Entire Invoice check box.
- When you select the 'Credit Entire Invoice' check box, the New TAT Code field opens for input. Enter or select from the query the TAT code for the entire Credit.
- Once you have completed the necessary entries for the Credit, click Issue Credit Now to generate the Auto Credit for the current Invoice. Note: If the Invoice selected is for a customer that is currently coded for deletion in Maintain Customer Master (SU13) the 'Create_out' message box displays. A credit will not be created for the selected invoice. Click 'OK' to close the message panel or click 'Copy' to copy the information to 'Notepad'. Once the information is copied, click 'OK' to close the message panel.
When the Credit is generated the following message displays: "Order xxxxx invoice xxxxxxx created with x lines. OK". Click OK to close the message window. The Auto Credit screen remains open. To allow you to modify the current Credit transaction.
- To clear the current Credit Note information without creating a Credit, click New.

Auto Credit

