IN41 - Entry of Different Product Types
|
Additional Information B/O & Cancelling Lot/Serial Products Model Cost Rollup Examples |
This section covers the Order Entry of Products that are different from 'PP' Products in Enter Inv/Direct Bills/Credits (IN41). These Products include Assembled Sets ('AS'), Models ('MO'), Serial or Lot Controlled Products and Dangerous Goods that require a Material Safety Data Sheet (MSDS).
- Assembled Set ('AS'):
- When you enter a Product that is set up as an 'AS' Product Type in Maintain Inventory Master (IM13/Stock), the To ship from components field is available.
- Assembled Sets are Products that can be stocked as complete units (sets or kits), but can also be built-up from their individual component pieces. Assembled Sets are special Products that are coded as 'AS' in IM13, with the components assigned to the Assembled Set in Model Maintenance (IM29/Assembled Sets).
- The 'Available' quantity in IN41/Lines for an 'AS' Product is displayed for the 'Set/Component', where the quantity available in completed Sets is listed first, and the quantity which can be built from available Components is listed second.
- When an Assembled Set is entered in IN41, the components will never be automatically considered for shipment even if there is an insufficient quantity of completed sets in inventory to fill the Order. You should manually adjust the B/O, To Ship and To Ship from Components to keep your stock levels intact.
- When the Order line is Updated, a screen automatically opens to display the Components of the Assembled Set.
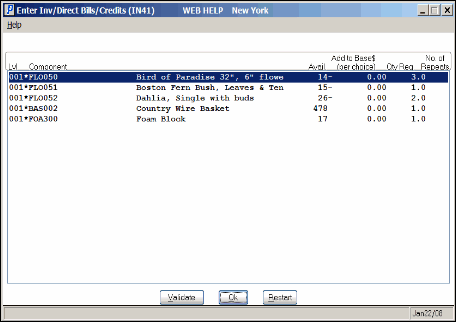
IN41/Assembled Sets windowThe following fields appear on the screen:
- Lvl - the Level for Assembled Sets is always '001'.
- Component - Component Product code.
- Description - description of the Component.
- Available - quantity for the component in the current Warehouse.
- Add to Base$ (per choice) - this column is not used for Assembled Sets. This value is always 0.00.
- Qty Req - the Quantity entered in IM29/Assembled Sets as the quantity required to build this set for each component.
- No. of Repeats - this column is not used for Assembled Sets
- Click OK to close the Assembled Sets screen. The Validate and Restart buttons are only used for Models and do not function for Assembled Sets.
- Once the Assembled Sets screen is closed, the following information displays on the Detail line for the Assembled Set:
- The first line for the Assembled Set (Pick xx Sets; P:x C:x):
- Pick xx Sets - identifies the number of sets to be picked (xx).
- P:x - identifies the number of Sets to be picked from 'Pre-packed' or completed units.
- C:x - indicates the number of sets that are built from components.
- The second line for the Assembled Set identifies the 'Header' information for the Assembled Set:
- Product code entered in the Product field. This is the 'Header' line for the Assembled Set.
- Qty Ordered.
- Back Order quantity.
- Total number of sets To Ship.
- Price of a single unit.
- Per value for the Header.
- Discount value for the Header.
- The additional lines for the Assembled Set identify each Component:
- Product code for the Component item.
- Quantity of this Component required to complete the Assembled Set, if shipping from components.
- Back Ordered quantity is always zero. Back orders are only applied at the Header level.
- Total number of Shippable units if shipping from components.
- Price is always zero for Component items. The Price is only applied to the Header.
- Per value for the Component.
- Discount is always 100% for all Component lines.
- To modify the 'Qty order', 'B/O', 'To Ship' or 'To ship from components' fields, you must recall the Assembled Set header and make the necessary changes. You cannot recall the components of an Assembled Set and make the modifications.
- To delete an Assembled Set from the current Order, you must recall the Assembled Set header and click the Delete button. Deleting the header automatically deletes the associated components.
- If you try to recall a component line or Assembled Set comment, the following message displays: "Component lines are set remarks cannot be altered. Recall the set line (###). OK". Click OK to close the message window.
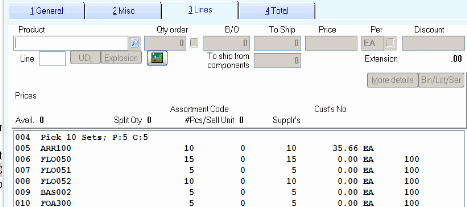
IN41/Lines Assembled Set Detail line - The first line for the Assembled Set (Pick xx Sets; P:x C:x):
- When you enter a Product that is set up as an 'AS' Product Type in Maintain Inventory Master (IM13/Stock), the To ship from components field is available.
- Models (MO):
- You can use the 'Model Cost Rollup' flag in CC00/Inventory Control to rollup the selling price of the model header based on the calculated selling price of the components (fixed or variable) on active price lists based on Markup on Cost or Gross Margin. This flag affects the selling price depending on the type of model. For more details, please see the Model Cost Rollup Examples topic.
- Once a Price is entered and the Order Line is Updated, the following screens may display:
- If the Model entered contains a 'Sub-Assembly', the Select Components window opens. (If the Model does not contain a Sub-Assembly, a screen entitled 'Enter Inv\Direct Bills\Credit Notes (IN41)' opens with the Components of the Model displayed. This screen is discussed in a bullet point later in this list). This window contains the 'Header' for the Sub-Assembly as well as each of the Components that are defined for the Sub-Assembly in IM29/Sub-Assemblies.
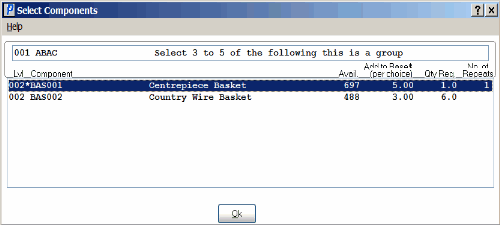
Select ComponentsThis window includes the following information columns for the Components of the Sub-Assembly:
- Level - Models can have Components and Sub-Assemblies; a multi-level Model can have multiple Component Levels.
- Component(s) - Sub-Assembly Group of the Model.
- Description - description of the Component.
- Available - quantity available in the current Warehouse.
- Add to Base$ (per Choice) - the QB1 list price of the Component MULTIPLIED by the minimum number of repeats allowed PLUS the 'Upcharge' defined in IM29/Sub Assemblies.
- Qty Req - the minimum quantity required for the current Model.
- No of Repeats - the quantity entered by the operator for Product flagged as non-mandatory in IM29/Sub-Assembly.
Note: If the Component is mandatory, an asterisk (*) appears after the 'Lvl' field and before the 'Component' field. The quantity of these components cannot be modified.
- Select the components of the Sub-Assembly by double-clicking on the Component line in the list box. The Enter desired multiple of component window automatically opens if the maximum quantity is greater than 1:
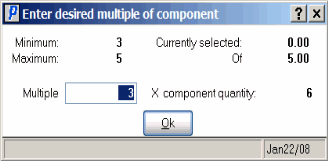
Enter desired multiple of component
Note: The Header section on the Select Component window for the Sub-Assembly identifies the total number of each Component you must select. If you try to exceed the maximum quantity for the sub-assembly, the following message displays: "You have already selected the maximum allowed for this sub-assembly. OK". Click OK to close the message window and adjust the number of each Component required.
- The window displays the following fields:
- Minimum - quantity for this Component as defined in IM29/Sub-Assembly.
- Maximum - quantity for this Component as defined in IM29/Sub-Assembly.
- Currently selected - the total quantity selected for the Sub-Assembly.
- Of - the 'Header' line on the Select Components screen identifies the number of units you can select for the Sub-Assembly; the maximum number of units displays in the 'Of' field.
- Multiple - enter the desired quantity. This quantity is multiplied by the 'Component Quantity'.
- Component Quantity - component quantity entered in IM29/Sub-Assembly.
- When the 'Multiple' field is entered, click OK to close the window.
- If the Model entered contains a 'Sub-Assembly', the Select Components window opens. (If the Model does not contain a Sub-Assembly, a screen entitled 'Enter Inv\Direct Bills\Credit Notes (IN41)' opens with the Components of the Model displayed. This screen is discussed in a bullet point later in this list). This window contains the 'Header' for the Sub-Assembly as well as each of the Components that are defined for the Sub-Assembly in IM29/Sub-Assemblies.
- The Select Component window re-opens with the 'Add to Base$ (per choice)' field and the 'No of Repeats' field updated with the information entered.
- Continue these steps until all of the Components have been updated. When all of the Components are updated, click OK to close the Select Components window.
- Once you have closed the Select Components window, the following window automatically opens:

- This screen contains the details of the Model i.e. the Sub-Assembly(s) and the Components that make up the Model. You can do one of the following options:
- Click Validate to ensure that all of the Components required for the Model are selected.
- Click Restart to clear all of the Component selections. You can now re-enter each of the Components of the Sub-Assembly.
- To edit a line, double-click on that line and make changes as required.
- When you are satisfied with you selections, click OK.
- Click Validate to ensure that all of the Components required for the Model are selected.
- Once you click OK, the Selected Model window opens. This windows includes the following:
- Selling price
- Cost for warehouse (xx)
- Gross Profit
- Click OK to close this window. If you altered the Price of the Model Product when the Product was entered, the following message displays: "Calculated (dollar value based on the selected components) Override (dollar value you entered) Use the calculated price? Yes/No". Select Yes to use the 'Calculated dollar value' or No to use the Override dollar value you entered.
- The Model Header and Components display in the Order detail list box.
Note: If a Model contains a Serial or Lot Controlled Product that are flagged to commit at time of Inventory (defined in IM13), the Commit Lots and Serial Numbers screen open once the Selected Model window is closed.
- To modify a Model's components or to edit the Order Quantity, double click on the 'Header'. You cannot select the components of a Model type Product for modification.
- If you try to recall a component line, the following message displays: "Model components and remarks cannot be altered. Recall the model line (###). OK". Click OK to close the message window.
- Whether or not you change any of the information for the Model header, the following message displays when the Order line is Updated: "Modify any model components? Yes/No". Select Yes to modify the components or select No to leave the selected component as originally set.
- Regardless of whether you select Yes or No, the following Confirmation message automatically displays: "Modify component lot, serial or bin commitments? Yes/No". (This message displays even if the Model entered does NOT contain Products with Lot, Serial or Bin commitments. In this case, selecting Yes or No results with in the Model being updated without any further manipulation.)
- Regardless of whether you select Yes or No, the following Confirmation message automatically displays: "Modify component lot, serial or bin commitments? Yes/No". (This message displays even if the Model entered does NOT contain Products with Lot, Serial or Bin commitments. In this case, selecting Yes or No results with in the Model being updated without any further manipulation.)
- You can use the 'Model Cost Rollup' flag in CC00/Inventory Control to rollup the selling price of the model header based on the calculated selling price of the components (fixed or variable) on active price lists based on Markup on Cost or Gross Margin. This flag affects the selling price depending on the type of model. For more details, please see the Model Cost Rollup Examples topic.
- Serial or Lot Controlled Products:
- If the Product entered is 'Serial' or 'Lot' Controlled and is flagged in IM13/Stock as 'Commit Lot/Serial at Invoicing' or has 'at Invoice' selected from the More Detail Data window (and is not back ordered), the Commit Lots and Serial Numbers window automatically opens.
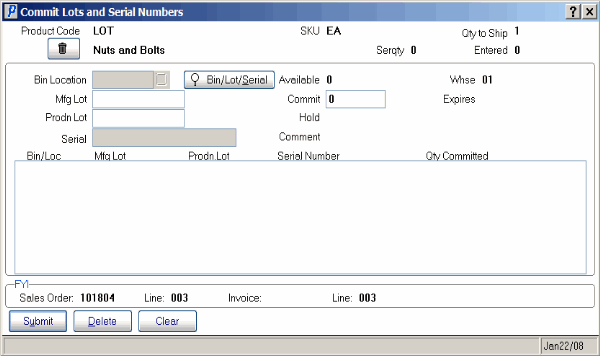
Commit Lots & Serial Numbers- The Commit Lot and Serial Numbers window requires you to enter the following information for the current Product:
- Header Section
- the 'Commit Lots and Serial Numbers' screen automatically opens with the Product Code, Description and SKU information displayed in the Header section.
- Proof Display section - the Proof Display section (in the top right corner of the window) includes the 'Qty to Ship' and 'Entered' fields. The information in this section informs you of the number of units from the 'To Ship' field of IN41/Lines that need to be assigned to Lots and Serial numbers.
- Depending on the set up of the Product in IM13/Stock, one of the following fields is available for data entry:
- Bin Location - this field is only available for Multi Bin warehouses
- Mfg Lot
- Prodn Lot
- Serial
- Bin/Lot/Serial - the Bin/Lot/Serial button is used to locate a Lot or Serial number. When clicked, the Lots & Serial Numbers Availability screen opens. Relevant information displays for each Lot or Serial number, including Bin/Loc/Whse, Mfg Lot, Production Lot, Receipt Date, Serial number, Expiry Date, Comment, Availablity, SKU and Hold flags as well as the 'Multiwhse' and 'Sequence' buttons.
- Note: If a Serialized Product is set to Serial Control at 'Invoicing' in Maintain Inventory Master (IM13/Stock), then serial numbers are not available for you to select through the Bin/Lot/Serial button. Serial numbers are assigned during the Invoicing of a Sales Order created in OE30 or a Direct Bill created in IN41.

Lots & Serial Numbers Availability- Multiwhse - clicking this option opens the View Sequence selection screen. You have two options to chose from:
- Current warehouse - view only Lot or Serial numbers for the current warehouse
- All warehouse - view only Lot or Serial numbers for the current warehouses.
Note: You can only select Lot or Serial numbers from the current Warehouse. If you find a Lot or Serial number in a different Warehouse, you can transfer it to the current Warehouse and apply it to the current Order line.
- Sequence - clicking this option opens the View Sequence selection screen. You have two options to chose from:
- View by Lot/Serial # - Lots and Serial numbers will be listed in ascending order.
- View by Receipt Date - Lots and Serial number will be listed by Receipt date.
- Header Section
- the 'Commit Lots and Serial Numbers' screen automatically opens with the Product Code, Description and SKU information displayed in the Header section.
- Enter the Lot or Serial Number into the available field or click Bin/Lot/Serial to find a Lot or Serial number.
Note: If you enter a Serial number that does not exist, the following message displays: "Serial number does not exist. OK". Click OK to close the message window and re-enter the Serial number. If you enter a Manufacturers Lot or Manufacturers Lot/Production Lot that does not exist, the following message displays: "This product is not available. OK". Click OK to close the message window and re-enter the Lots.
- The selected Lot or Serial number displays in the upper portion of the Commit Lots and Serial Numbers screen along with relevant information about the selection made. Click Update to add the information to the system.
- Once you have entered all the Bin\Lots and\or Serial numbers for the current order line and it has been Updated and the number of entries made matches the Qty to Ship the following message displays: "The commitment entered balances with the quantity to ship. Continue Entries? Yes/No". Select No to close the Commit Lot and Serial Numbers screen and return to IN41/Lines or select Yes to continue entering Bin, Lot or Serial numbers.
Note: If you select Yes and enter more Bin, Lots Serial numbers for the current Order line and then Update and close the screen, the following message displays: "The Commitment entered exceeds the quantity to ship. Add the difference of (x) to the order? Yes/No". Select Yes to increase the order quantity and return to IN41/Lines or select No to cancel the update request.
- If the Commit quantity for the Lot or Serial Product is less than the Order quantity, you must back order or cancel Lot or Serial controlled Products. For more information on back ordering and cancelling Lot or Serial controlled products, click here.
- To modify the Lot, Bin or Serial commitments, double click on the Order line. The Bin/Lot/Serial button becomes available. Click the button to open the Commit Lots and Serial Numbers screen where the necessary changes can be made and updated.
- Dangerous Goods:
- When a Dangerous Goods Product is sold to a Customer for the first time, a Product detail line is automatically added to the Order for a Material Safety Data Sheet
(MSDS) so that the MSDS or Data Sheet is picked and delivered along with the rest of the Order. An MSDS is a pre-printed document that contains chemical content and poison information, handling/storage instructions, warnings, etc. about a dangerous product. For each Dangerous Product with a corresponding Data Sheet, the Product code of the Data Sheet is entered into the 'MSDS Product' field in IM13/Misc.
- If the Customer orders the Dangerous Goods Product again, the Data Sheet is shipped along with the Order only if the Data Sheet is revised or if the Customer has not received the Data Sheet in the last 3 years. (This is determined by comparing the Order date to the MSDS revision date stored in IM13.)
- When a Dangerous Goods Product is sold to a Customer for the first time, a Product detail line is automatically added to the Order for a Material Safety Data Sheet
(MSDS) so that the MSDS or Data Sheet is picked and delivered along with the rest of the Order. An MSDS is a pre-printed document that contains chemical content and poison information, handling/storage instructions, warnings, etc. about a dangerous product. For each Dangerous Product with a corresponding Data Sheet, the Product code of the Data Sheet is entered into the 'MSDS Product' field in IM13/Misc.

