Store Transfers by Class Print (IC53)
The Store Transfer by Class Report (IC53) program provides an audit trail of all inventory transfers of class products between store locations. Store locations do not computer control their inventory at the product level; inventory is controlled at the dollar level through the G/L.
- This report should be printed after each batch of transfers is recorded via Store Transfers by Class (IC52).
- IC53 prints an audit trail of all product transfers processed for store locations, and updates the G/L for the appropriate inventory G/L accounts. Each location should have its own inventory account(s). The G/L accounts are set up on the Invoicing/General Ledger folder of Company Control Initialization (CC00) for each store location. The table should be set up as follows:
LOC GL TYPE SALES COS INVENTORY 01 00 9 01-40000 01-50000 01-11000 02 00 9 02-40000 02-50000 02-11000 - In the example above, G/L accounts are set up for store 01 and store 02. Note: Each store location must be set up in Maintain Customer Master (SU13) as a customer. The customer codes for each store are "#01" and "#02". The Class of Trade codes must be set to "STO". The sales offices are set up as "01" and "02" respectively. The customer types must be equal to "9".
- IC53 reads the G/L table in CC00/Invoicing/GL and extracts the inventory accounts for the locations affected. When the Store Sales Summary (RS51) is processed or when Floor Charges are processed in Enter Invoices/Direct Bills/Credit Notes (IN41) the programs extract the sales and cost of sales accounts for the locations affected.
- The G/L posting date to be used is entered in IC52 when a new batch of transfers is about to be recorded.
- The report format appears as follows, for each Transfer Number and each Line Number per Transfer:
---To----
Loc. GL---From---
Loc. GLInv.
ClassQty
Selling Gross
Price ProfitCost Selling
AmountCost
Amount - Note:
The Gross profit is calculated by applying the Minimum Gross Margin % recorded against the Class Product in IM13 to the Selling Price. The Cost Amount is the difference.
- The last page of the report prints a summary of the G/L postings to the inventory accounts affected (i.e. debits to the receiving store locationsí inventory accounts and credits to the sending store locations inventory accounts).
To run IC53:
- The Printer Selection screen automatically opens. Select the device destination and click OK.
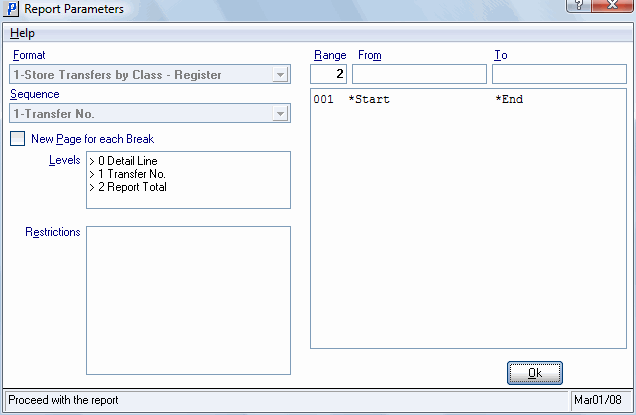
- The Report Parameters screen for IC53 opens.
- The Format field defaults to 'Store Transfers by Class - Register'. You cannot change the format.
- The Sequence field defaults to 'Transfer No.'. You cannot change the Sequence.
- If a New Page for each Break is required, select the check box.
- The Levels list box displays the various Levels of detail available for the report. All Levels are automatically selected in IC53; the '>' before each Level option indicates the Level is selected. Double click on the line to remove the selector. The levels that display are dependent on the Sequence selected.
- There are no Restrictions that apply to IC53.
- Select the Range From and To for the report. The Range must match the Sequence selected. Multiple Ranges may be entered.
- In the From field, enter the starting 'code' for the report.
- In the To field, enter the ending 'code' for the report.
- The information displays in the list box below.
- To add additional Ranges, repeat these steps.
Note: To print the entire file (all records in the selected sequence), simply tab through the From and To fields. The list box displays *Start and *End in the From and To fields.
- To delete a Range from the list box, double click on the line. The following message displays, "Do you wish to delete this range? Yes/No". Click Yes to delete the range.
- In the From field, enter the starting 'code' for the report.
- When all of the information on the Report Parameters screen is complete, click OK to run the report.
- The Format field defaults to 'Store Transfers by Class - Register'. You cannot change the format.
- The Report Complete screen opens when the report is generated. Depending on the print device selected, you are presented with one of the following two options:
- If you are printing the report to a local printer device, PDF file or to your screen, enter the Acceptance Codes to accept the report, click Restart to restart the printing of the report, or click Abort to cancel the report.
- If you are sending the report via an email or fax device, click OK to accept the report, click Restart to restart the fax/email (not always applicable), or click Abort to cancel the report.
- If you are printing the report to a local printer device, PDF file or to your screen, enter the Acceptance Codes to accept the report, click Restart to restart the printing of the report, or click Abort to cancel the report.

Store Transfer by Class Report (IC53)
