Adding Sections:
|
Additional Information Rendering Sections Side by Side |
On the Details folder within the Personalize views option, you can personalize the way the results are grouped on the Details folder of a view. PointForce iTopia supports the ability to organize Detail Results page fields into sections. Depending on which protion of the view (Main or Main Context) the sections are entered for, sections can be either:
- Linkable - linkable sections are associated with the Main subview only. When the section is linkable, a Section Hyperlink is automatically generated on the Details Result page that displays at the top of the Main section. When the hyperlink is clicked, the related section is displayed on details page. Using the hyperlink allows you to get to the information on the details page without using the vertical scroll bar. When sections are added to the Details page in the Main section they may also be collapsed using the collapse icon
 in each section. Note: The sections of on the details page may vary depending on the size of your monitor. iTopia automatically adjusts the sections to fit on your monitor.
- Non-linkable - non-linkable sections are associated with the Main Context subview only. 4. Using the sections in the Main Context allows you to group fields together allowing for more of the Main section to be viewable.
Grouping information into logical sections allows you to view the results in a concise layout which is easy to navigate through. For example, without grouping into sections, each page displays the fields onto the Details Result page in a single column that you have to scroll through to find information.
- Start by selecting the subview. Subviews are available from the drop down list located in the top left hand corner of the Details folder within Personalization.
Note: Depending on the 'User Type' assigned to your User ID, you will be able to see this drop down list; if you cannot see this drop down list, your user id is not authorized to modify anything but the Main section of the view's Detail page. Only your System Administrator can modify the set up of your User ID.
The subviews available are:
- Main - the information in the Main section of the View's Details Result page.
- Main Context - pertinent information is added to the Main Context section of the View's Details Result page. (No hyperlinks are created.)
- Key - this subview applies to data entry information only and is currently reserved for future use. Do not select the Key subview.
- Main - the information in the Main section of the View's Details Result page.
- Enter a Section Title in the Detail Section Description field and add the appropriated fields from the Available Fields list box under the Section title in the Show These Fields in This Order list box. Any number of Section Titles may be created but each Section must be associated with at least one field from the Available Fields list box. Once a field has been added to a Section it cannot be used again in any other Section.
To add a Section to the Details page of a given view, follow these steps:
- On the Details folder, select the subview (Main or Main Context). Note: If you cannot see this drop down list, you can only modify the Main section of the Detail page. In order to change this, your User Id must be modified by your System Administrator.
- Enter a section title in the Detail Section Description field. The query or lookup feature allows you to select an existing literal key; we recommend that you enter your own section title. Note: Detail Section Description fields do not display on the Detail page when entered for a Main Context group. They only serve to break up the groupings.
- Click on the Add Section Title action
 .
.
- The Detail section titles appear flush to the left of the list box and all of the fields that are part of a given detail section appear indented beneath it.
Note: New Section Descriptions are automatically added to the bottom of the field listings in the Show These Fields in This Order list box. If you want to add a new Section to the list box into a specific location (rather than at the end of the list), select a field or Section Description in the Show These Fields in This Order list box and then select the Add Section Title icon. Once the new Section is added to the list box you can start adding fields from the Available Fields list box under the new Section or moving fields from other Sections in the Show These Fields in This Order list box. You can move Section Titles, and associated fields, using the Move Up or Down actions.
- Delete a Detail Section title, by selecting it, and then by clicking on the Remove action. You can also remove the Section by double clicking on it. All fields that are part of the deleted section are now associated with the detail section that preceded it.
- Click Save to save your changes and return to the Search Criteria folder; otherwise, click Submit to save your changes and return to your view in search mode.
Note: If a 'Detail Section Description' exists without associated fields, it is not displayed in the Details Result page and is removed from the 'Show These Fields in This Order' List box once you return to the View.
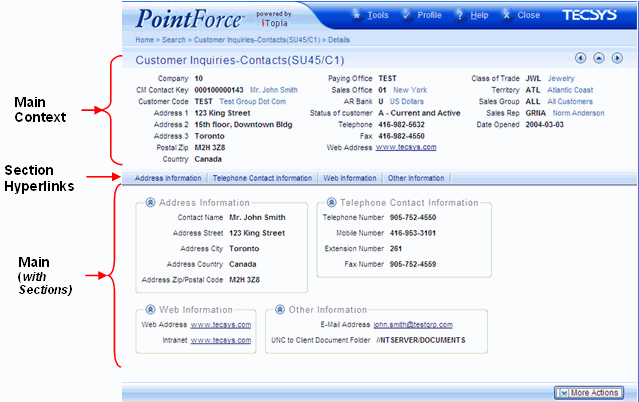
Note: If the view consists of only one Detail Section Description, then it does not display on the Details page. If the view consists of multiple Detail Section titles, these titles appear at the top of the main display area as Section Hyperlinks, and when the user clicks each section, the selected section displays on the page. Here is an example of a Details page with sections in the Main and Main Context subviews:
Rendering Detail Sections Side by Side:
PointForce supports the ability for two or more consecutive detail sections to appear side by side in the Main and Main Context sections on a Details page.
To force a section to appear alongside another section within the Details Result page of a given View, following these steps:
Note: If there is not enough horizontal space to accommodate the side-by-side sections, then they are displayed one beneath the other.
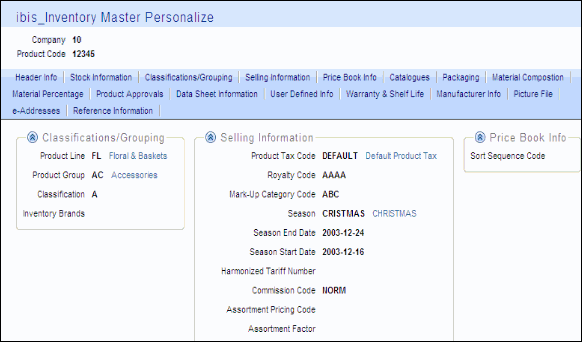
Here is an example of side by side Detail Sections:

Detail Page with Linkable Sections in the Main Subview and Sections (non-linkable) in the Main Context Subview


