Enter Fax Information window
|
Additional Information Maintain Dialling Prefixes (FX05) Maintain Document Options (FX04) |
The Enter Fax Information window displays when you send a fax On Demand from the following programs:
- Enter Orders/Quotes (OE30)
- Display Orders (OE45)
- Enter Inv/Direct Bills/Credits (IN41)
- Display Invoices (IN45)
- Create Purchase Orders (P040)
- Customer Inquiries/Account Summary (SU45)
Depending on the Fax selection made, a different version of the Enter Fax Information window opens:
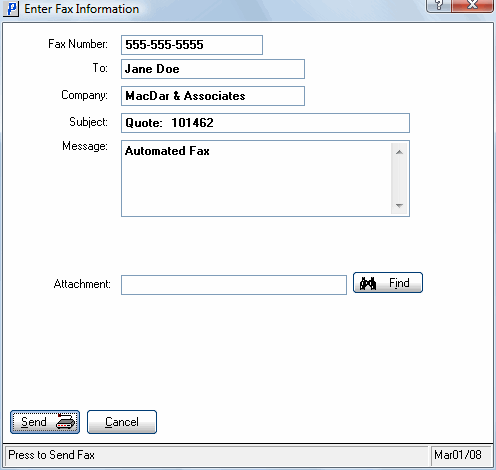
- Selecting the MyFax device (as defined in Maintain Printers (CC97)), the Enter Fax Information window includes the following fields:
- Fax Number - the Fax Number automatically displays if one is entered in following programs:
- If you are using the Fax functionality from OE30 or IN41, the Fax number entered in the 'Fax' field in the header section of the Maintain Customer Master (SU13) program displays for the customer entered in the header section of OE30 or IN41.
- If you are using the Fax functionality from PO40, the fax number entered in 'Fax #' field of the Maintain Supplier Master (PO11) program displays for the supplier entered on the Header Info folder of PO30.
- If you are using the Fax functionality from OE30 or IN41, the Fax number entered in the 'Fax' field in the header section of the Maintain Customer Master (SU13) program displays for the customer entered in the header section of OE30 or IN41.
- To - enter the name of the person to whom the current fax is being sent.
- Company - defaults to the information entered in one of the following programs:
- The 'Name' field from SU13 for the current record if the fax is sent from IN41, IN45, OE30 or OE45.
- The 'Name' field from Maintain Supplier Master (PO11) for the current record if the fax is sent from PO40.
Note: You can edit the Company field as required.
- The 'Name' field from SU13 for the current record if the fax is sent from IN41, IN45, OE30 or OE45.
- Subject - defaults to one of the following options:
- 'Quote' + the Order number for the current record if the fax is sent from OE30 or OE45.
- 'Invoice' + the Invoice number for the current record if the fax is sent from IN41 or IN45.
- 'P/O' + the PO number for the current record if the fax is sent from PO40.
- 'Statement' if the fax is sent from SU45/C2.
Note: You can edit the Subject field as required.
- 'Quote' + the Order number for the current record if the fax is sent from OE30 or OE45.
- Message - defaults to 'Automated Fax' regardless of which application you use for faxing On Demand documents. Note: You can edit this field as required.
- Attachment - you can attach any valid file formats accepted by MyFax. You can search for the Attachment using the Find button. If you are unsure of of the file formats accepted by MyFax, you can find a list from their website at www.myfax.com
(see the FAQ page).
- Note: Your fax will fail if you attach a file in an unaccepted format.

Enter Fax Information
- Fax Number - the Fax Number automatically displays if one is entered in following programs:
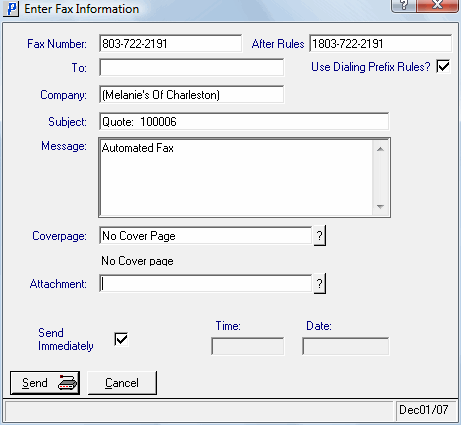
- Selecting the Castelle FaxPress device (as defined in Maintain Printers (CC97)), the Enter Fax Information window includes the following fields:
- Fax Number - the Fax Number automatically displays if one is entered in following programs:
- If you are using the Fax functionality from OE30 or IN41, the Fax number entered in the 'Fax' field in the header section of the Maintain Customer Master (SU13) program displays for the customer entered in the header section of OE30 or IN41.
- If you are using the Fax functionality from PO40, the fax number entered in 'Fax #' field of the Maintain Supplier Master (PO11) program displays for the supplier entered on the Header Info folder of PO30.
- If you are using the Fax functionality from OE30 or IN41, the Fax number entered in the 'Fax' field in the header section of the Maintain Customer Master (SU13) program displays for the customer entered in the header section of OE30 or IN41.
- After Rules - the After Rules field displays the number that will be dialled if the Maintain Fax/E-Mail Devices (FX01) 'LDD Prefix' and any Maintain Dialling Prefixes (FX05) overrides are applied. Note: If you change the Fax number in this field, the following message displays: "You’ve modified the fax number after the dialling rules have been applied. Do you wish to use this # instead and do not apply the rule when dialling? Yes/No". Select Yes to clear the message and change the fax number or select No to clear the message and reset the fax number back to its original state.
- Use Dialing Prefix Rules? - this check box is automatically selected so the FX01 'LDD Prefix' and any FX05 overrides will be applied for the current Fax Number. You can de-select the check box to ignore the FX01 'LDD Prefix' and FX05 overrides for the current number. Note: De-selecting the box does not change the After Rules number displayed.
- To - enter the name of the person to whom the current fax is being sent.
- Company: - defaults to the information entered in one of the following programs:
- The 'Name' field from SU13 for the current record if the fax is sent from IN41, IN45, OE30 or OE45.
- The 'Name' field from Maintain Supplier Master (PO11) for the current record if the fax is sent from PO40.
Note: You can edit the Company field as required.
- The 'Name' field from SU13 for the current record if the fax is sent from IN41, IN45, OE30 or OE45.
- Subject - defaults to one of the following options:
- 'Quote' + the Order number for the current record if the fax is sent from OE30 or OE45.
- 'Invoice' + the Invoice number for the current record if the fax is sent from IN41 or IN45.
- 'P/O' + the PO number for the current record if the fax is sent from PO40.
- 'Statement' if the fax is sent from SU45/C2.
Note: You can edit the Subject field as required.
- 'Quote' + the Order number for the current record if the fax is sent from OE30 or OE45.
- Message - defaults to 'Automated Fax' regardless of which application you use for faxing On Demand. Note: You can edit this field as required.
- Coverpage - defaults to the record setup in the Maintain Document Options (FX04) program. If a record has not been setup in FX04 for the current Sales Office / program, then this field is blank. You can select a cover page from the query.
- Attachment - defaults to the record setup in the FX04. If a record has not been setup in FX04 for the selected Sales office/program, then this field is blank. You can select an attachment from the query.
- Send Immediately - this check box defaults to the set up of the 'Send Immediately' field in FX04. If a record has not been setup in FX04 for the current Sales Office/program, the check box defaults to selected. You can de-select this check box and enter a specific 'Time' as required.
- Time - this field is only available if the 'Send Immediately' check box is de-selected. This field defaults to the set up of the 'Send Time' field FX04. You can change the time as required. If a record has not been setup in FX04 for the current Sales Office/program with a specific time, then this field displays as blank.
- Date - enter the date you wish to send the current fax if you do not want to send as of the current date.

Enter Fax Information
- Fax Number - the Fax Number automatically displays if one is entered in following programs:
The following table outlines the functionality of each button on the Enter Fax Information window:
| Button Label | Icon | Functionality |
| Send |  |
Sends the current fax to the fax queue. Once you click on this button, the following 3 'Fax Status' messages display:
Note: If any of these processes fail, an error message displays. Contact SMB Support if any problems occur. |
| Cancel |  |
Closes the 'Enter Fax Information' window and returns you to the original application. |

