Header Record for CT30
|
Additional Information Sales Office (CT01) Invoice/Dir Bill/Credits (IN41/Options) |
The Header record in Contract Maintenance (CT30) allows you to enter Customer and Location information for new Contracts or select a Contract number for existing Contracts. The information in the header section displays on every folder in CT30.
- Contracts are created whenever equipment is sold or rented to a customer and/or a service agreement is sold to a customer. Contracts can also be created from invoices created in Enter Inv/Direct Bills/Credits (IN41) through the 'Generate Contract' option found under the Tools menu. For more information about creating contracts through IN41, click here.
The following defines every field in the header section of CT30:
- Customer - enter or select from the query a Customer code. You must enter an existing Customer code in this field; Customer codes are maintained in Maintain Customers (SU13).
- Location - Enter or select from the query a Location code, if the contract if for another Ship To Address for the customer. You must enter an existing Location code in this field. Locations codes are maintained in Ship-to Addresses (SU14). Each location can identify a building where equipment is located or may be as detailed as the location of the equipment in the building. When you are using the Location field, only one piece of equipment is entered for each contract and service call.
- Contract # – the Contract number is automatically created once the data entered on the Information folder is updated if the 'Automatic or Manual Contract Number' field in Contract Sales Offices (CT01) is set to 'A'. If this field is set to 'M', then you must manually enter a Contract number in this field prior to updating the date on the Information folder. For further details on CT01, click here.
- If you enter or select a contract that was created in a different warehouse, the following message displays: "That contract belongs to sales office xx. OK".
- Contract Browser
 - selecting Contract Browser button opens the Contract Browser window that allows you to select an existing Contract.
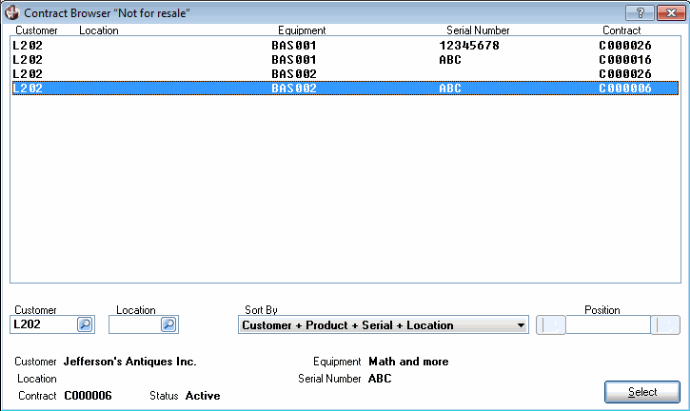
The Contract Browser window displays information about existing contracts. The following list defines every field on the Contract Browser window:
- List Box - the list box displays the Customer Code, Location name, Equipment, Serial Number (assigned to the Equipment) and the Contract Number.
- Customer - enter or select from the query a Customer Code. By entering a Customer you can limit the list of Contracts to that specific Customer.
- Location - enter or select from the query a Location. Note:
You cannot select a Location without selecting a Customer. By entering a Customer and Location you can further limit the list of Contracts to a specific Customer and Location.
- Sort By - the Sort by drop list allow you to sort the contents of the list box by:
- Customer + Location + Product + Serial
- Customer + Product + Serial + Location
- Product + Serial + Customer + Location
- Serial + Product + Customer + Location
- Contract
- Status + Customer + Location + Contract + Product
- Position - the Position field allows you to position a specific record to the top of the list box. The entries in this field are related to the select Sort by. For Example, if the Sort by select is 'Contract' you can enter a Contract number in this field.
Note: If your Operator ID is limited list a specific number of records (as defined in Mntn Operator Passwd/Privilege (CC03)) the 'Load the previous block of records from the file'
 and/or 'Load the next block of records from the file'
  icons display to the right and left of the Position field.
- Additional Information - additional information displays at the bottom of the window for the highlighted record in the list box. The Customer name, Location code, Contract number, Status (of the Contract), Equipment description and Serial Number display.
- Select
 – when you select this button, the highlighted record in the list box is retrieved and displays in CT30. Note: If you select a Contract that was not created for the current Sales Office, the following message displays: "That contract belongs to sales office XX. OK". Click OK to clear the message and select an alternate Contract.
- List Box - the list box displays the Customer Code, Location name, Equipment, Serial Number (assigned to the Equipment) and the Contract Number.
On the menu bar, there is a Go To menu item. The following options are found under the Go To menu:
- Sales Office - when selected, the Sales Office window opens. You can select an alternate Sales Office for which to enter Contracts.
- Contract Billing - when selected, the Contract Billing (CT40) program opens. For further information on CT40, click here.

Header section of Contract Maintenance (CT30)
Here is an example of the Contract Browser:

Contract Browser

