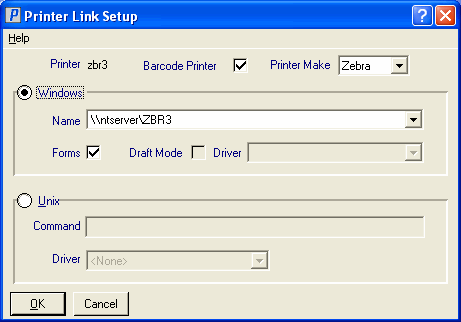
The Printer Link Setup screen is used to:
- Create a link between the Printer and the network drivers.
- Identify the Printer Make.
- Indicate whether the Printer is used as a Barcode Printer.
- If the Printer is being used as a Barcode Printer, select the Barcode Printer checkbox.
- When the Barcode Printer checkbox is selected, the Printer Make field becomes available. Enter or select from the drop down list a Printer Make. Valid options are:
- Zebra
- Monarch
- Tec
- Other
Note: When you select 'Other' as the Printer Make, the following message displays: "Before trying to print labels to this printer, please call your Business Consultant to arrange for your labels to be formatted for you new Bar Code Printer. OK". Click OK to close the message window, and work with your Enterprise Account Representative.
- If you are working in a Windows environment, click Windows:
Tip: Your System Administrator may be helpful at this stage.
- Name - select from the drop down list the name of the Printer on your local PC.
- Forms - when the Forms checkbox is selected, Enterprise assumes the program contains all of the required Printer codes and no Providex/WinSol driver will be used to translate mnemonics.
Note: when the 'Barcode Printer' field is selected, the Forms checkbox must be selected. However, the Forms checkbox can be selected without the 'Barcode Printer' field selected.
- Draft Mode / Driver - Draft mode can be selected only when the 'Forms' checkbox is unselected. When Draft Mode is selected, the Driver drop box is available. These two fields work together.
Normally, the "winprt" interface for the desktop Printer is used. Draft mode invokes the "windev" interface which is basically a 'raw' interface to the Printer. A choice of either the epson136.bcs or epson80.bcs Providex drivers will be offered. These drivers supply mnemonic translation. They also send a reset command which will set the Printer to its default mode (normal or draft mode, for example).
The Drivers available from the drop down list are:
- epson80.bcs - prints 80 columns.
- epson136.bcs - prints 136 columns.
- Name - select from the drop down list the name of the Printer on your local PC.
- If you are working in a Unix environment, the Unix section allows for configuration of Unix/Linux Printers:
Tip: Your System Administrator may be helpful at this stage.
- Command - this field allows you to enter the name of a device or a command string. Here are some examples of devices:
/dev/ttya1 Serial Printer connected to COM1 /dev/ttya10 Serial Printer connected to a Digi-Board COM port /dev/lp1 Parallel Printer connected to the parallel Printer port Here is an example for a Spooled Printer named "printer1":
>lp -s -oraw -dprinter1
Where the "> " is a redirection, the "lp" is a Unix command and the rest are options to the "lp" command. The "-s" is for silent, the "-o" is for option (in this case, "raw"), the "-d" is for destination (in this case, "printer1").
- Driver - select a driver appropriate for the Printer or "none" for no driver at all. The drop down list is made up of all Providex/Enterprise device drivers.
In the event that the Enterprise Server is a Windows platform (NT/2000/2003) any "Windows" Printer that is defined at the Windows Console will display as a "Unix" Printer when examined from a workstation.
- Command - this field allows you to enter the name of a device or a command string. Here are some examples of devices:
Technical Notes:
Laser Forms (Invoices or Sales Orders/picking/packing slips) must be printed to a "Windows" laser Printer. The print-on-print function is performed by the WindX (Enterprise Client) software. A laser Printer defined either on a Unix/Linux or Windows server can be used to print Reports but not Laser Forms.
With a Windows server, there is an advantage to configuring a Printer from the Server's Console. If a Printer is to be strictly for Enterprise (a large impact printer for Reports, as an example), it can be configured on the Enterprise Server and then "linked" to Enterprise from the Server's Console using CC97. In this manner, all Enterprise users will have access to the Printer without having to configure it on each of the workstations.

Printer Link Setup
