Print Statements (AR85)
The Print Statements (AR85) produces Statements for Customers set up to receive Statements in Maintain Customer Master (SU13/OEAR folder).
- The Email/Fax/Printer Selection screen automatically opens. Depending on the set up of the Customer in SU13, select the Printer, Fax and/or Email destination and then click OK.
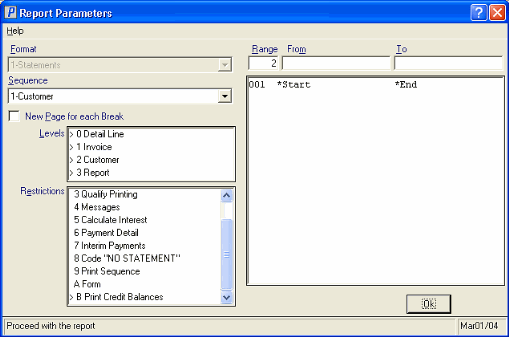
- The Report Parameters screen for AR85 opens.
- The Format field defaults to 'Statement'. You cannot modify the Format field.
- Select a Sequence from the drop down list. Valid options include:
- Customer - Statements print in Customer code order.
- Salesrep - Statements print in Sales Rep/Customer order.
- If a New Page for each Break is required, select the checkbox.
- The Levels list box displays the various Levels of detail available for the report. All Levels are automatically selected in AR85; the '>' before each Level option indicates the Level is selected. Double click on the line to remove the selector. AR85 includes the following Levels:
- Detail Line
- Invoice
Note: the Detail Line and Invoice levels must be included or omitted from AR85 together. If you do not want the Report to include the Detail Lines, the Invoice must also be omitted. - Customer
- Report
Note: The Customer Statement prints the same information regardless of the Levels selected.
- Select the Restrictions that apply to the Statement by double clicking on the line in the list box. Restrictions allow you to tailor AR85 to your specific needs. The '>' before a Restriction indicates the Restriction is selected. An '*' before a Restriction means the Restriction is mandatory. AR85 includes the following Restrictions:
- Statement Date - enter the statement date. This date may not be a future date and may be back dated. This is the only mandatory restriction for AR85.
- The Invoice date is compared to this date, and Invoices are aged into the appropriate 30-day aging group. Note: The Invoice Terms are taken into account in this program, for example if an Invoice has 60-day terms, then it is not moved out of the 'current' column until it is 61 days old, or 1 day overdue.
- Zero Balance - by selecting this option, zero balance or 'paid off' transactions, which are normally skipped, are included on the statement.
- Qualify Printing - by selecting this restriction, printing options become available. Statements will not print unless the account meets the exact restrictions selected. These restrictions include Short Paid Invoice, Paid On Account, Credit Unclaimed, Only 1/30, Only 31/60, Only 61/90, Only 91/120, Only 121+. This restriction is used when sending Collection Statements.
- Note: When using the Qualify Printing Restriction, you must run Generate Customer Account Status (AR52) first.
- Messages - select one type of message to print on the Statements. Options include None, Collection and General. Collection and General messages are defined in Collection/General Messages
(AR01).
- Note: When using the Messages Restriction, you must run AR52 first.
- Calculate Interest - if memo Interest is to be calculated on overdue Accounts, enter the monthly interest charge rate as a percentage value. For more information on calculating Memo vs Generated Interest Invoices, click here.
- Payment Detail- by selecting this option, Invoice payment/Credit Note/Adjustment details are printed on the Statement. If not selected, one line prints for each Invoice showing the Invoice amount, total payments and balance outstanding.
- Interim Payments - by selecting this option, payments received after the Statement date are included.
- Code "NO STATEMENT" - by selecting this option, a Statement is printed for Customers with SU13/OEAR field 'Send By' set to N (do not print Statement).
- Print Sequence - select to print account details in either Invoice Number or Invoice Date sequence.
- Form - select to print Statements on either Stock or Preprinted forms.
- Print Credit Balances - by selecting this option, a Statement prints for Customers with a credit balance, which are normally skipped.
Note: To modify a Restriction once it is set up, reselect the Restriction and make the necessary changes.
- Statement Date - enter the statement date. This date may not be a future date and may be back dated. This is the only mandatory restriction for AR85.
- Select the Range From and To for the report. The Range must match the Sequence selected; if, for example, the Sequence is Customer, you must enter Customer codes in the To and From fields. Multiple Ranges may be entered.
- In the From field, enter the starting 'code' for the report. Following our example, you may want to run AR85 starting at Customer code 'SEA123'.
- In the To field, enter the ending 'code' for the report. You may want to end at Customer code 'SEA987'.
- The information displays in the list box below.
- To add additional Ranges, repeat these steps.
Note: To print the entire file (all Sales Reps or Customer codes), simply tab through the From and To fields. The list box displays *Start and *End in the From and To fields.
- To delete a Range from the list box, double click on the line. The following message displays, "Do you wish to delete this range? Yes/No". Click Yes to delete the range.
- In the From field, enter the starting 'code' for the report. Following our example, you may want to run AR85 starting at Customer code 'SEA123'.
- When all of the information on the Report Parameters screen is complete, click OK to run the report.
- The Format field defaults to 'Statement'. You cannot modify the Format field.
- The Report Complete screen opens when the report is generated. Click OK to accept the report, click Restart to restart the printing of the report, or Abort to cancel the report. Enter the Acceptance Codes as required.

Print Statements (AR85)
