Maintain Bank Codes (AR02)
|
Additional Information Foreign Currency Invoicing |
The Maintain Bank Codes (AR02) program defines the Accounts Receivable Bank codes. Each Bank record stores the GL Control accounts for Accounts Receivable, Bank and Discount. If the Bank is flagged as 'Foreign', then a Currency code and GL account for exchange are also entered.
Each Customer is assigned a Bank code in Maintain Customer Master (SU13/OE/AR) (Note: only Bank codes with a Gateway of 'None' can be assigned to Customers in SU13). When cash is deposited, the Customer's Bank code points to the Bank Code record to determine which Bank and A/R control accounts to update. When invoices are processed, the Customer's Bank Code (which contains a currency assignment) indirectly identifies the Customer's currency. The Customer's currency is part of the key used in Maintain Payment Methods (IN08) to identify the Bank Record to be used to assign the correct A/R Control account to update for invoices and credit notes (for example, invoices posted On Account would Debit the A/R/ control account but invoices paid by Cash would Debit a Cash Clearing account).
- Note: When the Customer's Bank code is flagged 'Foreign', special-processing rules in the Invoicing cycle are executed to process the exchange. For more information on Foreign Currency Invoicing, click here.
If you try to access AR02 while Schedule Invoices/Credits (IN43) or Print Invoice Register (IN44) are running, the following message displays: "You must finish the invoicing cycle before Updating or Deleting any bank information in this program. AR02 will continue now in View Only mode. Once all invoicing cycles have been completed you must exit this occurrence of AR02 and run another from the Menu if you wish to Update or Delete Bank codes. OK". You can view AR02 information, but you cannot make modifications in AR02 until this Invoicing cycle is complete.
The following list defines every field in AR02:
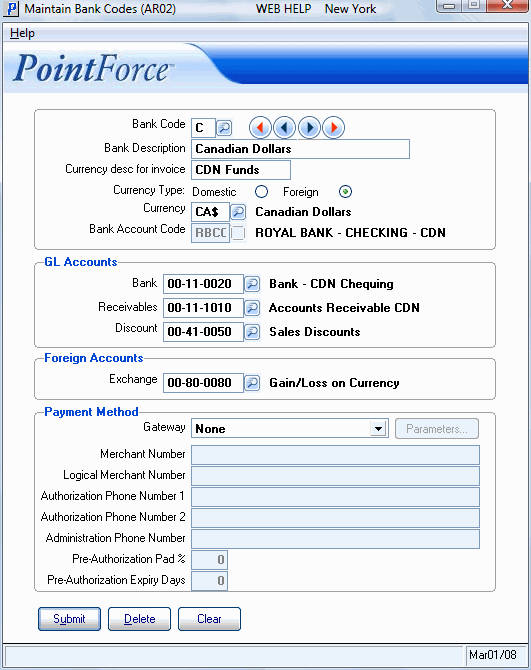
- Bank Code - enter or select from the query a one-character alphanumeric code.
- Bank Description - enter a description of the Bank Code to a maximum of 30-characters.
- Currency desc for invoice - enter a description that prints on all Customer Invoices when recalled for review in Display Invoices from History (IN45) and prints on all Customer's Invoices attached to a foreign Bank. The description can be a maximum of 15 characters in length. For example, you can add a Currency description of "in US Funds" and this will print at the bottom of the Invoice below "Please Pay this Amount".
- Currency Type - select the type of currency that relates to this Bank code. Valid options include:
- Domestic
- Foreign
- Currency - enter or select from the query a Currency code which will determine the exchange rate to be applied to convert foreign currency into domestic currency. Currency codes are defined in Maintain Currency Table
(CC22), and the exchange rate is taken from the 'Accounts Receivable' field in CC22.
- Note: The Currency Type of the Currency code entered in this field must match the 'Currency Type'. If you assign a 'Foreign' Currency code to a 'Domestic' Bank, the following message displays: "You CANNOT assign a Foreign Currency to a Domestic Bank. OK". In the same way, if you assign a 'Domestic' Currency code to a 'Foreign' Bank, the following message displays: "You CANNOT assign a Domestic Currency Code to a Foreign Bank. OK". In either scenario, click OK to close the message window and correct the Currency field.
- When you issue Invoices to a Customer assigned to a foreign Bank, the Sales and all Supplementary charges are converted to domestic Funds for the GL, Invoice Register and Sales Master files. Accounts Receivable is debited in foreign currency. The exchange factor is applied to all Sales and Supplementary charges; the difference is a DR/CR to the exchange GL account.
- For more details and examples, click on the Foreign Currency Invoicing document.
- Note: The Currency Type of the Currency code entered in this field must match the 'Currency Type'. If you assign a 'Foreign' Currency code to a 'Domestic' Bank, the following message displays: "You CANNOT assign a Foreign Currency to a Domestic Bank. OK". In the same way, if you assign a 'Domestic' Currency code to a 'Foreign' Bank, the following message displays: "You CANNOT assign a Domestic Currency Code to a Foreign Bank. OK". In either scenario, click OK to close the message window and correct the Currency field.
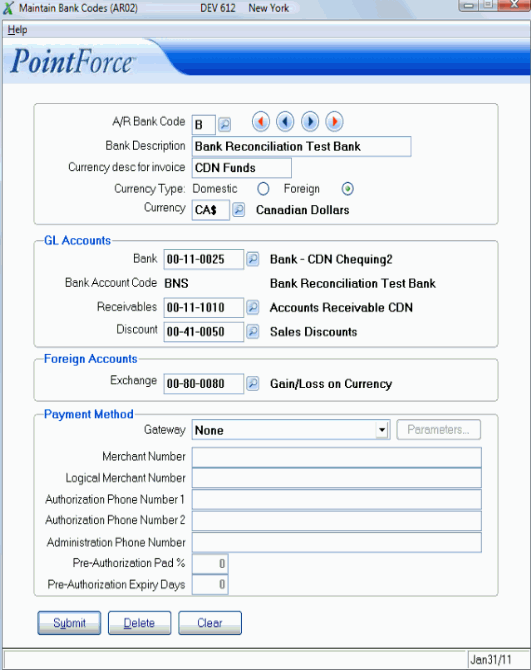
- Bank Account Code - this field is for display purposes only. When the current bank code is used with the bank reconciliation feature, then the bank account code field is populated. You can edit this field using the Bank Master view. For more details, please see the Bank Master topic.
- In the GL Accounts section:
- Bank - enter or select from the query the GL account for the Bank. GL accounts are defined in Maintain Chart of Accounts (GL01). The Bank account entered is the account that is automatically updated as a byproduct of the cash posting cycle. Once the GL account is entered, the corresponding GL account description automatically displays to the right of this field.
- Bank Account Code - this field is available in PFE 6.1.1 and is for display purposes only. The Bank Account Code is used with the Bank Reconciliation feature set up in PointForce iTopia (PFiT). If the Bank GL Account is associated with a Bank Account Code used by bank reconciliation, then the Bank Account Code automatically displays in this field. The bank reconciliation relationship is set up in the Bank Master view in PointForce iTopia. For more information on Bank Reconciliation, see the Bank Reconciliation Overview topic.
- Note: The Bank Account Code is NOT a mandatory field, i.e. you do not need a Bank Account Code associated with your Bank GL. However, if there is no Bank Account Code displayed in this field, then you do not have bank reconciliation set up for this bank GL Account.
- Receivables - enter or select from the query the GL account for Accounts Receivable. GL accounts are defined in GL01. The Accounts Receivable account entered is the account that is automatically updated as a byproduct of the Invoice and cash posting cycles. Once the account is entered, the corresponding GL account description automatically displays to the right of this field.
- Discount - enter or select from the query the GL account for Discounts. GL accounts are defined in GL01. The Discount account entered is the account that is automatically updated as a byproduct of the cash posting cycle. Once the account is entered, the corresponding GL account description automatically displays to the right of this field.
- Bank - enter or select from the query the GL account for the Bank. GL accounts are defined in Maintain Chart of Accounts (GL01). The Bank account entered is the account that is automatically updated as a byproduct of the cash posting cycle. Once the GL account is entered, the corresponding GL account description automatically displays to the right of this field.
- In the Foreign Accounts section:
- Exchange - enter or select from the query the GL account for Foreign Exchange. GL accounts are defined in GL01. This field is used for 'Foreign' type Bank codes only. The Foreign Exchange account entered is the account that is automatically updated as a byproduct of posting foreign Invoices. Once the account is entered, the corresponding GL account description automatically displays to the right of this field.
- In the Payment Method section allows you to enter the Merchant Bank information along with the gateway for EFT processing (manual or automated).
Note: Merchant Banks must be set up separately from regular Bank Codes. For example, Banks that are used in SU13 as the AR Bank should have a Gateway set to 'None'. When the Gateway is set to 'None', all fields below the Gateway field become unavailable. All the Types set up in Maintain Payment Methods (IN08) except EFT will use this Bank.
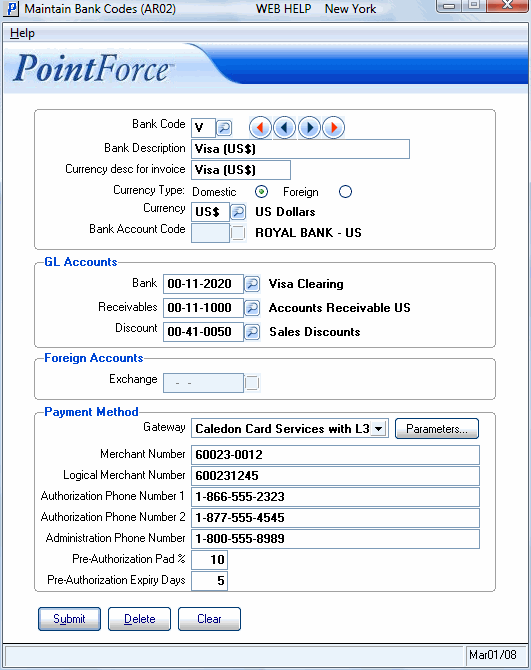
- Gateway - enter or select from the drop down list the type of Gateway set up for A/R Payments. When setting up the Merchant Bank, the Gateway may be either 'Manual' or 'BluePay Card Services'; Note: the description for the Automated gateway varies depending on who your company selects as a provider for the Automated gateway. This Bank will be used in IN08 with EFT Types ONLY. Valid options include:
- None
- Manual - requires an Operator to enter the EFT payment information into an external system to obtain Pre-Authorization or Authorization for Orders being paid by EFT methods.
- BluePay Card Services with L3 - depending on whether Level 3 processing is being used or not, the description for the automated Gateway can be 'BluePay Card Services' OR 'BluePay Card Services with L3' (this is determined at the time of installation). Note: the description for the Automated gateway varies depending on who your company selects as a provider for the Automated gateway. BluePay Card Services works in conjunction with a third-party payment processing Gateway system. Payment information is entered into Enterprise which automatically sends the information to the Gateway to secure the Pre-Authorization/Authorization.
When you select the Automated Gateway (like BluePay), the Parameters icon becomes active. For more details on the Parameters screen, click here.
Note: When changing the Gateway option between None, Manual and BluePay Card Service:
- If you change from either 'Manual' or Automated (like 'BluePay
') to 'None', Enterprise looks at the currency records in IN08 and checks for the bank code reference. If the bank code you are trying to change is on any of the payment methods (active) then you cannot change to None. You must first remove the Bank from all the IN08 Payment Methods, then AR02 will allow the change.
- If you change from either 'None' or 'Manual' to Automated, Enterprise first checks for SSL support with your ProvideX (PVX) version/license. If you have SSL support, the Automated Gateway connection is checked next. If the system cannot connect to your Automated Gateway account, then you cannot accept the Automated Gateway selection within AR02. Appropriate messages are displayed by Enterprise for both scenarios.
- None
- Merchant Number - enter the Merchant Number assigned by the Gateway provider.
- Logical Merchant Number - information entered in this field is used to override the Gateway Parameters Terminal ID. Only use this field when you are configuring multiple merchant bank accounts to process through the same BluePay gateway.
- Authorization Phone Number 1 - enter the primary phone number used for authorization of payments. This field is for information purposes only.
- Authorization Phone Number 2 - enter the phone number used for authorization of payments. This field is for information purposes only.
- Administration Phone Number - enter the phone number used to reach the Gateway provider. This field is for information purposes only.
- Pre-Authorization Pad % - enter a percentage in this field that allows you to 'pad' the Order total. This extra 'buffer' amount is over and above the Order total and covers such items as shipping costs or freight.
- The Pre-Authorization Pad % can be used to increase the estimated total value of an Order before it is sent out for pre-authorization to ensure that post picking charges such as freight, packaging and handling do not cause the Invoice total to exceed the amount that the payment is assured for by the Pre-Authorization code. Before an Order is scheduled for picking, its payment status is checked. If the Order is being settled by an EFT payment method and does not already have a valid pre-authorization code, it will be queued for pre-authorization. The amount to pre-authorize will be calculated as the total outstanding order value (including taxes) times the Pre-Authorization Pad %. Note: the Authorization process does not use this Pad %.
- Pre-Authorization Expiry Days - enter the number of days for which the pre-authorization is valid before expiring. This value should reflect the pre-authorization expiration days assigned to your Merchant Account and the number of days required while filling a printed Order. If a Pre-Authorization code expires before the printed Order is Invoiced, an Authorization must be obtained at the time of Invoicing.
- Gateway - enter or select from the drop down list the type of Gateway set up for A/R Payments. When setting up the Merchant Bank, the Gateway may be either 'Manual' or 'BluePay Card Services'; Note: the description for the Automated gateway varies depending on who your company selects as a provider for the Automated gateway. This Bank will be used in IN08 with EFT Types ONLY. Valid options include:
The following table outlines the functionality of each button on AR02:
| Button Label | Icon | Functionality |
| Submit |  |
Saves the information entered for the current Bank Code. When you are updating a new Bank with a Gateway of 'None', the following message displays: "Would you like to link this bank to the default ON ACCT payment method for all sales Offices? Yes/No". Select Yes to automatically update the On Acct Payment Method in IN08 with the current Bank's Currency, Bank Code and GL Account for all Sales Offices. Select No to add the Bank to AR02, but transactions in IN08 are not created. Note: If you create a new bank (with a gateway set to None) that is assigned to the same currency as another bank that already has an Account type record IN08, this message will not display. If the currencies are the same, additional records for the new bank are redundant making the need to add records in IN08 unnecessary. |
| Delete |  |
Deletes all of the information entered for the current Bank Code. If the Bank is referenced in IN08, the following message displays: "You must delete reference to this Bank Code from IN08. OK". Click OK to close the message window. Caution: There is no confirmation message prior to a deletion. When you click Delete, the Bank Code is automatically deleted from the system. |
| Clear |  |
Clears all of the fields and allows you to enter a new Bank Code. |
| Parameters |  |
When an Automated Gateway is entered in the Gateway field, the Parameters icon becomes available. Click Parameters to open the 'Automated Gateway Parameters' window. For details on the Parameters screen, click here. |
If you are using PFE 6.1.0, here is an example of the AR02 window:

Maintain Bank Codes (AR02)
If you are using PFE 6.1.0 with an EFT Payment Gateway, here is an example of the AR02 window:

Maintain Bank Codes with Gateway Information (AR02)
If you are using PFE 6.1.1, here is an example of the AR02 window:

Maintain Bank Codes (AR02)
