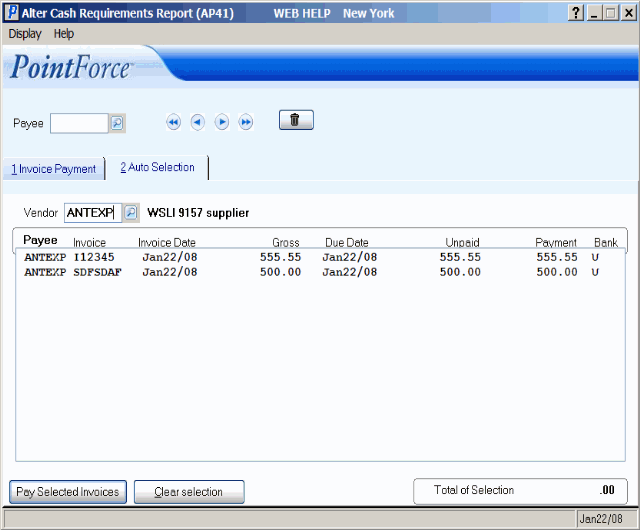
Auto Selection (AP41)
The Auto Selection folder on the A/P Cash Requirement Edit (AP41) is used to add to the Cash Requirements file one or more Invoices to be paid without having to first run the A/P Cash Requirement Print (AP40) program, which resets the Cash Requirements file. Once the additional Invoice(s) is added, you have the option of re-running AP40 using the 'Reprint of Cash Requirements' format after alterations are complete to review the overall changes. This is an optional step which allows you to review any changes before running Print Computer Cheques (AP42) to issue the payments.
The process is as simple as entering a Vendor to review the outstanding Invoices, selecting Invoices from the list box and then using the 'Pay Selected Invoices' option to add the Invoice to the Cash Requirements file.
- When the 'Auto Selection' folder is opened, the cursor is automatically placed in the Vendor field and the 'Display' option from the top menu bar is set to 'By Vendor'.
- Enter or select from the query a Vendor or Payee in the Vendor field. The Vendor of the Invoice can differ from the from the Payee, who will ultimately issue the payment, if the Invoice was posted with a 'Pay To Vendor' in AP30. You can review all of the outstanding Invoices that a 'Pay To Vendor' is responsible for paying by selecting the the 'Payor' option from 'Display' on the top menu bar before entering the Pay to Vendor in this field.
- Once a Vendor is entered, the list box automatically displays the outstanding Invoices. Invoices that are already in the Cash Requirements file for payment also appear on the list; these Invoices can be identified by an amount in the 'Payment' column.
- To select an Invoice to be added to the Cash Requirements file, double click on the Invoice line in the list box. A '>' appears in the first column when the Invoice is selected. To de-select an Invoice, double click on the line and the '>' disappears from the first column.
- If the Invoice already exists in the Cash Requirements file, the following message displays: "This invoice already exists in the due file. OK". Click OK to close the message window.
- If the Invoice selected is on hold, the following message displays: "This Invoice is on HOLD. Do you want to release it to be paid? Yes/No". Select Yes to release the invoice from hold and pay the invoice; select No to cancel the request.
- To select an Invoice to be added to the Cash Requirements file, double click on the Invoice line in the list box. A '>' appears in the first column when the Invoice is selected. To de-select an Invoice, double click on the line and the '>' disappears from the first column.
- A running total of Invoices selected for payment displays in the Total of Selection section at the bottom of the screen.
- When all of the Invoices are selected for the current Vendor, click Pay Selected Invoices to generate the Invoice payment records. Note: You must click on 'Pay Selected Invoices' for one Vendor (or Payee) before moving to another Vendor. The Auto Selection folder does not save the marked records from one Vendor to the next.
- Once the Invoice Payment record(s) has been created, the Invoice Payment
folder automatically opens with the Payee of the last record processed from the list for you to review. The 'Pay Selected Invoices' function does not account for the Discount Dates as the AP40 method of selecting Invoices for payment dues. Therefore, if you want to enter a 'Discount To Take' amount, you must modify the Invoice on the Invoice Payment folder.
- To reset all of the Invoices in the list box that are marked for payment but have not been processed with the 'Pay Selected Invoices' option, click on Clear Selection. When you click on 'Clear Selection', the '>' symbol(s) are removed from the line(s) in the list box and the 'Total of Selection' section is returned to zero.
- You can choose from the following options under Display in the top menu bar:
- By Vendor - Invoices are displayed in the list box according to the Vendor against which they were posted; this is not necessarily the Vendor that will issue the payment. When the 'Display by Vendor' option is selected, the Vendor field is used to specify the Vendor (AP30) against which the Invoice was posted. The first column of the list box displays the Vendor that will issue the payment for the Invoice; the Payee or the Pay To Vendor.
- By Payee - Invoices are displayed in the list box according to the Vendor that will issue the payment, which is not necessarily the Vendor against which the Invoice was posted. When the 'Display by Payee' option is selected, the Vendor field is used to specify the Payee or Pay To Vendor (AP30) that will issue the payment for the Invoice. The first column of the list box displays the Vendor against which the Invoice was posted.
- By Vendor - Invoices are displayed in the list box according to the Vendor against which they were posted; this is not necessarily the Vendor that will issue the payment. When the 'Display by Vendor' option is selected, the Vendor field is used to specify the Vendor (AP30) against which the Invoice was posted. The first column of the list box displays the Vendor that will issue the payment for the Invoice; the Payee or the Pay To Vendor.

