Recurring Invoices
Recurring Invoices are created in Enter Invoices (AP30) by duplicating the parameters of a 'Future Invoice', including Vendor, Amount, Vendor's Info and the GL Distributions. The Recurring Invoice feature can be used for automated payment plans with fixed billing amounts for which you do not necessarily receive a monthly billing statement, for example your Internet Service Provider.The Recurring Invoice feature is part of the 'Future Invoice' function of AP30. Once a 'Future Invoice' has been created and balanced in AP30/GL Distribution, you are given the option of creating Recurring Invoices.
Note: Future Invoices are stored in the Open Invoice File and appear for processing as soon as the 'Discount' or 'Due Date' fall within the range of the various Accounts Payables reports, for example the Print Cash Requirements Report (AP40) or the Print Aged Trial Balance (AP83). The GL postings for Future Invoices are held in the GL Collector File and are brought forward as each GL period is closed until they become due and are posted.
Recap: Preparing for Recurring Invoices
- In AP30, create or select a Batch to work with. The 'Batch Total' should be calculated to include the 'Gross Amount' of the initial Future Invoice and each recurring Invoice in order to balance the Batch Proof.
- Enter or select from the query the Vendor for the Recurring Invoices.
- Enter the Invoice of the first Recurring Invoice; the unique Invoice numbers for the remaining Invoices will be specified on the Enter Future Recurring Invoices screen (see Creating Recurring Invoices below).
- TIP: When entering monthly billings, you may want to use a consistent Invoice numbering convention, such as year + month. For example, 200608, 200609, 200610.
- On the Header folder:
- Select 'Future' as the Invoice Type.
- Enter or select from the query the Invoice Date for the initial Future Invoice. If a Vendor offers Payment Terms, ensure you have the correct date entered before creating the Recurring Invoices so that all Recurring Invoices will be created with the correct terms applied.
- Enter a message in the Message field if the information is useful. For example, "Contract #2006-42213". This message corresponds to the first Future Invoice but will be applied to all Recurring Invoices. You will have to edit each Recurring Invoice individually to update the Message field.
- Enter an amount in the Gross Amount field.
- Adjust the Vendor's Info as required.
- Select 'Future' as the Invoice Type.
- On the GL Distribution folder:
- Create the 'GL Distributions' and balance the Invoice.
- When the 'Future Invoice' is balanced, the following message displays: "Do you wish to create recurring invoices? Yes/No". Select Yes and the Enter Future Recurring Invoices screen automatically opens. Select No to cancel the request and close the message window.
- Create the 'GL Distributions' and balance the Invoice.
Creating Recurring Invoices:
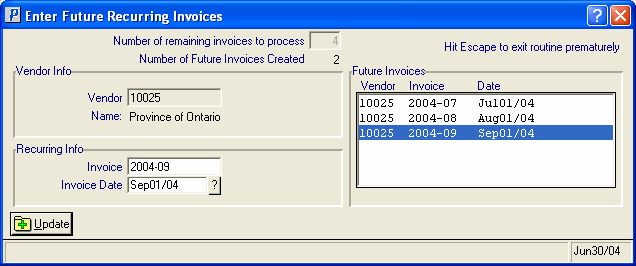
The Enter Future Recurring Invoices screen requires you to specify how many additional Invoices you want to create and then configure the 'Recurring Info' for each of those additional Invoices.
- On the Enter Future Recurring Invoices screen, enter the 'Number of remaining invoices to process' and then press Tab. Note: This number does not include the initial Future Invoice you have already created. For example, if you are creating one year's worth of monthly recurring Invoices (twelve Future Invoices), you have eleven remaining Invoices to process.
- Once the 'Number of remaining invoices to process' is entered and Tab is pressed, the following message displays: "Is x (number of Invoices entered), the correct number of remaining invoices to process? Yes/No". Select Yes to accept the number entered. Select No to cancel the request and close the message window.
- Once the 'Number of remaining invoices to process' is confirmed, the Recurring Info section is available:
- For each remaining Recurring Invoice, enter a unique Invoice number in the Invoice field. As stated in the 'Preparing for Recurring Invoices' section above, when entering monthly billings, you may want to use a consistent Invoice numbering convention, such as year + month. For example, 200608, 200609, 200610.
- For each remaining Recurring Invoice, enter or select from the query the Invoice Date. The Invoice Date is used as the GL Posting Date for the Recurring Invoice when the GL Distributions are copied for it from the initial Future Invoice.
- For each remaining Recurring Invoice, enter a unique Invoice number in the Invoice field. As stated in the 'Preparing for Recurring Invoices' section above, when entering monthly billings, you may want to use a consistent Invoice numbering convention, such as year + month. For example, 200608, 200609, 200610.
- Click Update to add the Recurring Invoice. The following message displays: "OK to update invoice xxxxxx with invoice date: mmddyy. Yes/No". Select Yes to update the Invoice. Select No to cancel the update request and close the message window.
Note: For each new Recurring Invoice that you update, the 'Number of remaining invoices to process' is reduced and the 'Number of Future Invoices Created' is increased.
- When the last recurring Invoice is updated, the Enter Future Recurring Invoices automatically closes and you are returned to the Invoice field of the Header section in AP30. You can modify and/or delete Recurring Invoices in AP30, as required.
Note: You can exit the Enter Future Recurring Invoices screen before all of the Recurring Invoices are entered by pressing ESC. You can exit when you have created LESS than the specified number of Recurring Invoices, but you cannot create MORE than the specified number without beginning a new Future Invoice or recalling an existing Future Invoice. When you press ESC to end the process, the following message displays: "You still have x (number of Invoices) left to input. Do you want to stop at this point? Yes/No". Select Yes to return to the Invoice field of the Header section of AP30. Select No to cancel the request and continue entering the remaining Invoices.

