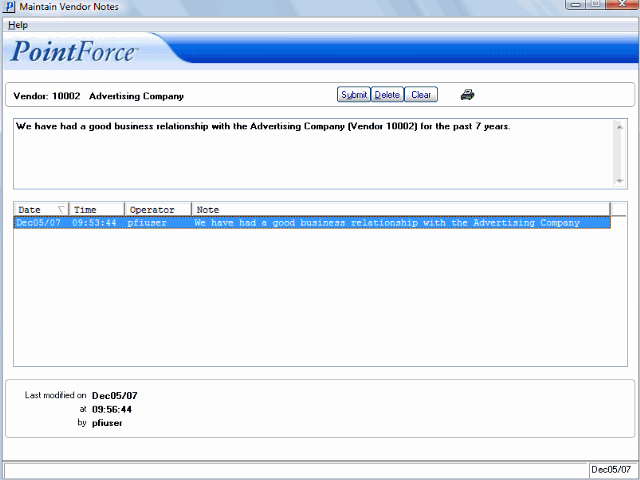
Maintain Vendor Notes
The Maintain Vendor Notes enables you to create or review Notes related to the current Vendor. This screen allows you to enter 'unstructured' information about the Vendor that can be retrieved at a later date.
Follow these steps to set up a Vendor Note:
- In the header section of AP13 or AP50, click on the Vendor Notes icon
 to create a new Note or click on the Existing Notes icon
 to review, edit or add to an existing note.
- On the Maintain Vendor Notes screen, the Vendor Code and Vendor Name automatically display in the Header section.
- In the text box below the Vendor information, enter or edit the text of the Note. You can enter up to 1,048 characters of text per Note.
- When all of the information has been added, click Update to add the Note to the Vendor.
- To review an existing Note, double click on the appropriate line in the list box in the middle of the screen to recall the Note. The list box provides the following details on each Note:
- Date
- Time
- Operator
- Note
- The bottom portion of the screen identifies the following information about the Vendor Note:
- The date Vendor Note was Last modified on.
- The time of the last modification.
- The User ID responsible for the last update.
- When the Note is entered or when the edits are complete, click on Update.
- To delete an existing Note, recall the Note and click on Delete.
- To clear the text box, click on New and begin entering a new Note.
- To print a Note or a range of Notes, click on the Printer icon
 .
.
- The Printer Selection screen automatically opens. Select the Printer destination and click OK.
- The Date Range Selection screen automatically opens. Enter or select from the query a Start Date from which the Notes will print, and then enter or select from the query an End Date. Click OK when the correct dates are entered.
- The Vendor Notes report for the range entered automatically prints to the printer selected.
- The Report Complete screen opens when the report is generated. Click OK to accept the report, click Restart to restart the printing of the report, or click Abort to cancel the report. Note: You do not need to enter the Acceptance Codes to accept this report.
- The Printer Selection screen automatically opens. Select the Printer destination and click OK.

Maintain Vendors (AP13/Maintain Vendor Notes)

