G/L Future Period Financial Generation (GL75)
You can generate a future Financial report with Generate Financial Reports (GL75). GL75 uses the data generated in the Work File from Prepare Work Files (GL72). GL75 works exactly like Generate Reports (GL51) except that GL51 uses Live system files and GL75 uses the Work File.Reports are produced using the parameters defined in Maintain Report Parameters (GL05) and copied into the Work files and the parameters selected in this program. The reports are printed by Print Financial Reports (GL76).
The report generation process is separated into two phases which run automatically. The process of each phase displays when the report is run. The phases are:
- Detail Lines
- Sub-total and Total lines
The GL system does allow you to produce a consolidated financial statement across multiple companies. To facilitate this, the chart of accounts should be common across those companies (i.e. the Sales GL account is the same GL code in all companies).
The Work files used to produce future financial statements must be generated (in GL72) up to the same fiscal period across all companies.
The report will be generated using the report parameters from the company you are in when you execute GL75. For example, you are producing a Consolidated Income Statement for companies 11 and 12. If you execute GL75 in Company 11, then the Income Statement report parameter (defined in Maintain Report Parameters (GL05)) in Company 11 will be used. If you execute program GL75 in Company 12, then the Income Statement report parameter in Company 12 will be used.
Setting Up and Using GL75:
- When GL75 initially opens, the Consolidation of GL Reports screen automatically opens. Highlight the Company for which you want to print reports and click OK.
- If there are no Companies listed on the 'Consolidation of GL Reports' screen, in the 'Add/Delete Company' field, enter or select from the query the Company code with which you want to work. The Company automatically displays in the list box. Select/highlight the Company and click OK to open GL75.
- If you want to delete a Company listed on the 'Consolidation of GL Reports' screen, in the 'Add/Delete Company' field, enter or select from the query the Company code you want to delete. The program detects that the Company is already 'added' to the list box and the Company is automatically deleted.
- If there are no Companies listed on the 'Consolidation of GL Reports' screen, in the 'Add/Delete Company' field, enter or select from the query the Company code with which you want to work. The Company automatically displays in the list box. Select/highlight the Company and click OK to open GL75.
- GL75 automatically opens. The following list defines every field on the screen:
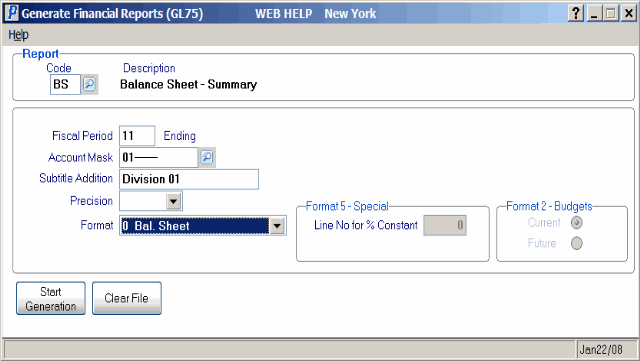
- Code - enter or select from the query the Report Code for the Report you want to generate. The Report Codes are assigned in GL05.
Once the Code is entered, the Report description automatically displays in the Description field to the right of the Code.
- Fiscal Period - enter the Future Period you are reporting (from GL73). The default is the last period closed.
You can generate a Preliminary Financial Report for the future period you are reporting after the 'Preliminary General Ledger Report' is run in Preliminary GL Report (GL73).
- Account Mask
- the Account Mask field is used to qualify the GL accounts that are to be included on the report. Eligible accounts will contain characters that match the 'mask' characters and are in the same position as the 'mask' characters. A dash (-) means those characters of the GL account are unqualified. For example, an Account Mask of 01----- will include only GL accounts that begin with '01' and will included all '01' accounts.
You can use this field to produce a financial report for a specific Branch/Division using a generic report parameter defined in GL05.
If you use an Account Mask, you can also use the 'Subtitle Addition' field to describe what the Account Mask selects. This provides specific information in the Subtitle of the report when the report prints.
- Subtitle Additions - when an Account Mask is defined, the content of the report may require some additional clarification. In this case, you can enter text in the Subtitle Addition field to supplement the 'Sub-title' field set up in GL05. For example, you create an Income Statement report with a Title in GL05 of 'Income Statement' and a Sub-title in GL05 of 'Branch:'. In GL75, you can enter the actual Branch name in the Subtitle Addition field, for example '07-Toronto'. The report generated out of GL75 will have 'Income Statement - Branch: 07-Toronto' on the Title/Sub-title line.
- Precision - determines the point at which the report will be rounded off and reported. The Precision options available from the drop down list include:
Precision Description Value Reported Value 0 Rounded to the nearest
dollar (no decimals).1961.87 1962 2 Rounded to nearest
cent (no rounding).1961.87 1961.87 100 Rounded to nearest
hundred1961.87 20
Report Title includes:
'Figures in Hundreds of Dollars'1000 Rounded to nearest
thousand1961.87 2
Report Title includes:
'Figures in Thousands of Dollars'Note: If you are printing either '12-Month Budget' or '3-Year Forecast' formats, you must use either Precision 100 or 1000.
- Format - the Format drop down list offers the following valid options:
- 0 - Balance Sheet - Balance Sheet showing the balances as of this year, last year and last year-end.
- 1 - Income Statement-Variance
- Income Statement format showing the Actual and Previous Year Totals for month-to-date, year-to-date and previous year-end PLUS percent and dollar variances between years.
- 2 - 12-Month Budget - the twelve-month budget spread with a total for the year. The Precision must be set to 100 or 1000. The Current or Future Budgets option can be selected with this format.
- 3 - 3-Year Forecast - a three-year Budget Forecast. This gives totals for the next three years.
- 4 - 12-Month History - a twelve-month history showing the closing balance for Balance Sheet accounts and the monthly transactions for the Profit and Loss accounts.
- 5 - Special - a Special report giving the month-to-date, percent of month-to-date, year-to-date and percentage of year-to-date. When this format is selected, the 'Line No for % Constant Variable' is also required.
- 6 - YTD - A short report containing the year-to-date value only.
- 7 - Income Statement-Budgets - Income Statement showing the Actual, Budget and Previous Year Totals for month-to-date, year-to-date and previous year-end PLUS percent variances between years. This format is similar to the Format 1 - Income Stmt-Variance but with budget amounts instead of dollar variances.
- 0 - Balance Sheet - Balance Sheet showing the balances as of this year, last year and last year-end.
- The Format 5 - Special section is available when the Format of the report is set to '5 - Special':
- Line No for % Constant - the Special Format Reference Line points to a specific line number in the report (the Constant Value), and all of other Detail lines in the report are compared to this value. The value of the GL Account (or summarized accounts) on the Reference Line is used in the following formula along with the Current Value of each Detail line:

For example, you want to determine what percentage of Total Sales your Expenses represent. In this case, the Reference line is set to the Line No. for Total Sales. Then each Detail line in the report is compared against the Total Sales line to calculate the percentage.
Enter a valid line number for the report being generated.
- Line No for % Constant - the Special Format Reference Line points to a specific line number in the report (the Constant Value), and all of other Detail lines in the report are compared to this value. The value of the GL Account (or summarized accounts) on the Reference Line is used in the following formula along with the Current Value of each Detail line:
- The Format 2 - Budgets section is available when Format 2 - Budgets is selected. Select one of the following options:
- Current
- Future
Format 2 incorporates the budget figures as maintained in Maintain Budget Figures (GL65).
- Code - enter or select from the query the Report Code for the Report you want to generate. The Report Codes are assigned in GL05.
- When all of the information for the Report generation is entered, click Start Generation to generate the report and save it in a temporary file. To print ALL the reports that were generated, run Print Financial Reports (GL76). GL76 uses the temporary file to print the reports and then GL76 deletes the temporary file.
- To manually clear or erase the temporary file containing the reports recently generated, click Clear File. This allows you to start generating all of the reports again. Note: When you run GL76 and print the reports, the temporary file is automatically cleared.
Generate Financial Reports (GL75)
