G/L Future Period Trial Balance (GL74)
The Trial Balance (GL74) program prints an ending Trial Balance report using data generated in the Work File from Prepare Work Files (GL72). GL74 works exactly like the Trial Balance (GL50) report, except that GL50 uses Live system files and GL74 uses the Work file.GL74 prints a subtotal for GL Header Accounts (i.e. Account codes containing '*', see Maintain Chart of Accounts (GL01)). GL74 also prints a subtotal for Branch and Company, similar to Preliminary/Final GL Report (GL81).
- The Printer Selection screen automatically opens. Select the device destination and click OK.
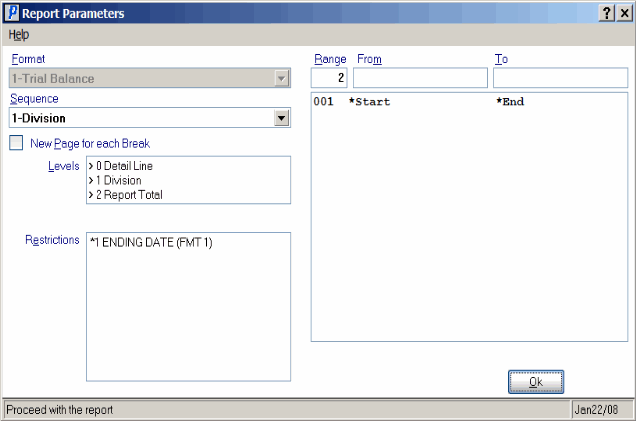
- The Report Parameters screen for GL74 opens.
- The Format field defaults to 'Trial Balance'. You cannot modify the Format field.
- Select a Sequence from the drop down list. Valid options include:
- Division - lists all Accounts within a Division (i.e. BBTAAAAA sequence)
- General Ledger Account - list all Divisions for an Account (i.e. TAAAAABB sequence)
- Division - lists all Accounts within a Division (i.e. BBTAAAAA sequence)
- If a New Page for each Break is required, select the check box.
- The Levels list box displays the various Levels of detail available for the report. All Levels are automatically selected in GL74; the '>' before each Level option indicates the Level is selected. Double click on the line to remove the selector. GL74 includes the following Levels:
- Detail Line
- Division/General Ledger Account
- Report Total
- Select the Restrictions that apply to the Trial Balance report by double clicking on the line in the list box. Restrictions allow you to tailor GL74 to your specific needs. The '>' before a Restriction indicates the Restriction is selected. Once a Restriction is selected, it can be de-selected but the '>' remains. An '*' before a Restriction means the Restriction is mandatory. GL74 includes the following Restriction:
- Ending Date (Fmt 1) - enter or select from the query the Ending Date for the Trial Balance. This is a mandatory field. The Ending Date must be a valid Period End date in Maintain Fiscal Periods (CC90). Although the expectation is that you would be running GL74 for the future period you generated the Work files for, you are in fact allowed to go further into the future. Using GL72 generation date as the baseline, you may print for the period just prior to that date (i.e. last period closed in the Work files) up to the last period in the fiscal calendar.
Note: To modify a Restriction once it is set up, reselect the Restriction and make the necessary changes.
- Select the Range From and To for the report. The Range must match the Sequence selected. Multiple Ranges may be entered.
- In the From field, enter the starting 'code' for the report.
- In the To field, enter the ending 'code' for the report.
- The information displays in the list box below.
- To add additional Ranges, repeat these steps.
Note: To print the entire file (all Division codes), simply tab through the From and To fields. The list box displays *Start and *End in the From and To fields.
- To delete a Range from the list box, double click on the line. The following message displays, "Do you wish to delete this range? Yes/No". Click Yes to delete the range.
- In the From field, enter the starting 'code' for the report.
- When all of the information on the Report Parameters screen is complete, click OK to run the report.
- The Format field defaults to 'Trial Balance'. You cannot modify the Format field.
- The Report Complete screen opens when the report is generated. Enter the Acceptance Codes to accept the report (if applicable), click Restart to restart the printing of the report, or click Abort to cancel the report.

Trial Balance (GL74)
