G/L Future Period Report (GL73)
The Preliminary GL Report (GL73) works exactly the same as the Preliminary/Final GL Report (GL81), except GL73 uses the Work Files generated in Prepare Work Files (GL72) instead of the Live GL Files. GL73 produces a preliminary month end GL trial balance report which lists all transactions for the month as well as transaction totals, new month end balances and Account group totals. GL73 reports up to the period specified in the GL72 file generation routine.Note: You cannot use GL73 for the current period open, you must use GL81.
Here is an excerpt from a sample report:
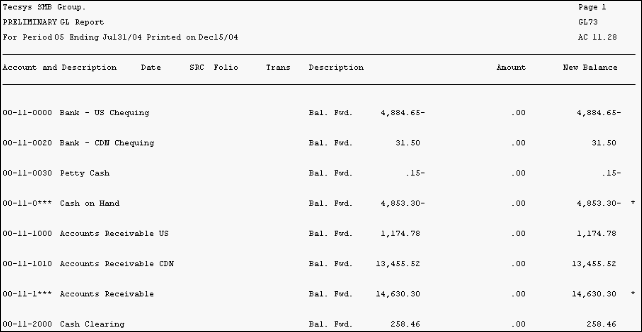
Excerpt from GL73
- When you open GL73, the Preliminary GL Report screen automatically displays:
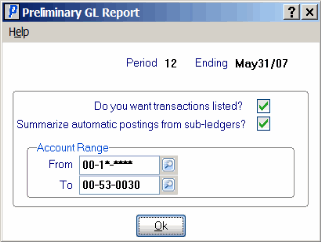
Preliminary GL Report (GL73)
The following list defines every field on GL73:
- Period - displays the period number associated with the 'Closing date for period to print' field in GL72. This field is for information purposes only and cannot be edited.
- Ending - displays the period end date taken from the 'Closing date for period to print' field in GL72. This field is for information purposes only and cannot be edited.
- Do you want transactions listed? - select this check box when you want to list transaction details for each GL Account. The report lists all transactions against the GL Account between the opening period balance and the period ending balance. The report also identifies the source of each transaction.
- Summarize automatic postings from sub-ledgers? - select this check box to summarize the postings automatically generated from the various sub-ledger registers. For example, each day the Cash Receipts Register automatically posts entries into the GL Collector file to Debit the Bank and Credit Accounts Receivable; those entries are assigned Source Code 'AR'. Instead of reporting the individual detail records for each day's deposit, the Summarize option would add all the 'AR' records together and report the total in one line. If the Summarize option is not selected, then all postings for the period are reported in detail. Note: Journal Entries from Enter Journal Vouchers (GL30) are never summarized.
- Account Range From/To - this section allows you to enter the beginning and ending GL Account range to print for the Preliminary GL Report.
- Note: To print the entire file (all GL Accounts), simply tab through the From and To fields. The From field is automatically set to a starting Account of Zeros and the To field is automatically set to an ending Account of upper case 'Z's'. These default settings cover all Accounts.
- Period - displays the period number associated with the 'Closing date for period to print' field in GL72. This field is for information purposes only and cannot be edited.
- The Printer Selection screen automatically opens. Select the device destination and click OK.
- The Report Complete
screen opens when the report is generated. Depending on the print device selected, you are presented with one of the following two options:
- If you are printing the report to a local printer device, PDF file or to your screen, enter the Acceptance Codes to accept the report, click Restart to restart the printing of the report, or click Abort to cancel the report.
- If you are sending the report via an email or fax device, click OK to accept the report, click Restart to restart the fax/email (not always applicable), or click Abort to cancel the report.
- If you are printing the report to a local printer device, PDF file or to your screen, enter the Acceptance Codes to accept the report, click Restart to restart the printing of the report, or click Abort to cancel the report.
