A/P Check Print (AP42)
|
Additional Information Prepaid Inventory |
The Print Checks (AP42) program produces checks based on the Invoices selected for payment by Cash Requirements Report (AP40) and Alter Cash Requirements Report (AP41) programs. Separate runs must be done for each Bank code, allowing you the opportunity to physically change the check forms in the printer for each bank.
The following items print on the check stub:
- Invoice details, including any Messages set up in Enter Invoices (AP30).
- Reference information entered in AP30 displays for invoices which prepay a portion of a Purchase Order. Invoices that have had Prepayments applied display the Reference, Prepayment Amount and the Check number from the applied Prepayment(s). For more information on prepayments, click here.
If more than one check stub is required, the check itself will be cancelled. The system generates unique check numbers by Bank Account.
- The Printer Selection screen automatically opens. Select the Printer destination and click OK.
- The Check Print screen automatically opens:
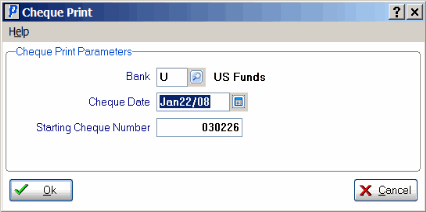
Check Print (AP42)
- Enter or select from the query the Bank code from which the checks are produced. If there are no Invoices for the selected Bank code, the following message displays: "No Checks to be printed for this Bank account. OK". Click OK and enter the appropriate Bank code. When a valid Bank code is entered, the Description displays beside the Bank field.
- Enter or select from the query the Check Date. This date must be within the current or next fiscal period for AP (as updated by AP89). This date is assigned to the GL distributions for the check run.
- The Starting Check Number field is enabled depending on the set up of Maintain Bank Codes (AP01):
- If the 'Pre-Numbered Checks' field is de-selected (off), then this field is NOT available.
- If the 'Pre-Numbered Checks' field is selected (on), then this field is available. The system keeps track of the last Check number used and displays the next Check number as the default Starting Check Number, but you can modify this field as required.
- If the 'Pre-Numbered Checks' field is de-selected (off), then this field is NOT available.
- The Test Print Required screen is enabled depending on the set up of AP01:
- If 'Print Laser Checks' is de-selected (off), then you are using continuous form Checks. When you click OK to close the Check Print window, the 'Test Print Required' window automatically displays allowing you to do one or more test prints to align the Checks before the print job begins.
- Enter or select from the query the Bank code from which the checks are produced. If there are no Invoices for the selected Bank code, the following message displays: "No Checks to be printed for this Bank account. OK". Click OK and enter the appropriate Bank code. When a valid Bank code is entered, the Description displays beside the Bank field.
- The Checks are sent to the Printer.
- Once the Checks are generated, the AP Check Number Verification screen opens:
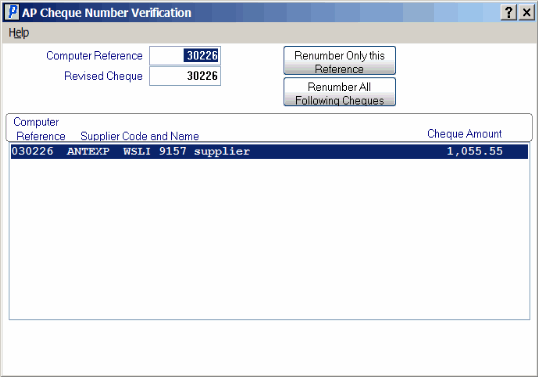
AP Check Number Verification (AP42)
-
All of the Checks are listed in the list box for you to review.
- To recall a Check for renumbering, double click on the Check line in the list box or enter the Computer Reference number of the Check in the Computer Reference field.
- Enter the new Check number in the Revised Check field.
- You have two options: you can select the Renumber Only this Reference option or you can select the Renumber All following Checks option. In both cases, the renumbered Check(s) display in the list box below.
Note: If you renumber a Check to a Check number that is already in use, the following message displays: "This Check number is already in use. Choose a new unique number as the revised check number. OK". Click OK to close this message window and select a new number for the Check.
Note: The 'Renumber Only this Reference' and 'Renumber All Following Cheques' buttons are disabled when the Computer Reference and Revised Cheque fields are blank. In order to enable either renumber routine, you must have a cheque number entered in either field.
- When all of the information is correct, exit this program by pressing ESC or by clicking on the 'X' in the upper right hand corner.
- As you exit the program, the following message automatically displays: "Exit Check number verification routine? Yes/No". Select Yes to exit the 'AP Check Number Verification' program. Select No to close the message window and return to the 'AP Check Number Verification' program.
-
All of the Checks are listed in the list box for you to review.
- The Report Complete screen opens when the Report is generated. Enter the Acceptance Codes to accept the report (if applicable), click Restart to restart the printing of the report, or click Abort to cancel the report.
