A/P Cash Requirement Print (AP40)
|
Additional Information Prepaid Inventory |
The A/P Cash Requirement Print (AP40) program produces a report by Vendor of all Invoices selected for payment. Invoices are selected for payment based on the Limiting Due Date and Discount Qualification Date entered in the AP40 restrictions compared to the Invoice's Due Date for Payment and Discount Date. The window of time between the Discount Qualification Date and the Limiting Due Date determines if discount is eligible to be taken.
Invoices that are due (Invoice’s Due Date is on or before the ‘Limiting Due Date’) are selected for payment. Then the program checks for discount eligibility:
- If there is no discount amount, the program goes to find the next invoice.
- If there is a discount amount and the Invoice's Discount Date is within the window of time between the 'Discount Qualification Date' and the 'Limiting Due Date', then the discount will be taken.
- Intention of this window of time for discount eligibility is to not take discount if the invoice was not paid on time and is now way past its discount date.
Invoices that are not yet due (Due Date is beyond the 'Limiting Due Date') the program checks to see if the invoice should be selected in order to take advantage of supplier discounts.
- If there is no discount amount, the program goes to find the next invoice; AP40 will examine that invoice for payment in the next AP40 run.
- If there is a discount amount and invoice’s Discount Date is => (on or after) the Discount Qualification Date and <= (on or before) the Limiting Due Date (ie, is in window of time defined by the Discount Qualification Date and the Limiting Due Date), then that invoice will be selected for payment and the discount will be taken.
NOTE: If there is a discount amount and the invoice Discount Date is => (on or after) the invoice Due Date for Payment, when the invoice is selected for payment, the discount will always be taken. This tricks the system into always taking the vendor’s discount, even if the invoice is past due.
Examples:
- Limiting Due Date: April 21
- Discount Qualification Date: April 14
- Discount eligibility window: April 14-April 21
| Example Invoice Number | Invoice Discount Date | Invoice Due Date | Disc Amt | Select for Pymt | Take Disc? | Comments |
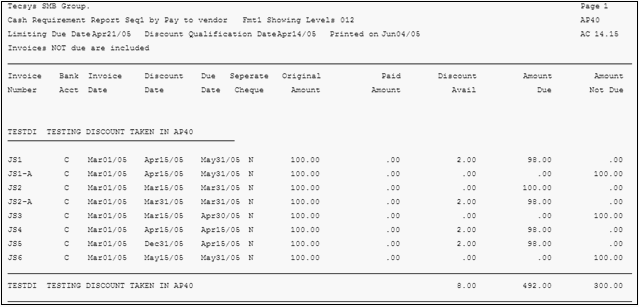
| JS1 | April 15 | May 31 | 2.00 | Y | Y | Invoice not due but is selected to take advantage of Vendor's discount. |
| JS1-A | April 15 | May 31 | 0.00 | N | N | Invoice not due; no discount. Wait until due for payment. |
| JS2 | March 15 | March 31 | 2.00 | Y | N | Invoice due for payment but missed Discount Date. |
| JS2-A | March 15 | March 15 | 2.00 | Y | Y | Invoice past due for payment but still takes discount because invoice discount date => invoice due date for payment. |
| JS3 | March 15 | April 30 | 2.00 | N | N | Invoice not due and Discount Date missed. Wait until due for payment. |
| JS4 | April 15 | April 15 | 2.00 | Y | Y | Invoice due for payment; takes discount if invoice discount date => invoice due date for payment. Also discount is taken because invoice discount date is within the discount window. |
| JS5 | Future | April 15 | 2.00 | Y | Y | Invoice due for payment; takes discount if invoice discount date => invoice due date for payment. |
| JS6 | May 15 | May 31 | 2.00 | N | N | Invoice not due; still in time to pick up discount in future run. |
Here is the corresponding AP40 report:

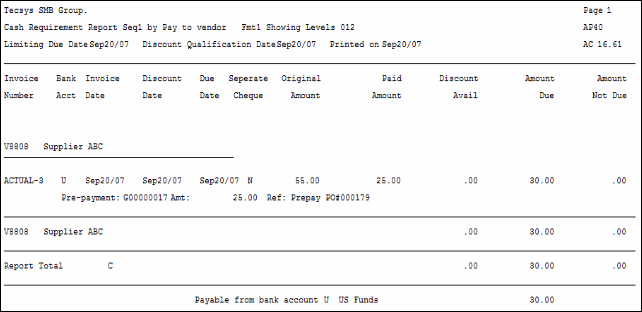
When you create prepayment invoices to a Vendor, AP40 only displays the normal information as it would for any other payable transaction. Invoices that have had prepayments applied display the Prepayment invoice number(s), Amount(s) and Reference(s) below the transaction. For more information on Prepaid Inventory, click here.
The report lists the Invoices that are due for payment for the Vendor or Vendors specified on the Report Parameters screen. The total cash required to pay the Invoices selected is listed at the end of the report by bank. In the case of Bank's with foreign currencies (defined in Maintain Bank Codes (AP01)), the domestic currency equivalent also prints. Invoices with a 'Hold' status (AP30) are reported as a reminder but will not be included in the cash requirements total.
- The Printer Selection screen automatically opens. Select the Printer destination and click OK
.
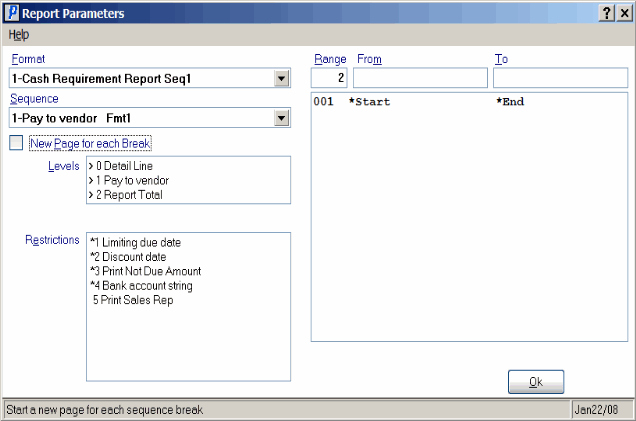
- The Report Parameters screen for AP40 opens.
- Select a Format from the drop down list. Valid options include:
- Cash Requirements Report Sequence 1 - calculates and selects Invoices to be paid (Invoices with and without discounts). If records already exist in the Cash Requirements file, the following message displays: "Do you wish to clear Cash Requirements file and then regenerate per entered parameters? Yes/No". Select Yes to remove the existing payment records before the current Requirements are generated. This also means that Payments modified using A/P Cash Requirement Edit (AP41) will be lost if you choose to clear the file. Select No to cancel the request and close the message window.
- Reprint of Cash Requirements Report Sequence 2 - select this format to report changes made using AP41. This option does not recalculate or attempt to select additional Invoices for payment.
- Cash Requirements Report Sequence 1 - calculates and selects Invoices to be paid (Invoices with and without discounts). If records already exist in the Cash Requirements file, the following message displays: "Do you wish to clear Cash Requirements file and then regenerate per entered parameters? Yes/No". Select Yes to remove the existing payment records before the current Requirements are generated. This also means that Payments modified using A/P Cash Requirement Edit (AP41) will be lost if you choose to clear the file. Select No to cancel the request and close the message window.
- Select a Sequence from the drop down list. Valid options include:
- Pay to Vendor Format 1 - use this option when the Format selected is 'Cash Requirements Report'.
- Bank Format 2 - use this option when the Format selected is 'Reprint of Cash Requirements Report'.
Caution: You cannot run format 1 - 'Cash Requirements Report Sequence 1' with sequence 2 - 'Bank Format 2', and you cannot run format 2 - ' Reprint of Cash Requirements Report Sequence 2' with sequence 1 - 'Pay To Vendor Format 1'. You must run format 1 with sequence 1 and format 2 with sequence 2.
- Pay to Vendor Format 1 - use this option when the Format selected is 'Cash Requirements Report'.
- If a New Page for each Break is required, select the check box.
- The Levels list box displays the various Levels of detail available for the report. All Levels are automatically selected in AP40; the '>'before each Level option indicates the Level is selected. Double click on the line to remove the selector. AP40 includes the following Levels:
- Detail Line
- Pay to Vendor
- Bank
- Report Total
- Select the Restrictions that apply to the Cash Requirements Report by double clicking on the line in the list box. Restrictions allow you to tailor AP40 to your specific needs. The '>' before a Restriction indicates the Restriction is selected. Once a Restriction is selected, it can be de-selected but the '>' remains. An '*' before a Restriction means the Restriction is mandatory. AP40 includes the following Restrictions:
- Limiting Due Date - this mandatory Restriction sets the limiting due date for payment. Each Invoice's Due Date (AP30) is compared to this date. All Invoices with Due Dates (AP30) on or before the Limiting Due Date are selected for payment. See the examples above.
- Discount Date - this mandatory Restriction sets the discount qualification date. An Invoice may not be due for payment according to it's Due Date, but may be due for payment in order to take advantage of a Vendor's discount terms. Any Invoice not yet due but with a Discount Date on or after the entered Discount Qualification Date will be selected for payment if the invoice has a discount amount.
- Discounts are applied if the Invoice's Discount Date is within the range of the specified 'Discount Qualification Date' and 'Limiting Due Date' or if the Invoice's Discount Date is equal to or greater than the Invoice's Due Date. This condition means that you want to take advantage of a Vendor's Discount no matter when the Invoice is paid. See the examples above
- Print Not Due Amount - this mandatory Restriction controls the option to print all Invoices in the range of Vendor's selected. When this Restriction is selected, the Invoices not yet due will print as memos only on the report.
- Bank Account String - this mandatory Restriction is used to select one or more Bank Codes for which Invoices assigned to the bank(s) will be selected for payment. The 'Bank Account' query allows you to view a list of AP Bank Codes. Select a valid Bank Code and then press Tab to add it to the string of codes displayed below the field. You can select additional Bank Codes as required. When all Bank Codes are entered, click OK.
- Print Sales Rep - select this option to have the Sales Rep code print on the Report.
- Limiting Due Date - this mandatory Restriction sets the limiting due date for payment. Each Invoice's Due Date (AP30) is compared to this date. All Invoices with Due Dates (AP30) on or before the Limiting Due Date are selected for payment. See the examples above.
- Select the Ranges From and To for the report. The Range must match the Sequence selected. Multiple ranges may be entered.
- In the From field, enter the starting 'code' for the report.
- In the To field, enter the ending 'code' for the report.
- The information displays in the list box below.
- To add additional Ranges, repeat these steps.
Note: To print the entire file, simply tab through the From and To fields. The list box displays *Start and *End in the From and To fields.
- To delete a Range from the list box, double click on the line. The following message displays: "Do you wish to delete this range? Yes/No". Select Yes to delete the range.
- When all of the information on the Report Parameters screen is complete, click OK to run the report.
- In the From field, enter the starting 'code' for the report.
- Select a Format from the drop down list. Valid options include:
- The Report Complete screen opens when the report is generated. Click OK to accept the report, click Restart to restart the printing of the report, or click Abort to cancel the report.

Print Cash Requirements Report (AP40)
Here is a sample of the Print Cash Requirements Report (AP40):

