Role Permission Examples
|
Index Setup Permissions for a Role Maintain Permissions for a Role Setup Permissions for a User |
The Role Permissions view allows you to setup and/or maintain permissions for:
This topic walks you through the steps for each example (click on the links above to go directly to each example).
- Setup Permissions for a new role
In this example we will add some of the resources (both group and individual) that are included in the Product Inquiries (IC45) resource to a new Role called 'ibis_example', created in the Roles table.
- Determine the group resources that are required. In this case, we will need the 'ibis_product_menu' (Products) and 'ibis_product_inquiries' (Product Inquiries(IC45)) group resources.
- Select Create on the Role Permissions view.
- Enter the Role name in the Role Name field, in this case we will enter ibis_example.
- Enter the group resource in the Resource Name field, in this case we will enter ibis_product_menu.
- Enter execute in the Operation Name field.
- Click Submit.
- Repeat these steps for the 'ibis_product_inquiries' resource.
- Select Create on the Role Permissions view.
- Determine the group resources that are required. In this case, we will need the 'ibis_product_menu' (Products) and 'ibis_product_inquiries' (Product Inquiries(IC45)) group resources.

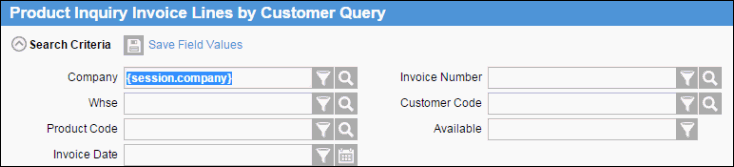
- Determine the individual and/or other group resources that you want to add to the new Role. In this case we want to add the resources for Product Inquiries-Order/Quotes (IC45/I1) (ibis_v_oeoop.ic45_i1_orders_quotes) and the Product Inquiries-Invoice Lines by Customer (IC45/I2) (ibis_inidp.ic45_i2_inv_lines_by_cust).
- You will also need to decide the operations (permissions) that should be added to these resources. In this case, we want to add the execute, read and customize operations.
On the Create page of the Role Permissions view:
- Enter the individual resource in the Resource Name field, in this case ibis_v_oeoop.ic45_i1_orders_quotes.
- Enter read in the Operation Name field.
- Click Submit.
- Enter execute in the Operation Name field.
- Click Submit.
- Enter customize in the Operation Name field.
- Click Submit.
- Repeat these steps for the 'ibis_inidp.ic45_i2_inv_lines_by_cust' resource.
Note: If you want all of the Related resources that are normally displayed and accessible on the Details page of the two individual resources above, you need to apply permissions to the Related Resource Group as well as to the individual resources within the Related Resource Group.
Special Note: There is no need to assign permissions to look up fields that are used as Search Criteria in a view that a user would not normally have access to. iTopia automatically assumes that the view accessed through the look up is executable only. In the example above, the user that the 'ibis_example' Role was assigned to has no permissions to the tables 'ibis_ici1' (Products (IM13) or 'ibis_sucu' (Account Master), however, the user can still access the look ups for the Product Code and Customer Code in the Product Inquiries-Invoice Lines by Customer(IC45/I2) view.
- Maintain Permissions for existing Role:
In this example, we will delete a resource and add operations (permissions) to an existing resource for the existing Role 'ibis_example'.
- Determine the resources and permissions that are included in the role by entering the role name in the Role Name search field of the Role Permissions view.
- The Role Permissions view is sorted by Role Name, Resource Name and then by Operation Name. In order to make it easier to view the resources and associated operations, you should sort the table the Resource Name by clicking on the table heading Resource Name.
- To delete a resource and the assigned operations (in this case we will delete all of the records for 'ibis_v_oeoop.ic45_i1_orders_quotes'), select the check boxes next to the resource and then select Delete from the 'Use Selected Records as Criteria for Action' icon
 . The selected records are removed.
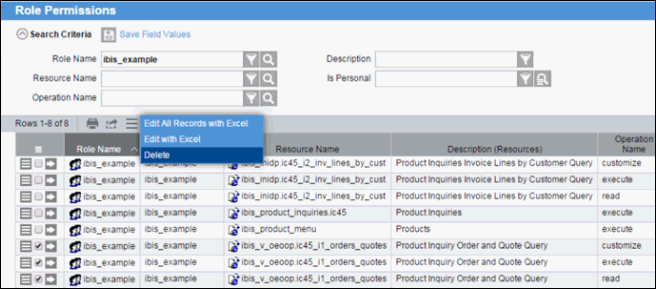
- The Role Permissions view is sorted by Role Name, Resource Name and then by Operation Name. In order to make it easier to view the resources and associated operations, you should sort the table the Resource Name by clicking on the table heading Resource Name.
- To add an Operation for an existing Resource you will need to Create a new record. In this case we are going to add the Export operation to the Resource 'ibis_inidp.ic45_i2_inv_lines_by_cust'.
- Click Create and enter the Role name (ibis_example), Resource Name (ibis_inidp.ic45_i2_inv_lines_by_cust) and Operation Name (export).
- Click Submit.
- Click Create and enter the Role name (ibis_example), Resource Name (ibis_inidp.ic45_i2_inv_lines_by_cust) and Operation Name (export).
The Role now only contains the individual Resource 'ibis_inidp.ic45_i2_inv_lines_by_cust' with the applied Operations and the two Group Resources ('ibis_product_inquiries' and 'ibis_product_menu').
- Determine the resources and permissions that are included in the role by entering the role name in the Role Name search field of the Role Permissions view.

- Setup Permissions for a User:
Since Role Names also include User IDs, it is possible to add resources and permissions directly to a user instead of applying the Resource to a Role and then applying the Role to the user. This is not a commonly used method of assigning Resources to users since any special views can usually be created by the user through Personalization unless they do not have permissions to a table that they require information from or the Customize operation is not available to the user.
When you enter a User ID in the Role Name field of the Role Permissions table, all of the views that the user created using Save As through Personalization are displayed along with the user's resource for their My Views folder (user_user11_menu). As the system administrator, you can modify the Operations on these resources but we do not recommend that you do.

-
The following example will guide you through the process of assigning permissions to a specialized view for a specific user. There are two methods to adding permissions to the specialized view.
- Through the Permissions action within the Personalization of the specialized view:
- Enter the user's ID in the Add a Role field and click Add.
- Select the Operations that apply by clicking the appropriate check boxes.
- Click Submit or Save.
- Through the Role Permissions table:
- Click on Create.
- Enter the appropriate Role, Resource and Operation name.
Note: Regardless of the method you use to add the specialized view, the user that it is assigned to will need to add the view name to his/her My Views folder if they want to see the view name on a menu. If this step is not performed, the user can always access the view by entering the view name in the search field.

