Header Record (SE45)
The Header record in Display Call History (SE45) allows you to recall an existing service call. The information in the header section displays on every folder in SE45. You can enter customer and equipment information in the header section.The following list defines every field in the Header section of SE45:
- Call - enter or select from the query a service call. The service call must be flagged as 'Closed' or as 'Issue Invoice' in Enter Service Calls (SE30) and SE42 must be run to "execute" the call.
- Customer - displays the Customer code associated with the call from SE30. Once the customer code is entered, the customer name and telephone number from Maintain Inventory Master (IM13) display to the right of this field.
- Location - displays the alternate Ship-To Address associated with the call from SE30, if applicable. If an alternate ship-to is entered on the original service call, the customer name and telephone number associated with the alternate address from Maintain Ship-To Addresses (SU14) displays to the right of this field.
- Equipment - enter or select from the drop down list the equipment (product) associated with the call from SE30. Once the equipment is entered, the product description from IM13 displays below this field.
- Serial No. - enter or select from the drop down list the Serial Number associated with the Equipment field, as required.
- Contract Info - this text box will only be populated if the CT (Contract Billing) module is installed. Once the Equipment and Serial Number fields are entered, a search is performed by the system to determine whether an active contract exists for the Customer/Location/Equipment/Serial No. record. If a contract is found, it is displayed in the Contract Info box. Note: The contract controls whether Parts and Labour are covered under the contract, and also defaults the primary technician and rate fields.
The following table outlines the functionality of the button in the Header section of SE45:
| Button Label | Icon | Functionality |
| Send To |  |
Prints a copy of the service call/equipment history record entered in the header section. When you click on the Send To button, the 'Send To' window opens. The Send To window has 3 options from which to select:
|
Here is an example of the Header section of SE30:
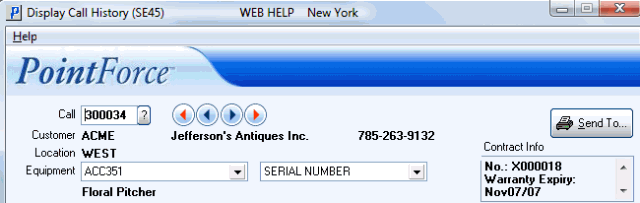
Header section of Display Call History (SE45)

