Dispatch (SE30)
|
Additional Information Customer/ShipTo EFT for Tokenization (AR05) Overview of the Service Module Troubleshooting Tokenized Credit Cards |
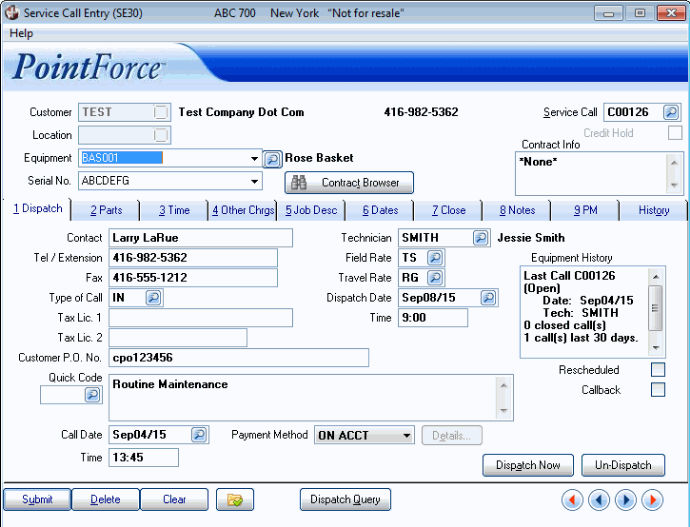
The Dispatch folder in Service Call Entry (SE30) allows you to enter dispatch information for the service call entered in the Header section.
- This information includes the reason for the service call and the payment method (and associated details as required).
- You can also provide a contact details, assign the type of call (estimate, invoice, etc.), assign a technician, update the dispatch date and time, etc.
The following list defines every field on the Dispatch folder:
- Contact - enter the contact name at the client's site. You can enter up to a maximum of 20 characters in this field.
- Note: If the CT (Contract Billing) module is installed, and a contract exists for the selected customer/location/equipment/serial number combination entered in the header section, the Contact entered on the Service Program folder of Contract Maintenance (CT30) displays in this field.
- Tel/Extension - enter the contact's telephone number and extension (if applicable). You can enter up to 15 digits for the telephone number (including brackets and/or dashes) and extension of the Contact.
Note: For new Service Calls, the Tel/Extension field defaults to the following information (in the following sequence):
- When the Customer Code is entered in the Header section, the Tel/Exenstion field automatically displays the Telephone Number for the customer set up in Customers (SU13).
- If a valid Location Code is entered in the Header section, this field automatically displays the Telephone Number for the customer's Ship To Code set up in Customer Ship-To Address (SU14).
- If the CT (Contract Billing) module is installed, and an active contract exists for the Equipment, this field is automatically displays the Telephone number entered on the Service Program folder of CT30.
You can override the default values at any time.
- When the Customer Code is entered in the Header section, the Tel/Exenstion field automatically displays the Telephone Number for the customer set up in Customers (SU13).
- Fax - enter the contact's fax number. You can enter up to 15 digits for the fax number (including brackets and/or dashes).
Note: For new Service Calls, if a Fax number exists in SU13 for the current customer, it automatically displayed in this field. You can override the default value at any time.
- Type of Call - enter or select from the query the Type of Call. This field defaults to the 'Call Type' entered in the Service/Repair folder of Company Control Initialization (CC00).
- The Type of Call field categorizes the call for reporting purposes and defines the call as being an Estimate, Preventative Maintenance or any other type.
-
Call Types also determine the default TAT code for parts used on the call.
- Once a call has been entered with Parts used, if the Type of Call is changed to a different Call Type with a different default TAT code, the following message displays: "The TAT codes for Parts Used will be changed from xxx to yyy. OK". Once you click OK, the TAT code for all of the un-invoiced lines on the Parts will automatically be updated with the new TAT code. For more information about Call Types click here.
Note: The following rules apply to Call Types that are flagged as 'Preventative Maintenance' or 'Estimate Only':
- If the Type of Call is flagged as 'Preventative Maintenance' the PM folder is available.
- If the Type of Call is flagged as 'Estimate only', the call is treated the same as regular service calls. In this case, the Call Type should also be configured with a default TAT Code of EST, which is created by the system during the SE initialization process. This TAT code ensures that Parts Used entered on the estimate will be priced correctly, but will not reserve the parts in inventory.
When entering an Estimate, the parts, time, other charges, and job description are entered prior to printing the estimate.
On the Dates folder (folder 6), you can enter estimate-specific dates such as the authorization, estimated completion, and actual completion dates and times.
The Estimate can be printed and/or faxed to the customer by clicking on Send To on the Close folder (folder 7), or by running Service Call Print (SE34).
If the customer authorizes the work to be done, the Estimate can be converted into a regular open service call by recalling the estimate in SE30 and changing the Call Type to a type not flagged as being for estimates only. This new Call Type will likely be configured with a default TAT Code which updates inventory. This action invokes the following warning message: "The TAT codes for Parts Used will be changed from EST to xxx". The system will then adjust the TAT codes for any Parts Used and attempt to allocate inventory.
- The Type of Call field categorizes the call for reporting purposes and defines the call as being an Estimate, Preventative Maintenance or any other type.
- Tax Lic 1 - enter a Tax License in this field up to a maximum of 21 alpha numeric characters.
- Note: The Tax License 1 field defaults to the Tax License 1 set up in the OE/AR folder of SU13 for the current customer. You can override the tax license as required. The tax license is passed to the Direct Bill invoice generated from the Service Call Invoice Creation and Print (SE42) program for printing on the invoice if desired.
- Tax Lic 2 - enter a Tax License in this field up to a maximum of 21 alpha numeric characters.
- Note: The Tax License 2 field defaults to the Tax License 2 set up in the OE/AR folder of SU13 for the current customer. You can override the tax license as required. The tax license is passed to the Direct Bill invoice generated from SE42 for printing on the invoice if desired.
- Customer P.O. No
- enter the customer's Purchase Order number in this field to a maximum of 12 alpha numeric characters. This is a mandatory field if the Customer is set up to have P.O. numbers in SU13. The Direct Bill Invoice generated by SE42 will be assigned this Customer P.O. Number.
- Quick Code - enter or select from the query the appropriate quick code to describe the Service Call. Quick Codes are used for frequently occurring reasons for a service call. As each Quick Code is selected, the Quick Description text associated with that code is added to the Details list box to the right of the Quick Code field.
- Quick Codes are maintained in Service Call Quick Descriptions (SE15). For more information about Quick Codes click here.
- Details List Box - if you are not using a Quick Code, enter a free form description of the service call in this field. This field is mandatory and must be populated with a Quick Code description or one is manually entered.
- Call Date - when a new Service Call is entered, this date defaults to the system date from your server. You can edit the call date as required.
- Both the Call Date and Time fields are used in the calculation of the response time for a call for statistical reporting.
- Time - when a new Service Call is updated for the first time, if this field is blank it will be assigned the current system time from your server. You can edit the call time as required.
- Both the Call Date and Time fields are used in the calculation of the response time for a call for statistical reporting.
- Payment Method - enter or select from the query the appropriate Payment Method for the current service call. The Payment Method is controlled by the customer's Terms Code from the OE/AR folder in SU13.
- If an EFT type of payment method is selected for the current Customer the Details button is available. You must click the Details button and enter the appropriate information.
- Details - when you click on the Payment Method Details button
 , the Service Call Payment Method Details window opens. For more information, see the Service Call Payment Method Details help topic.
- Technician - enter or select from the query the primary technician for the call. Note: The technician entered here sets the default for the Technician field on the Time folder. You can override this default on the Time folder as required.
- Note: If the CT (Contract Billing) module is installed, and an active contract exists for the equipment, this field displays the information entered in the Technician field on the Service Program folder of CT30.
- Field Rate - enter or select from query the default Field Rate for the call. Rates are maintained in Rates (SE10). The field rate entered here sets the default for the Rate field on the Time folder. This field defaults to the Rate Code entered in on the Service/Repair folder of CC00.
- Note: If the CT (Contract Billing) module is installed, and an active contract exists for the equipment, this field displays the information entered in the Field Rate field on the Service Program folder of CT30.
- Travel Rate - enter or select from the query the default Travel Rate code for the call. This is mainly a reference field.
- Note: If the CT (Contract Billing) module is installed, and an active contract exists for the equipment, this field displays the information entered in the Travel Rate field on the Service Program folder CT30.
- Dispatch Date - the Dispatch Date field can be automatically set by clicking on the Dispatch Now button, or by dispatching a call from the Dispatch Query button. The Dispatch Date field is automatically cleared by clicking on the Un-Dispatch button. The Dispatch Date field can also be manually maintained.
- Note: Entering or selecting a date prior to the current system date causes the following message to display: "Dispatch Date and Time is earlier than the Call Date and Time – response time will not be calculated for this service call. OK". Click OK to close the message window. The Dispatch Date must be a date that is equal to or greater than the current Call Date.
- Time - the dispatch Time field can may be automatically set by clicking on the Dispatch Now button, or by dispatching a call from the Dispatch Query button. The Time field is automatically cleared by clicking on the Un-Dispatch button. The Time field can also be manually maintained.
- TIP: You can also use an 'a' to indicate AM or a 'p' to indicate PM and the system will convert the time entered to the 24 hour clock. For example, if you enter 0330a and tab out of this field, the system converts this to 03:30 hours. You must enter all 4 digits of the time in this case.
- Equipment History - the Equipment History box displays information on prior service activity for the equipment.
- Rescheduled - select the Reschedule check box to flag a Service Call as being rescheduled. When the Service Call is updated in SE42, the technician’s statistics file is updated with the information. Technician’s statistics can be printed by running the Technician Activity (SE50) report.
- Callback - select the Callback check box if the customer calls back because the repair was not successful. When the Service Call is updated in SE42, the technician’s statistics file is updated with the information. You can print Technician’s statistics via the SE50 report.
The following table outlines the functionality of each button on the Dispatch folder:
| Button Label | Icon | Functionality |
| Dispatch Now |  |
Dispatches the service call to the technician. When you click on the Dispatch Now button, the Dispatch Date and Time fields on this folder are automatically set. The dispatch date and time are recorded on the Call Back/Alerts (SE51) report.
|
| Un-Dispatch |  |
Removes the 'Dispatched' status from the service call.
|
| Details | |
Opens the Service Call Payment Method Details window. Enter the payment information and click OK to save the information and close the window, or click Cancel to close the window without saving any of the information. For more information, see the Service Call Payment Method Details help topic. |
| Submit |  |
Saves the information entered on the current folder. The Update function cannot be performed if any of the mandatory fields are missing information. Note: If you attempt to move to another folder before clicking Update, the following message displays: "Save service call changes? Yes/No". Select No to ignore any changes to the current folder and open the new folder. Select Yes to save the changes and open the new folder. |
| Delete |  |
Opens the Which section of service call do you wish to remove? window. This window contains the following options for deletion:
Once you have selected the desired option, click OK. To close the panel without deleting any information for the current record, click Cancel. Note: If the service call has been flagged to issue an invoice or is closed the following message displays: "This service call has been flagged to issue a invoice! Only items entered after the issue will be deleted. OK". If you wish to delete information from the current service call you must reverse the close and the invoice. |
| Clear |  |
Clears the current service call information allowing you to enter a new service call or recall an existing service call. |
| New Record |  |
Clears all of the fields on all of the folders that do not contain defaults but does not clear the Service Call. This action enables you to enter additional equipment for the current Service Call. |
| Dispatch Query |  |
Locates a specific service call, or dispatches calls without opening the call in SE30. The Dispatch Service Calls browser contains the following information and functionality:
Note: You cannot dispatch Service Calls in the following scenarios:
|
Service Call Entry (SE30/Dispatch)
