Printers (CC97)
|
Index Printer Link Setup (CC97) |
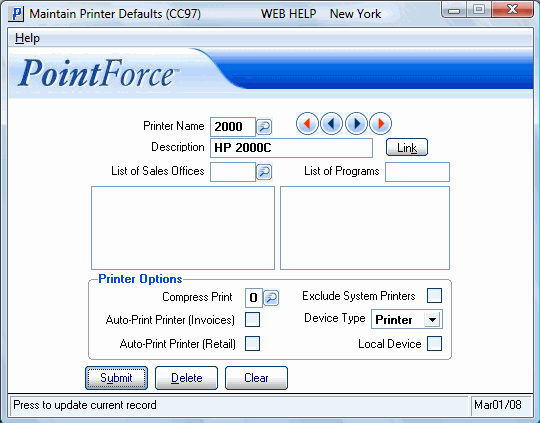
The Maintain Printer Defaults program is used to define the Printers that are used by the programs in Enterprise.
The following list defines every field on CC97:
- Printer Name - enter or select from the query a Printer Name. The Printer Name can be a maximum of 4 alpha-numeric characters in length.
- Note: If you are using MyFax as your fax solution, you must set up a "printer" entitled TFAX (for Email Fax (SMTP)) or IFAX (for Internet Fax (XML)) based on volume needs as determined by MyFax.
- Description - enter a description of the Printer. This description displays with the Printer Name on the Printer Selection list.
- Link - click on this button to link the Printer to the network drivers. The Link screen also allows you to identify the Printer Make and whether the Printer is used as a Barcode Printer. For more details on the Printer Link Set Up screen, click here.
- List of Sales Offices - enter or select from the query the Sales Office(s) that have access to the Printer. Adding a Sales Office(s) to the list limits the use of the selected Printer to that Sales Office. Leaving the Sales Office list blank allows all Sales Offices access to the Printer.
- To remove a Sales Office from the list, enter the Sales Office code into the 'List of Sales Offices' field and press Enter. The following message displays: "Remove Sales Office ## from the list? Yes/No". Select 'Yes' to remove the Sales Office; select 'No' to cancel the request.
- List of Programs - enter the program codes for which the Printer can be used, for example, IN44 (Print Invoice Register). Adding programs to the list limits the Printer to print from these programs only. For example, you may have a printer dedicated to printing Cheques, therefore you would add AP42 (Print Cheques) to the Program list. Leaving the Program list blank allows all programs to access the Printer.
- To remove a Program from the list, enter the Program name into the 'List of Programs' field and press Enter. The following message displays: "Remove program NN## from the list? Yes/No". Select 'Yes' to remove the Program; select 'No' to cancel the request.
- In the Printer Options section, the following fields are available:
- Compress Print - enter or select from the query a Compress Print option. Valid options include:
- Y - Yes Print Compressed.
- N - No Print Regular.
- O - Optional (Ask at Print Time)
- Auto-Print Printer (Invoices) - select this check box to have the Printer available in the 'Invoice Auto Printer' query in Maintain Operator Passwd/Privilege (CC03/Company Access). Invoices are generated in Enter Inv/Direct Bills/Credits (IN41) and are normally printed in Print Invoices/Credit Notes (IN42). When the 'Invoice Auto Printer' in CC03 is set to this printer, Invoices are automatically printed to this Printer from IN41.
- Auto-Print Printer (Retail) - select this check box to have the Printer available in the 'Retail Printer' query in CC03/Company Access. You cannot access Enter Cash Counter Invoices
(RS41) until a Printer is selected in the 'Retail Printer' field in CC03.
- Exclude System Printer - this field works with the 'List of Programs' list box. When this check box is selected, the Printer Selection window includes only the 'current' Printer when the program(s) in the list box is run. For example, if AP15 Print Vendor Lists is entered in the list box for Printer NETW and the Exclude System Printers check box is selected, when AP15 is run, the only printer listed on the Printer Selection window will be NETW.
- Device Type - identify the Device Type. The following are valid options:
- Printer
- Fax
- Local Device - select this check box to have the Printer available in the 'Local Printers Defined' list in CC03/Local Printers.
- Compress Print - enter or select from the query a Compress Print option. Valid options include:
Note: If the Printer entered does not exist on the local PC, and you click the Link icon, the following message automatically displays: "Printer Printer's Name does not exist on the local machine. Please see your network administrator to configure it for you. OK". Click OK to close the message window, and add the Printer to your local PC or have your Network or System Administrator add it for you.
Maintain Printer Defaults
