A/P Manual Check Register (AP51)
The Manual Check Register (AP51) is used to print the Check Register for manually issued Checks, Drafts, Transfers and Adjustments that were posted through Enter Manual Checks & Adjustments (AP50). A GL Summary by posting date is also included in the report.When the report is accepted:
- The GL distributions are written to the GL Collector file.
- Entries are written to the Outstanding Check file for Check reconciliation purposes.
- If you are using the Bank Reconciliation feature, all manual checks bound to a Bank Code that is assigned to a bank reconciliation GL Account are replicated to the GL Transactions view in PointForce iTopia (PFiT). For more details on the Bank Reconciliation feature, see the Bank Reconciliation Overview topic.
The following list outlines the steps required to run the Manual Check Register:
- The Printer Selection screen automatically opens. Select the device destination and click OK.
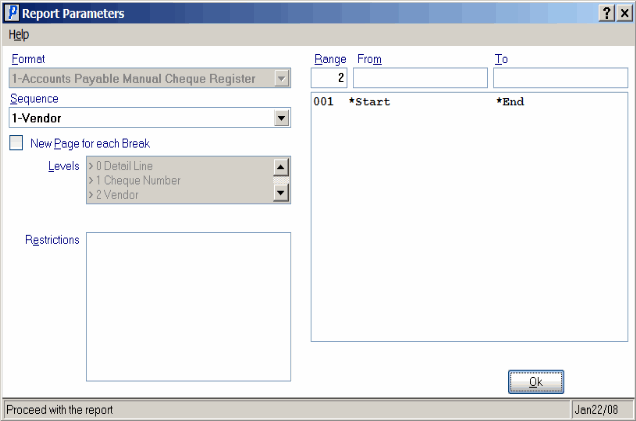
- The Report Parameters screen for AP51 opens.
- The Format field defaults to 'Accounts Payable Manual Check Register'. You cannot modify the Format field.
- Select a Sequence from the drop down list. Valid options include:
- Vendor - the Report is sorted in Vendor sequence.
- Check No. - the Report is sorted in Check number sequence.
Note: The Register can be printed in Vendor or Check Number sequence, it is not possible to print a specific Range of Vendors or Check Numbers. The Range should be set up from *Start to *End; i.e. no matter what you enter, the entire Register prints.
- Vendor - the Report is sorted in Vendor sequence.
- If a New Page for each Break is required, select the check box.
- The Levels list box displays the various Levels of detail available for the report. All Levels are automatically selected in AP51; the '>' before each Level option indicates the Level is selected. AP51 includes the following Levels:
- Detail Line
- Check Number
- Vendor
- Report Total
- Select the Range From and To for the report. For the AP51 Register, it is not possible to print a specific Range of Vendors or Check Numbers. The Range should be set up from *Start to *End; i.e. no matter what you enter, the entire Register prints.
- Note: To print the entire file (all Registers), simply tab through the From and To fields. The list box displays *Start and *End in the From and To fields.
- When all of the information on the Report Parameters screen is complete, click OK to run the report.
- The Format field defaults to 'Accounts Payable Manual Check Register'. You cannot modify the Format field.
- The Report Complete screen opens when the report is generated. Depending on the print device selected, you are presented with one of the following two options:
- If you are printing the report to a local printer device, PDF file or to your screen, enter the Acceptance Codes to accept the report, click Restart to restart the printing of the report, or click Abort to cancel the report.
- If you are sending the report via an email or fax device, click OK to accept the report, click Restart to restart the fax/email (not always applicable), or click Abort to cancel the report.
- If you are printing the report to a local printer device, PDF file or to your screen, enter the Acceptance Codes to accept the report, click Restart to restart the printing of the report, or click Abort to cancel the report.
Manual Check Register (AP51)
