Part Warranty Claim Print (SE54)
The Parts Warranty Claims (SE54) program can be used as a guide to submitting warranty claims to the manufacturer/supplier.
- In order for warranty information to display on this report, the Manufacturer warranty information must be entered on the original service call in Enter Service Calls (SE30) by launching the Warranty window from the Parts, Time, or Other Charges folders.
- A warranty claims file record is created when Invoice Listing and Creation (SE42) runs. At the same time, an Accounts Receivable invoice may also optionally be created for the warranty claim to the manufacturer. For more information processing warranty claims see the 'Processing Warranty Claims' section of the Overview of the Service Module document.
Follow these steps to print Service Calls in SE54:
- The Printer Selection screen automatically opens. Select the device destination and click OK.
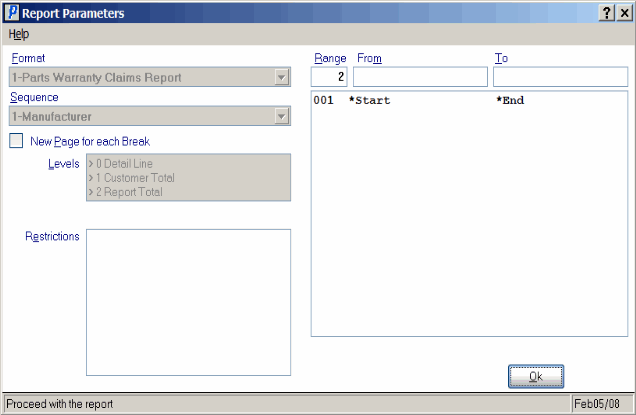
- The Report Parameters screen for SE54 opens.
- The Format field defaults to 'Parts Warranty Claims Report'. You cannot modify the Format field.
- The Sequence field defaults to 'Manufacturer'. You cannot modify the Sequence field.
- If a New Page for each Break is required, select the check box.
- The Levels list box displays the various Levels of detail available for the report. All Levels are automatically selected in SE54; the '>' before each Level option indicates the Level is selected. Double click on the line to remove the selector. SE54 includes the following Levels:
- Detail Line
- Customer Total
- Report Total
- There are no Restrictions that apply to the SE54.
- Select the Range From and To for the report. The Range must match the Sequence selected. Multiple Ranges may be entered.
- In the From field, enter the starting 'code' for the report.
- In the To field, enter the ending 'code' for the report.
- The information displays in the list box below.
- To add additional Ranges, repeat these steps.
Note: To print the entire file (for example, for all Manufacturers), simply tab through the From and To fields. The list box displays *Start and *End in the From and To fields.
- To delete a Range from the list box, double click on the line. The following message displays, "Do you wish to delete this range? Yes/No". Click Yes to delete the range.
- In the From field, enter the starting 'code' for the report.
- When all of the information on the Report Parameters screen is complete, click OK to run the report.
- The Format field defaults to 'Parts Warranty Claims Report'. You cannot modify the Format field.
- The Report Complete screen opens when the report is generated. Enter the Acceptance Codes to accept the report (if applicable), click Restart to restart the printing of the report, or click Abort to cancel the report.
-
When the report is printed, the a Confirmation message window automatically opens that displays the following message: "Clear the file for the printed range of manufacturers? Yes/No".
- Select Yes to clear the printed range of manufactures and close the message window.
- Select No to close the message window without clearing the file.
- Select Yes to clear the printed range of manufactures and close the message window.

Report Parameters window from Parts Warranty Claims (SE54)
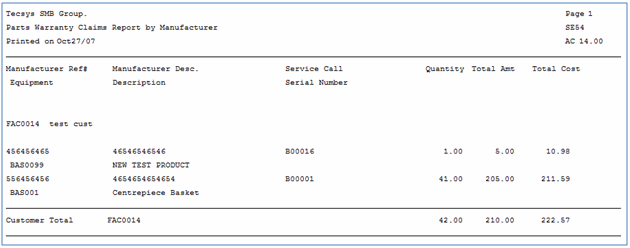
Here is an example of the Parts Warranty Claims Report:

Example of the Parts Warranty Claims (SE54) report
