Use RMA (RS41)
The Create Order/Invoice/Credit from existing RMA window opens once the 'Use RMA' button is clicked in OE30, IN41 or RS41. The 'Use RMA' button is only available in RS41 for new transactions.
- If you try to select an RMA that is already on an Order, Invoice or Credit, the following message displays: "Cannot create, RMA has been Ordered/Invoiced/Credited. OK". Click OK to close the message window.
Note: Use RMA is available when the Transaction Type is set to Retail Credit or Retail Invoice.
The Use RMA button is used in conjunction with Return Merchandise Entry (IN67). In IN67, an RMA (Returned Merchandise Authorization) is generated and is typically used to authorize and control returns of Product from Customers. An RMA can be used to automate the production of a Customer’s Credit Note and ensure its accuracy.
Within OE30/IN41/RS41, Use RMA is used when an RMA generated in IN67 is not used to create a Credit Note, but instead is the source of a shipping document to return the Product to the Customer. This feature is often used in businesses where Product must be sent to the Warehouse for inspection or service, and then returned to the Customer. In this case, an RMA is used to bring the Product into the Warehouse, then a Sales Order and shipping document control the return delivery of the Product to the Customer.
- Note: Orders created from RMAs generated through IN67 that have a Campaign and/or Trade Show code associated with the original Invoice will have the Campaign and/or Trade Show displayed on the Order. Only in OE30 can you edit both fields (Campaign and Trade Show).
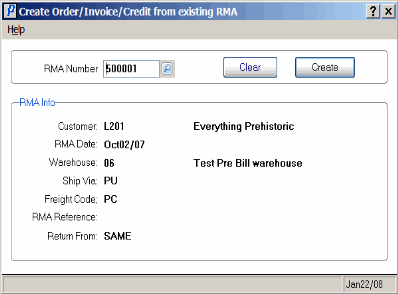
The following list defines every field on the Create Order/Invoice/Credit from existing RMA screen:
- RMA Number - enter or select from the query an RMA in the RMA Number field. Once an RMA is entered into this field, information from the RMA automatically displays in the RMA Info section of the screen.
- If the RMA is in use in IN67, a message displays with the RMA number, Operator ID associated with the RMA and the date/time the RMA was locked at. You must close the RMA in IN67 before you can continue.
- In the RMA Info section:
- Customer - the Customer code and the Customer name associated with the current RMA.
- RMA Date - the Date on which the RMA was created in IN67.
- Warehouse - the Warehouse in which with RMA was created in IN67.
- Ship Via - the return shipping method entered on the RMA. This is used as the Ship Via on the resulting Sales Order.
- Freight Code - displays the Freight Terms code entered on the RMA created in IN67. The Freight code is used on the resulting Sales Order.
- RMA Reference
- displays the RMA reference number entered on the RMA created in IN67. The value in the RMA Reference field is used in the 'PO Number' field on the resulting Sales Order.
- Returned From - displays the Returned From address on the RMA created in IN67. The Returned From address is used in the 'Ship To' field on the resulting Sales Order.
- Customer - the Customer code and the Customer name associated with the current RMA.
| Button Label | Icon | Functionality |
| Clear |  |
Clears the window of all input fields and displays. This feature is useful if a mistake is made in the entry of the RMA Number and the screen must be cleared allowing for a new RMA number to be entered. TIP: Clicking New does not update the RMA number to the Sales Order. |
| Create |  |
Generates a new Sales Order using an RMA as its basis. Before you can click on Create, a valid RMA number must be entered into the 'RMA Number' field. The new Sales Order contains all of the Products that were previously entered on the RMA, along with Comment Lines indicating the RMA number used and the Invoice and Line number from which the RMA was built. |
Use RMA

